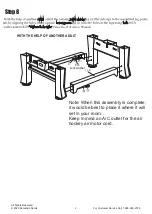
IMPORTANT NOTE: BEFORE INSTALLING PLAYFIELD SCREWS - PLEASE BE SURE ALL
PARTS HAVE BEEN REMOVED FROM INNER CABINET AND AIR MOTOR CORD IS BROUGHT
THROUGH THE HOLE IN SIDE PANEL.
Air Motor Cord
With the help of another adult, carefully reinstall the hockey table playfield (#2) onto the main cabinet and attach using
Screws (#18). Attach the plastic Rub Strips (#42) to the ends of the Cabinet with Screws (#43).
Tighten, but do not strip out Screws #18 and #43.
Remove all components from the carton. Note: Parts are packed inside the table cabinet. Remove the Hockey Table
Playfield (#2). Inside the table cabinet you will find all the parts needed to assemble your table. Remove all parts.
IMPORTANT, be sure to feed the plug end from the fan motor through
(Both ends of table)
the hole in the side apron.
Step 1
18
18
2
Fan Motor
Carefully stand the air hockey playfield on edge while removing parts.
Do not lay playfield down onto the air motor.
(under the hockey playfield)
1
IMPORTANT NOTE:
Do not run cord through Side Pocket hole.
Use Pilot holes to attach
#42 plastic rub strips
Use holes beside the Side Pocket.
Also, make sure air motor cord is not pinched
as the hockey playfield is reinstalled.
42
42
Stick on Cord Holder
Table Tennis Playfield
Cushion
12 Pieces
Note: Be careful to remove all
Note: Leg levelers
could be packed
in the four corners
packing materials and such as
to insure air motor fan does
not get stopped up with
packing debris.
Used together
NOTE: READ + STUDY ALL ASSEMBLY TEXT, DIAGRAMS AND DIAGRAM NOTES.
IMPORTANT: Press Air Hockey Playfield Down Tight While Installing each (#18) Screw
©
202 2 Escalad e Sports
Fo r Custome r Servic e Cal l 1-888-996-2729
5
All Rights Reserved.
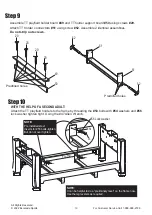
TT playfield holder
board
2 Pieces
TT holder connector
Block
4 Pieces
TT playfield holder
support board
2 Pieces
#46
#48
#49
#50
#51
39-3/8”×3”
39-3/8”×2”
7-3/8”×3”


