background image

                                                                                                                                                                                XM907-V2.2.0-A 

31 

(Focus  error)  This  message  will  appear  after  the  reset  of  the  fixture  if  the  magnetic-indexing  circuit 
malfunction (sensor failed or magnet missing) or the stepping-motor is defective (or its driving IC on the 
main PCB). The Focus is not located in the default position after the reset. 


11. CLEANING AND MAINTENANCE 

The following points have to be considered during the inspection: 
1) All screws for installing the devices or parts of the device have to be tightly connected and 
must not be corroded. 
2) There must not be any deformations on the housing, color lenses, fixations and installation 
spots (ceiling, suspension, trussing). 
3) Mechanically moved parts must not show any traces of wearing and must not rotate with   

unbalances. 

4) The electric power supply cables must not show any damage, material fatigue or sediments.   
Further instructions depending on the installation spot and usage have to be adhered by a skilled 
installer and any safety problems have to be removed. 


In order to make the lights in good condition and extend the life time, we suggest a regular 
cleaning to the lights. 
1)  Clean the inside and outside lens each week to avoid the weakness of the lights due to 

accumulation of dust. 

2)   Clean the fan each week. 
3)   To make sure the smooth gobo rotation, we suggest adding proper lube to the wheel each 

three month, avoiding the excessive lube splashes during the gobo rotating. 

4)   A detailed electric check by approved electrical engineer each three month, make sure that 

the circuit contacts are in good condition, prevent the poor contact of circuit from 
overheating.   

We recommend a frequent cleaning of the device. Please use a moist, lint- free cloth. Never use 
alcohol or solvents. 
There are no serviceable parts inside the device except for the lamp. Please refer to the 
instructions under “Installation instructions”. 
Should you need any spare parts, please order genuine parts from your local dealer. 


12. TECHNICAL SPECIFICATIONS 


Power supply: 

AC230V~

50/60Hz 

Power consumption

:

 300W 

Lamp: 

PLATINUM 15R 

Lamp power: 

300W 

Packing carton dimensions:

 65x46x42.5 cm 

Flight case dimensions: 

100 x 59 x (65+15) cm (Double flightcase packing) 

Net weight: 

22.5KGS   

Gross weight: 

26.5KGS

carton packing

  100KGS (Double flightcase packing) 


Summary of Contents for Neo Plat 15R Beam

Page 1: ...Products http www americanpro audio com User Manual KEEP THIS MANUAL FOR FUTURE NEEDS Contents...

Page 2: ...19 8 4 PERSONALITY 19 8 4 1 Status Settings 19 8 4 2 Service setting 21 8 4 3 Fans Control 22 8 4 4 Display Setting 22 8 4 5 Temperature C F 22 8 4 6 Initial Status 23 8 4 7 Reset Default 23 8 5 Reset...

Page 3: ...motion Movement Pan 540 630 540 90 offset optional Tilt 270 Speed of pan tilt movement adjustable Scan position memory auto reposition after unexpected movement Colors Basic color wheel with 8 dichro...

Page 4: ...If the device has been exposed to temperature changes due to environmental changes do not switch it on immediately The arising condensation could damage the device Leave the device switched off until...

Page 5: ...in discotheques theatres etc the device was designed for indoor use only This fixture is only allowed to be operated with the max alternating current which stated in the technical specifications in t...

Page 6: ...reached the maximum rated life and should be replaced immediately After the lamp has flickered for about five minutes it should strike normally allowing the fixture to be used temporarily until a rep...

Page 7: ...Otherwise it is likely to trigger the protecting firmware to make the replaced lamp close itself automatically Please remember the lamp is not a hot restrike type you must wait for approximately 10 m...

Page 8: ...tion of all installation material and the device If you lack these qualifications do not attempt the installation yourself Improper installation can result in bodily injury T he electric connection m...

Page 9: ...s on the bottom of the device Tighten the quick lock fasteners fully clockwise c Install the second Omega holder d Pull the safety rope through the holes on the bottom of the base and over the trussin...

Page 10: ...XM907 V2 2 0 A 9 Layout Drawings...

Page 11: ...stallation material being used and periodic safety inspection of all installation material and the fixture If you lack these qualifications do not attempt the installation yourself Improper installati...

Page 12: ...nt out from the DMX controller The allocation of this starting address is achieved by setting the correct number on the display located on the base of the device You can set the same starting address...

Page 13: ...ut 1 minute from last button press Function Set Dmx Address Dmx Value Slave Mode Auto Program Sound Control A001 AXXX PAN Slave1 Slave2 Slave3 Master Alone Master Alone DMX address setting DMX value d...

Page 14: ...ey Lock 02 60m 05m ON OFF ON OFF Display shutoff time Reverse 180 degree Key Lock Temperature C F Celsius Fahrenheit Temperature switch between Initial Status PAN XXX Initial effect position Reset Def...

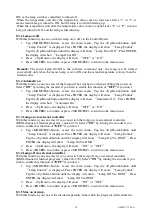
Page 15: ...annel The display automatically shows the channel with a value changing 1 Access the main menu 2 Tap the Up Down button until DMX Value is displayed 3 Press ENTER the display will show DMX Value 4 Tap...

Page 16: ...Press ENTER to confirm or press MODE ESC to return to the main menu Total Run Time With this function you can display the running time of the device The display shows XXXX XXXX stands for the number o...

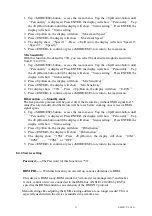
Page 17: ...y will show XXXX Minute 5 Press ENTER to confirm or press MODE ESC to return to the main menu LastRun Password With this function you can display the timer password The time password is 038 1 Tap MODE...

Page 18: ...you can display the temperature on the display board of the base near CMY filter in Celsius 1 Tap MODE ESC button access the main menu Tap the Up Down button until Information is displayed Press ENTER...

Page 19: ...e display will show Automatic On Press ENTER the display will show Automatic On 2 Press Up Down the display will show OFF or ON 3 Press ENTER to confirm or press MODE ESC to return to the main menu 8...

Page 20: ...f the lamp be shut off automatically due to over heat it can not be striked again automatically it must be turned on again by manually 8 4 PERSONALITY 8 4 1 Status Settings Address via DMX With this f...

Page 21: ...e display will show ON 5 Press ENTER to confirm or press MODE ESC to return to the main menu Pan Degree With this function you can select pan degree for 630 or 540 1 Tap MODE ESC button access the mai...

Page 22: ...ess ENTER to confirm or press MODE ESC to return to the main menu Hibernation Standby mode The lamp and step motors will be power off if the fixture stay without DMX signal for 15 mins Factory default...

Page 23: ...ress Up Down the display will show ON 5 Press ENTER to confirm or press MODE ESC to return to the main menu Key Lock With this function you can activate the automatic keylock status If this function i...

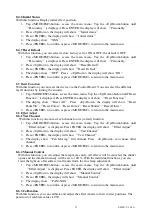
Page 24: ...Up Down the display will show Reset Pan Tilt Reset Colors Reset Gobos Reset Shutter Reset Others 3 Press ENTER to confirm or press MODE ESC to return to the main menu 8 6 Effect Adjust 8 6 1 Test Chan...

Page 25: ...eturn to the main menu 8 8 Edit program 8 8 1 Select Programs With this function you can select the program for the Program Run 8 8 2 Edit Program With this function you can edit the internal programs...

Page 26: ...select which Slave program is to be sent Selection Part 1 means that the Slave unit runs the same program as the master units Press the Enter button to confirm Press the MODE ESC button in order to r...

Page 27: ...1 30 44 Color 2 45 59 Color 3 60 74 Color 4 75 89 Color 5 90 104 Color 6 105 119 Color 7 120 127 Color 8 128 189 Forwards rainbow effect from fast to slow 190 193 No rotation 194 255 Backwards rainbo...

Page 28: ...ting gobo indexing Fine 0 255 Fine indexing 4 4 11 Fixed Gobos 0 7 Open hole 8 15 Gobo 1 16 23 Gobo 2 24 31 Gobo 3 32 39 Gobo 4 40 47 Gobo 5 48 55 Gobo 6 56 63 Gobo 7 64 71 Gobo 8 72 79 Gobo 9 80 87 G...

Page 29: ...m Prism Gobo macros 0 31 Open 32 127 Rot Prism 128 135 Macro 1 136 143 Macro 2 144 151 Macro 3 152 159 Macro 4 160 167 Macro 5 168 175 Macro 6 176 183 Macro 7 184 191 Macro 8 192 199 Macro 9 200 207 M...

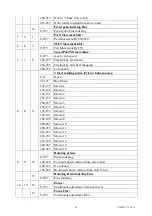
Page 30: ...14 22 Lamp on off reset internal programs 0 19 colour change normal 20 29 colour change to any position 30 39 colour gobo change to any position 40 59 Lamp on 60 79 Lamp switch off 80 84 All motor re...

Page 31: ...of the fixture if the head s magnetic indexing circuit malfunctions sensor failed or magnet missing or the stepping motor is defective or its driving IC on the main PCB The TILT movement is not locate...

Page 32: ...od condition and extend the life time we suggest a regular cleaning to the lights 1 Clean the inside and outside lens each week to avoid the weakness of the lights due to accumulation of dust 2 Clean...

Page 33: ...XM907 V2 2 0 A 32 Remark errors and omissions for every information given in this manual excepted All information is subject to change without prior notice...

Reviews: