16
Leveling the Drum
CAUTION:
The belt tracking maybe adversely effected if
machine is operated unleveled.
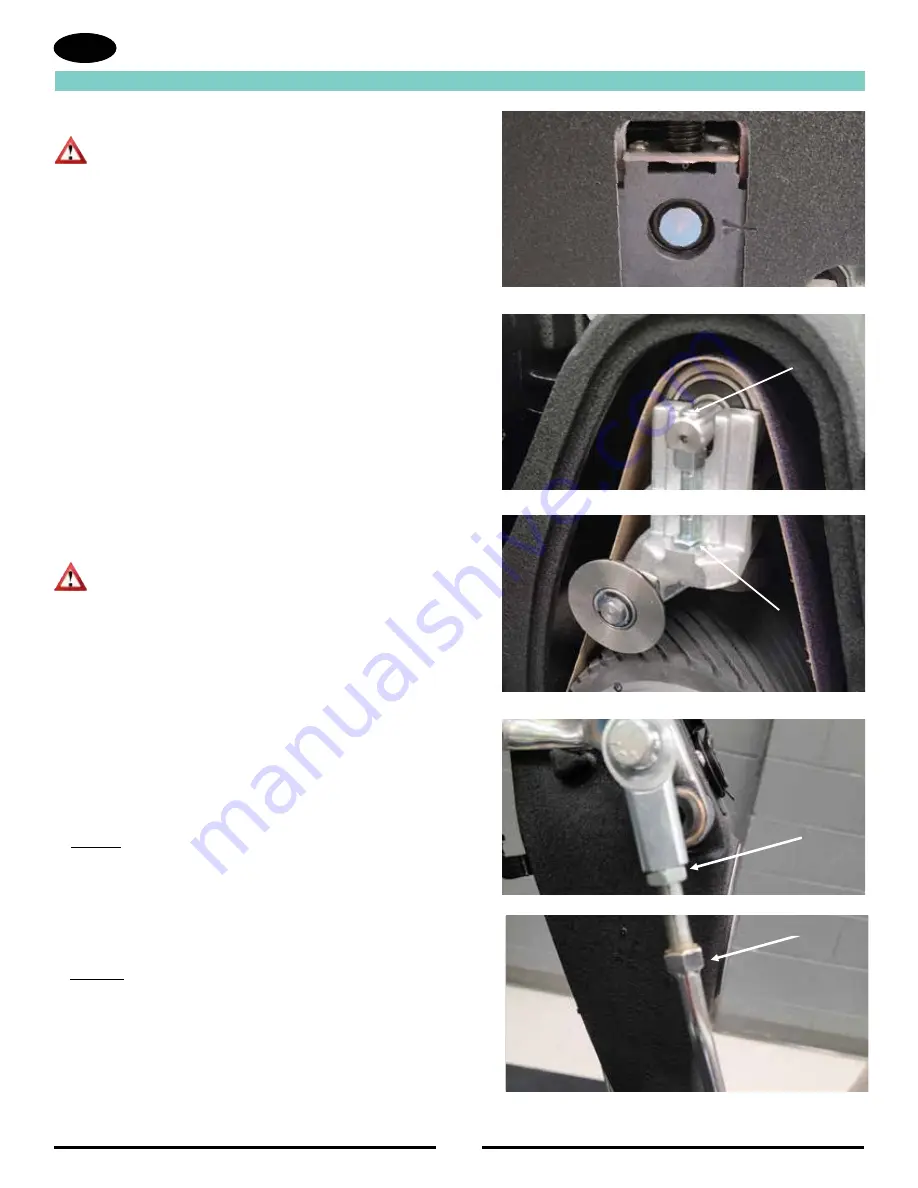
The machine is leveled at the factory set and no adjustments should be
necessary. After any maintenance is performed to the carriage system,
the pointer on the leveling bracket must be returned to original mark.
(See figure 39).
If it is necessary to reset level after replacing wheels follow this
procedure:
1. Lower the drum to the floor.
2. Drive the adjusting screw in, to sand heavier on the left (the drive
belt side). Back the adjusting screw out, to sand heavier on the
right (the side opposite the drive belts). Test the setting on an even
surface. Make further adjustments if necessary.
3. Mark new pointer location on main frame.
Belt Tracking
NOTE: The sanding belt should run evenly on the face of the drum.
For this, the outer edge of the sanding belt must be .09 inches (2mm)
out from the end of the drum. This provides optimum transition between
“passes”.
WARNING:
Injury to the operator could occur if any machine
adjustments are made while the motor is running. Do not
attempt to make any adjustments while the machine is
plugged in or running.
To adjust the belt tracking follow this procedure:
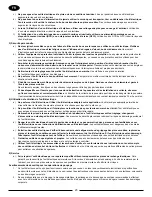
1. Locate the belt tracking adjuster screw. (See figure 40A)
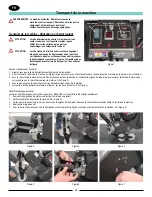
2. Hold the belt tracking adjuster screw and loosen the locknut.
(See figure 40B).
3. Rotate the tracking adjuster screw counterclockwise to move
the belt in.
4. Rotate the tracking adjuster screw clockwise to move the belt out.
5. Test adjustment and tighten the locknut.
Operating Control
To increase the travel or extend the reach on the grip control, follow this
procedure:
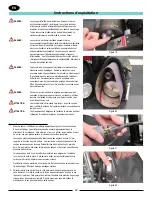
1. Loosen the locknut on the control rod. (See figure 41A)
2. Screw the control rod adjuster (See figure 41B) “In” until the
desired reach is found.
3. Tighten the locknut.
To decrease the travel or reduce the reach on the grip control, follow this
procedure:
1. Loosen the locknut on the control rod. (See figure 41A)
2. Screw the control rod
adjuster “out”
until desired reach is found.
3. Tighten the locknut.
EN
Figure 40A
Figure 41A
Figure 39
Figure 40B
Figure 41B
A
B
A
B
A
B
A
B
Sander Adjustment Procedures
Summary of Contents for 07236A
Page 1: ...Belt Sander Legend Operator s Manual...
Page 2: ...2...
Page 20: ...20...
Page 39: ...39 Wiring Diagram...
Page 64: ...64 Transport Dolly Assembly RF083000 022421 1 3 4 2 8 5 7 6 TRANSPORT DOLLY ASSEMBLY...
Page 68: ...68...
Page 70: ...70...
Page 71: ...71...


