background image

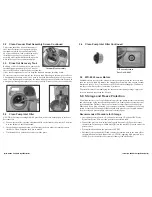
5.2    Clean Vacuum Float Assembly Screen Continued 

This screen should be cleaned frequently if 

the Carpet Extractor is being operated in an 

environment which has an abnormal build-

up of lint and debris, such as cleaning newly 

installed carpet. Loss of vacuum is most 

normally associated with lint build-up in this 

filter at the top of the vacuum stand pipe.

5.3    Rinse Out Recovery Tank

Build-up of fine silt and debris can damage the 

auto-dump pump and dump valve. Clean out 

the recovery tank on a regular basis to extend the 

life of these components as well as keep the tank and machine smelling better.
To rinse out recovery tank, remove the recovery tank lid and open the dump valve. Place 

a bucket under the dump valve. Use a hose to rinse the dirt and debris out of the recovery 

tank. Close the dump valve and spray the tank with deodorizer or disinfectant. Proceed to 

waste pump cleaning and replace the recovery tank lid. Dispose of dirty water and debris.

5.4    Clean Pump Inlet Filter

CAUTION: before proceeding with this procedure, make sure both the power cords are 

disconnected.

•  To examine the filter, open the solution tank lid on the front of the machine. The filter 

is in the bottom of the solution tank.

•  Grasp the filter cap and unscrew the filter from the brass nipple by turning counter-

clockwise. Clean or replace the filter as needed.

• 

Tilt the tanks back onto the base and secure the plate.

(8) 12-Gallon, 500 PSI Carpet Extractor

12-Gallon, 500 PSI Carpet Extractor (9)

Vacuum Float Assembly

5.4    Clean Pump Inlet Filter Continued

1/4” Acorn Strainer
Part No. 10-0845

5.5    WD-40 Vacuum Motors

Should moisture ever enter the vacuum motors, completely drain the recovery tank, 

open the recovery tank lid, remove the vacuum float assembly, turn on both vacuum 

motors and spray a five (5) second burst of WD-40 into the standpipe. Continue to 

run the vacuum motors for at least three (3) minutes.
To prevent moisture from damaging the vacuum motors during storage, empty the 

recovery tank and store with the lid open.

6.0   Storage and Freeze Protection

You must winterize your Carpet Extractor to protect the pump system from freezing 

and also damage being caused to fittings and valves. Damage due to freezing is not 

covered under the Warranty. Store your extractor in temperatures over 40 degrees 

Fahrenheit. If you plan on storing your extractor in freezing conditions or for a long 

period of time, the following procedure should help prevent your Carpet Extractor 

from freezing and prevent pump and seals from drying out.

Recommended Procedure for Storage

•  In a separate container, mix 1/2-gallon of water with 1/2-gallon of RV Water 

System Antifreeze. Mix well and pour into the solution tank.

• 

Connect the pressure hose to the female quick disconnect (QD) on the front of 

the machine. Insert an open-ended male QD into the female QD on the end of the 

pressure hose. 

•  When primed, turn down the pressure to 100 PSI.
• 

Disconnect the open-ended QD and connect the solution hose to the male QD at 

the auto-fill/chemical feed connection. CAUTION: applying high pressure (over 

100 PSI) to the chemical feed system will damage the mechanism.

Summary of Contents for STEAMASTER

Page 1: ...nder normal use and service for a lifetime American Sniper warrants the motors to be free from defects in material and workmanship under normal use and service for two 2 years from the original date of sale American Sniper warrants the pump and all electrical components to be free from defects in material and workmanship under normal use and service for one 1 year Parts replaced or repaired under ...

Page 2: ...t is the purchasers responsibility to take your machine to an authorized service center The manufacturer covers up to one 1 year 365 days of service labor at the manufacturer s calculated hourly labor rate repair time when performed by a manufacturer s authorized service provider Ultimately labor reimbursement costs are at the discretion of the manufacturer At no time is the manufacturer responsib...

Page 3: ...tructions READ THIS MANUAL BEFORE USING YOUR CARPET EXTRACTOR KNOW THE PROPER OPERATION CORRECT APPLICATIONS AND THE LIMITATIONS OF THIS EQUIPMENT BEFORE USE Reduce the Risk of Fire Electric Shock or Injury Use only as described in this manual Use only the attachments recommended by the manufacturer Test all outlets with an outlet tester before plugging machine into any outlet Plug cord into the n...

Page 4: ...Attach the vacuum hose and the brass quick disconnect Fill the solution tank with warm water less than 100 degrees Fahrenheit Fill to approximately 4 inches from the top Pre spray and agitate the surface with detergent made for floor cleaning or upholstery Use only warm water to extract the pre spray from the surface Be sure to replace any filters back into the machine prior to use Do not use citr...

Page 5: ... Grate for Extractor 3 40 10 1030 S3 3 Stage Extractor Motor Gasket 2 41 SN 12 MFLD Extractor Motor Manifold 2 42 10 0830 Hinge Keeper for Extractor 2 43 10 0821 Extractor Hinge 2 44 10 0820 End Cap for Rod on Extractor 4 45 SN 12 MB BLKGRAN 12 Gallon Motor Base Black Granite 1 46 10 0836 19 Axle for Extractor 1 47 10 0807 Wheels for Extractor 2 48 10 0834 Pump Flat Washer 18 49 10 0835 N Nut for ...

Page 6: ...nect the vacuum hose and solution hose from the machine If water remains in the solution tank use the short vacuum hose and vacuum the excess water from the tank image 1 Disconnect the power cords from the outlets and from the machine Remove the float assembly from the recovery tank and clean filter as needed Replace float assembly and tank lid image 2 Drain any remaining water from the recovery t...

Page 7: ...rage and Freeze Protection Continued Recommended Procedure for Storage Continued Attach and wands and hand tools that will also be stored with the Carpet Extractor Open the valve for 30 seconds directing the spray to the solution tank Disconnect the hose and with the valve open and the jets pointing down depress the dimple on the male QD This will drain the solution out of the tool Drain thoroughl...

Page 8: ...arpet Extractor 9 Vacuum Float Assembly 5 4 Clean Pump Inlet Filter Continued 1 4 Acorn Strainer Part No 10 0845 5 5 WD 40 Vacuum Motors Should moisture ever enter the vacuum motors completely drain the recovery tank open the recovery tank lid remove the vacuum float assembly turn on both vacuum motors and spray a five 5 second burst of WD 40 into the standpipe Continue to run the vacuum motors fo...

Reviews: