background image

American Spa Owner’s Manual

LTR50001143, Rev. M

Pr

eparing f

or 

Your Ne

w P
or

tab
le Spa

5

240 Volt Electrical Installation

120 Volt Electrical Installation

Testing the GFCI Breaker

All 240V spas must be permanently connected (hard 

wired)  to  the  power  supply.  See  the  wiring  diagram 

on page 6.

These instructions describe the only acceptable 

electrical  wiring  procedure.  Spas  wired  in  any 

other  way  will  void  your  warranty  and  may 

result in serious injury.

When  installed  in  the  United  States,  the  electrical 

wiring of this spa must meet the requirements of NEC 

70 and any applicable local, state, and federal codes.

The  electrical  circuit  must  be  installed  by  an 

electrical  contractor  and  approved  by  a  local 

building or electrical inspector.
Failure  to  comply  with  state  and  local  codes 

may result in fire or personal injury and will be 

the sole responsibility of the spa owner.

The power supplied to the spa must be on a dedicated 

GFCI protected circuit as required by NEC 70 with no 

other appliances or lights sharing the power.
Use  copper  wire  with  THHN  insulation.  Do  not  use 

aluminum wire.
Use the table below and on the next page to determine 

your GFCI and wiring requirements.
Wires that run over 100 feet must increase wire gauge 

to the next lower number. For example: A normal 50 

amp  GFCI  with  four  #6  AWG  copper  wires  that  run 

over 100 feet would require you to go to four #4 AWG 

copper wires.

One  Pump  Control  System  uses  a  VS300  control  box 

and  requires  one  40  amp  GFCI  and  four  #8  AWG 

copper wires. Two Pump Control System uses a 5100 

GFCI and Wiring Requirements

Always follow applicable local, state and federal codes 

and guidelines.
Use  only  a  dedicated  electrical  line  with  a  15  amp 

breaker.
Cord-and-plug connections may not use a cord longer 

than  15  feet  (4.6  m)  and  must  be  plugged  into  a 

dedicated  15  amp  GFCI  connection  (NEC  680.42(A)

(2)).  Do not use extension cords!
Always use a weatherproof-covered receptacle.
Receptacle shall be located not less than 5 feet (1.5 

m) from and not exceeding 10 feet (3.0 m) from the 

inside wall of the spa.  (NEC 680.43(A))
Do  not  bury  the  power  cord.  If  your  cord  becomes 

damaged, replace it before next usage.
All 120V spas must have a GFCI. This can be either a 

15 amp GFCI receptacle or a 15 amp GFCI cord and 

plug kit as shown (CKIT110 - P/N ELE09700087).

Testing the GFCI

Test the GFCI plug prior to first use and periodically 

when the spa is powered.
1.  Plug  in  the  GFCI  into  the  power  outlet.  The 

indicator should turn on.

2.  Press  the  TEST  button.  The  GFCI  will  trip,  the 

indicator will turn off, and the spa will stop operating.

3.  Press the RESET button. The GFCI will reset, the 

indicator will turn on again, and the spa will turn 

back on.

The spa is now safe to use.
If  the  GFCI  trips  while  the  spa  is  in  use,  press  the 

RESET button. If the GFCI does not reset, unplug the 

spa and call your local Cal Spas dealer for service. DO 

NOT USE THE SPA!

Test the GFCI breaker prior to first use and periodically 

when  the  spa  is  powered.  To  test  the  GFCI  breaker 

follow these instructions (spa should be operating):
1.  Press the TEST button on the GFCI. The GFCI will 

trip and the spa will shut off.

2.  Reset the GFCI breaker by switching the breaker 

to the full OFF position, wait a moment, then turn 

the breaker back on. The spa should have power 

again.

control box and requires one 50 amp GFCI and four #8 

AWG copper wires.

Summary of Contents for AM-418B

Page 1: ...LTR50001143 Rev M 1 1 17...

Page 2: ...O Wiring Diagram 7 Filling and Powering Up Your Portable Spa 8 Priming the Pump 11 Operating Your Spa 12 Electronic Control Operation 12 Electrical Power Efficiency 14 Diagnostic Messages 14 Spa Opera...

Page 3: ...ater can induce hyperthermia Hyperthermia occurs when the internal temperature of the body reaches a level 3 F to 6 F above the normal body temperature of 98 6 F or 2 C to 4 C above 37 C While hyperth...

Page 4: ...should not use a spa or hot tub WARNING To avoid injury exercise care when entering or exiting the spa or hot tub WARNING Do not use drugs or alcohol before or during the use of a spa or hot tub to av...

Page 5: ...use it for relaxation and therapy you will probably want to create a specific mood around it If you live in a region where it snows in the winter or rains frequently place the spa near a house entry...

Page 6: ...ommend that a qualified licensed contractor prepare the foundation for your spa If you are installing the spa indoors pay close attention to the flooring beneath it Choose flooring that will not be da...

Page 7: ...Always follow applicable local state and federal codes and guidelines Use only a dedicated electrical line with a 15 amp breaker Cord and plug connections may not use a cord longer than 15 feet 4 6 m...

Page 8: ...American Spa Owner s Manual LTR50001143 Rev M Preparing for Your New Portable Spa 6 GFCI Wiring Diagram...

Page 9: ...American Spa Owner s Manual LTR50001143 Rev M Preparing for Your New Portable Spa 7 NEO Wiring Diagram...

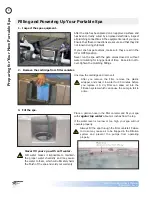
Page 10: ...re you replace it A dry filter can allow air into the filtration system which can cause the pump to fail to prime After the spa has been placed on an approved surface and has been correctly wired by a...

Page 11: ...0V spas are connected to the proper electrical outlet After two minutes the pump should prime If it does not follow the priming instructions on the next page If it does continue with the next step Sta...

Page 12: ...e sure the filter has soaked at least 30 minutes before you install it 7 Adjust water chemistry Test and adjust the water chemistry See the section on page 23 for instructions on water clarity 8 Let t...

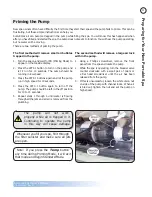
Page 13: ...cond method will remove a large air lock within the pump 1 Using a Phillips screwdriver remove the front panel from the spa and locate the pump 2 While the spa is operating turn the bleeder valve coun...

Page 14: ...mperature will be maintained in standard mode The hot tub will heat to 100 F 37 5 C at start up until the set temperature is changed as described below Operating Your Spa Electronic Control Operation...

Page 15: ...Press the Jets 2 button to turn pump 2 on Press it once again to turn the pump 2 off Light Press the Light button to turn on the light Press it once again to turn the light off Automatic Time outs Th...

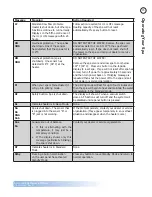
Page 16: ...is in Economy Mode None F or C Temperature unknown After the pump has been running for two minutes the temperature will be displayed HL HFL A difference in readings between temperature sensors has be...

Page 17: ...urn power back on If display message is repeated then shut the power off to the spa and call your dealer or service organization Pr When your spa is first actuated it will go into priming mode The pri...

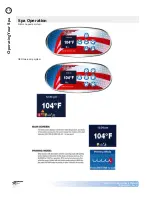
Page 18: ...American Spa Owner s Manual LTR50001143 Rev M Operating Your Spa 16 Spa Operation NEO one pump system NEO two pump system...

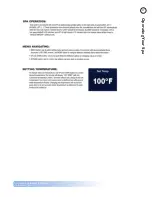
Page 19: ...American Spa Owner s Manual LTR50001143 Rev M Operating Your Spa 17...

Page 20: ...American Spa Owner s Manual LTR50001143 Rev M Operating Your Spa 18 F F F F A...

Page 21: ...American Spa Owner s Manual LTR50001143 Rev M Operating Your Spa 19 Settings Screens...

Page 22: ...American Spa Owner s Manual LTR50001143 Rev M Operating Your Spa 20 Error Screens...

Page 23: ...ckwise to increase clockwise to decrease Water Diverters Water diverter knobs are 1 and 2 knobs located around the top of your spa They allow you to divert water through jets from one side of the spa...

Page 24: ...ur spa may include two to eight streamer waterfalls When the booster pump is on turn the 1 diverter knob to adjust the rate of flow to the waterfall jets The waterfall jet faces are not adjustable Do...

Page 25: ...equat Met prate er sit dolor iriureetuer si Feummy nullamcore magna ad dio er sequamconum nis eu feugiamet vent et wisis ero dolore dip exeraestie estie vel inisci elisl ut diat cons aut alit lut lore...

Page 26: ...end to be too high and may be difficult to bring down High TA can be corrected by adding an alkalinity decreaser When the TA is balanced it normally remains stable although adding water with high or l...

Page 27: ...st strip or a reagent kit See the table on the following page for the ideal range Add one or two tablespoons granulated chlorine to the spa water weekly Note that chlorine dissipation rate will be fas...

Page 28: ...next higher filtration number then if water quality is still not adequate consult the advice of your Cal Spas dealer for additional chemical or system recommendations Be sure to give them your bather...

Page 29: ...ssary If your water source is high in calcium add stain and scale preventer Once a month Deep clean your spa s filter Follow filter cleaning instruction at beginning of this section Every two to four...

Page 30: ...ound spa Buildup of oils and dirt Wipe off scum with clean rag if severe drain the spa use a spa surface and tile cleaner to remove the scum and refill the spa Algae Growth High pH Low sanitizer level...

Page 31: ...into the holes Important Keep the spa covered when not in use Covered spas will use less electricity in maintaining your set temperature Covering your spa will protect your spa s finish from the sun s...

Page 32: ...ed to drain your spa be aware of the potential of freezing in your spas equipment and plumbing Even if the directions below are followed perfectly there is no guarantee that your spa will not suffer f...

Page 33: ...ions on page 19 for changing modes 2 Following the water quality instructions starting on page 23 adjust the pH 3 Shock the water add either chlorine or bromine sanitizer 4 When you return check and a...

Page 34: ...ted with common automotive vinyl protectants Warning Do not use automotive vinyl protectants on spa covers or pillows These products are generally oil based and will cause severe water clarity issues...

Page 35: ...the spa cabinet Everything can be done with your device The example shown below is from an iPhone device Your device may appear differently Before you begin make sure Bluetooth in enabled on your dev...

Page 36: ...s order White Cyan Magenta Blue Yellow green Green Red To cycle through the different color choices press the button repeatedly Each time you press the button you advance to the next color 2 Flashing...

Page 37: ...SQN halo 2 neck jet 100 shut off Halo w graphite gray center PLU29520 611 500 SQ2D 2 euro jet directional Halo w graphite gray eyeball PLU29520 011 500 SQ3D 3 directional mini jet Halo w graphite eyeb...

Page 38: ...eplacement parts Water Diverter Valves Diverter Valve 2 Star Fire Textured Black PLU21300468 Diverter Valve 1 Star Fire Textured Black PLU21300469 Air Control Valve Air Control Valve Star Fire Black P...

Page 39: ...37 This fixture is for Interior Light part number LIT16100625 Waterfalls Cascade II Waterfall Curved Black Textured with Valve PLU21800826TEX Hydro Stream Waterfall Flush Mount Special Black 210 9201...

Page 40: ...ech LIT16100620 4 LED light string LIT16100621 Interior light with logic LIT16100625 LED light string jumper 46 inches daisy chain ELE09902531 Replacement Cabinet Panels The complete selection of repl...

Page 41: ...ooling The covers listed below are filled with 1 lb foam Size Fits spa models Type Part numbers 78 round AM 511RS Basic Slate COV78RDB42S WN 2 72 x 72 triangle AM 628TS Basic Slate COV7272TRB42S WN 2...

Page 42: ...on the spa Contact your dealer Heat Problems Spa does not heat Heating mode not selected See control panel instructions on page 11 Water level is too low Add water to correct level No electrical power...

Page 43: ...d empty the hoses Close or turn off empty cycle if necessary Water Pressure Problems Jets surge on and off Water level is too low Add water to normal level Jets are weaker than normal or do not work a...

Page 44: ...act your dealer Pump turns off during operation Automatic timer has completed its cycle Start the cycle again Pump has overheated due to the vents on the equipment door being blocked Clear items away...

Page 45: ...ials Normal wear and weathering of the finish will occur naturally over time and are not defects LIMITED WARRANTY YEAR LIMITED W WA AR RR 1 Y Y Y R RA R R RA A T T TY Y Y A A AN NT T A A AN N N NT T T...

Page 46: ...his Limited Warranty does not provide coverage for the insulating cover any item attached to or installed on the spa after the date of manufacture or for gaining access to any component for repair or...

Page 47: ...American Spa Owner s Manual LTR50001143 Rev M Appendix 45...

Page 48: ...American Spa Owner s Manual LTR50001143 Rev M Appendix 46...

Page 49: ...American Spa Owner s Manual LTR50001143 Rev M Appendix 47...

Page 50: ...American Spa Owner s Manual LTR50001143 Rev M Appendix 48...

Page 51: ...American Spa Owner s Manual LTR50001143 Rev M Appendix 49...

Page 52: ..._________________________________________ Date Installed ________________________________________________________________________ Dealer s Phone Number ________________________________________________...

Reviews: