background image

M 9 6 8 3 5 5 D  

INSTALLATION

TEST

3

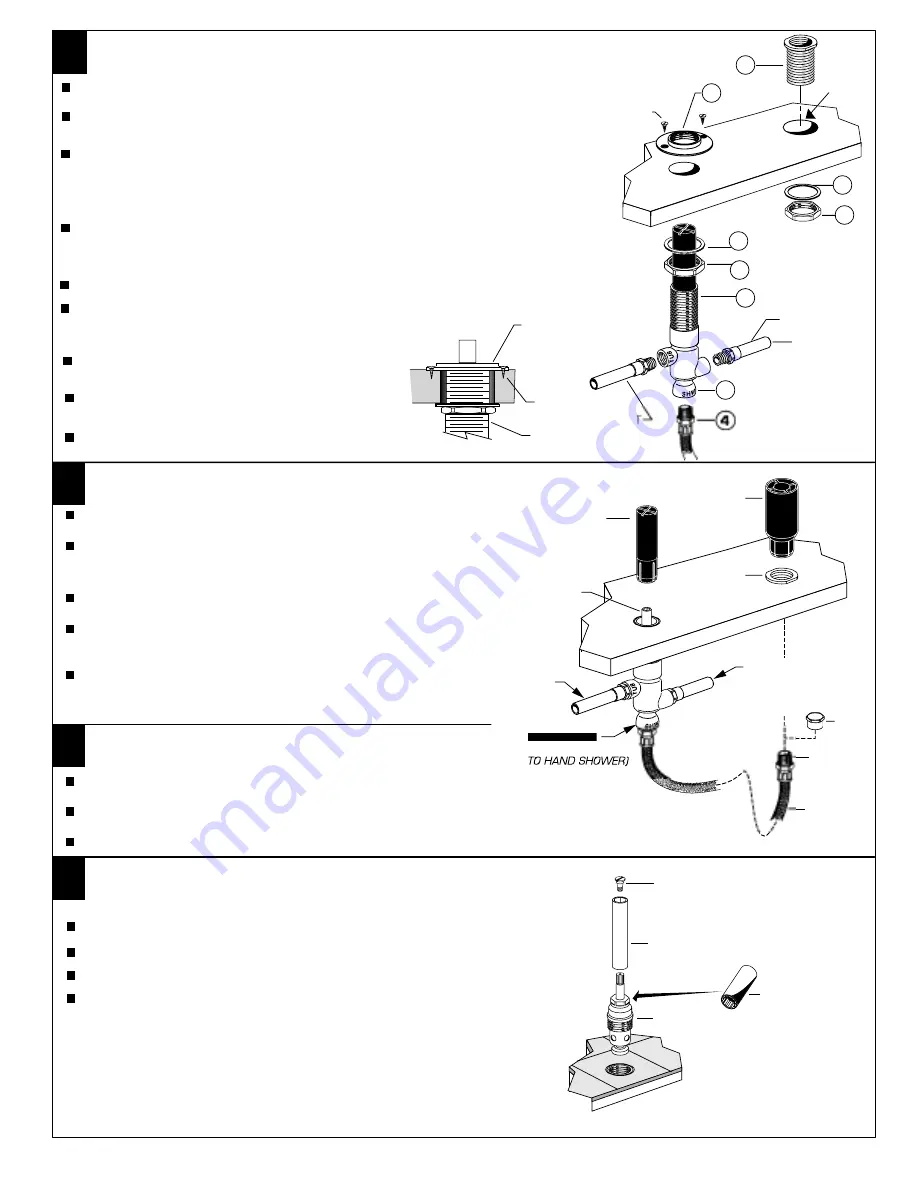
NOTE: Use thread sealant on all threaded connections.

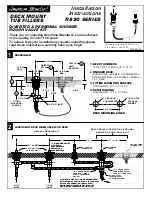
For copper water tube installations, make two 4" long adapter nipples
( 1/2" Male NPT x 1/2" CWT ). Thread nipples into the inlet and tub
outlet of the DIVERTER BODY. Tighten connections securely. 

Do Not Solder

these Connections on the DIVERTER BODY. Damage may occur.

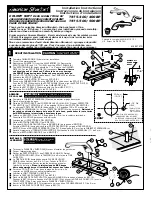
Thread HOSE (4) into the SHOWER CONNECTION (5) of the DIVERTER BODY (6) 
and tighten securely. 

Check with local plumbing codes for backflow 

prevention requirements. Install a backflow prevention device if required.

Position the DIVERTER BODY (6) as required and 
tighten the MOUNTING NUT (7) securely.

Cap the HOSE OUTLET. Remove the DIVERTER GUARD.

Remove the SPOUT GUARD. Assemble the 1/4" PLUG to the SPOUT
SHANK with a thread sealant. 

See the R800 SERIES ROUGH VALVE KIT

instructions for details.

Turn on the water supplies.

Rotate the DIVERTER SLEEVE back and forth fully.
Check all connections for leakage.

Turn off the water supplies. Replace the DIVERTER
GUARD and the SPOUT GUARD. Remove the CAP
from the HOSE OUTLET.

1/2" COPPER WATER
TUBE INLET 

(MIXED

SUPPLY FROM BATH
FITTING)

(MIXED SUPPLY

1/2" COPPER WATER
TUBE 

(MIXED SUPPLY

TO TUB FILLER SPOUT)

CAP

4" LONG
ADAPTER
NIPPLES

VALVE LOCK
RING FLUSH WITH
TOP OF THREADS ON
VALVE SHANK 

VALVE
BODY

4

HOSE

5

6

FITTING

MOUNTING

SURFACE

SLEEVE
GUARD

DIVERTER
GUARD

DIVERTER
SLEEVE

HOSE

WATER INLET

TUB OUTLET

#8 SCREWS

#8 SCREWS

HOSE
END

SLEEVE

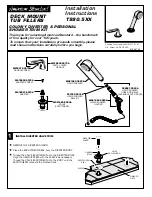
Insert the HOSE  through the SLEEVE from below the mounting deck.

Thread the SLEEVE GUARD onto the HOSE END connection.

Insert the SLEEVE GUARD into the SLEEVE.

Note:

 Test Cap not provided.

SERVICE

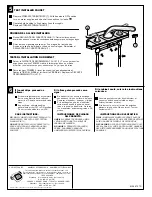
Turn off the water supplies.

Turn HANDLE to the off position.

Remove the SLEEVE from DIVERTER by losening screw.

Using 14mm (9/16") Deep Socket, remove diverter.

TO REMOVE DIVERTER

DEEP SOCKET

14mm (9/16")

SCREW

DIVERTER SLEEVE

DIVERTER

1-3/8" 
Dia. HOLE
FOR HAND
SHOWER

Drop the SLEEVE (1) into the hole in the mounting deck.

Assemble the WASHER (2)  and LOCKNUT (3) to the SLEEVE (1) and
tighten securely.

1

2

3

5

6

7

8

Assemble MOUNTING NUT (7) and WASHER (8) onto DIVERTER BODY (6).

Connect the water inlet and tub outlet lines to
the DIVERTER BODY (6).

Fasten the VALVE LOCK RING (9) to the wooden
mounting surface with #8 screws (not provided).

Insert the DIVERTER BODY (6) through the mounting deck from below. 
Assemble the VALVE LOCK RING (9) so it is flush with the top of 
the DIVERTER BODY (6).

9

Summary of Contents for Colony Soft T975.400

Page 1: ...el juego decorativo Cierre el suministro de agua Quite los PROTECTORES 1 del CUERPO DE LAS V LVULAS 2 Quite el PROTECTOR DEL GRIFO 3 y el TAP N 4 de 1 4 de pulgada 6 4 mm del POSTE DEL GRIFO 5 La alt...

Page 2: ...DAPTATEUR DE POIGN E 2 sur la TIGE DE LA POIGN E 1 Installer la VIS D ADAPTATION 3 et serrer fermement Mettre la MANETTE VOLANT 4 en position et la placer sur l ADAPTATEUR 2 Installer la VIS POUR MANE...

Page 3: ...n de abierto No force los manerales solamente girelos a 90 grados Stream straightener may accumulate dirt causing distorted and reduced water flow Remove aerator and rinse clean If spout drips operate...

Page 4: ...code Reemplace las letras YYY por el c digo de acabado Remplacer le YYY par le code de finition appropri M961460 0020A VALVE ESCUTCHEON KIT JUEGO DE ESCUDETE KIT D CUSSON TROUSSE DE GARNITURE POUR MON...

Page 5: ...LVE ESCUTCHEON 1 INSTALL DIVERTER VALVE TRIM REMOVE THE DIVERTER GUARD Place the ESCUTCHEON SEAL over the DIVERTER BODY Thread the VALVE ESCUTCHEON into the DIVERTER BODY Align the HANDLE STEM with th...

Page 6: ...SE HOSE END SHOWER HOSE SET SCREW RUBBER RING SHOWER ESCUTCHEON SHOWER ESCUTCHEON HOLDER SEAL WASHER SEAL WASHER SLEEVE GUARD SLEEVE SEALANT HAND SHOWER HAND SHOWER HOLDER SEAL WASHER INSTALL HANDLE T...

Page 7: ...TING HOLES ADJUSTABILITY TO 1 1 2 THICK 1 DECK THICKNESS TOTAL DECK THICKNESS UP TO 2 1 2 ADJUSTABILITY TO 1 1 2 THICK Insert the SPOUT SHANK through the mounting deck from below Assemble the SPOUT SH...

Page 8: ...LOCK RING 1 4 PLUG SPOUT GUARD TEE CONNECTIONS WATER SUPPLY CONNECTIONS OUTLET TUBE CUT AS REQUIRED TEE HOT COLD FRICTION WASHER MOUNTING NUT SPOUT SHANK Cut the copper outlet tubes of the VALVE BODIE...

Page 9: ...02 Weekdays 8 00 a m to 7 00 p m Eastern Time SPOUT LOCK RING A906110 0070A SPOUT MOUNTING KIT M962279 0070A VALVE LOCK NUT A911546 0070A VALVE LOCK RING M906671 0070A SPINDLE 903898 0070A SCREW 91831...

Page 10: ...DECK FITTING MOUNTING SURFACE ACRYLIC BATH MOUNTING 1 1 2 NPT INLET TUB SHW 1 2 NPT 1 3 8 D MAX 1 3 8 D MAX 1 3 8 D 1 3 8 D HOLE 1 3 8 D HOLE FOR HAND SHOWER 1 3 8 D HOLE FOR DIVERTER 6 to 18 6 to 18...

Page 11: ...BATH FITTING HOSE OUTLET MIXED SUPPLY 1 2 COPPER WATER TUBE MIXED SUPPLY TO TUB FILLER SPOUT CAP 4 LONG ADAPTER NIPPLES VALVE LOCK RING FLUSH WITH TOP OF THREADS ON VALVE SHANK VALVE BODY 4 HOSE 5 6...

Page 12: ...62280 0070A R890 MODEL NUMBER DIVERTER PERSONAL SHOWER ROUGH VALVE KIT HOT LINE FOR HELP For toll free information and answers to your questions call 1 800 442 1902 Weekdays 8 00 a m to 8 00 p m EST I...

Reviews: