background image

2

INSTALLATION AND FRAMING INSTRUCTIONS

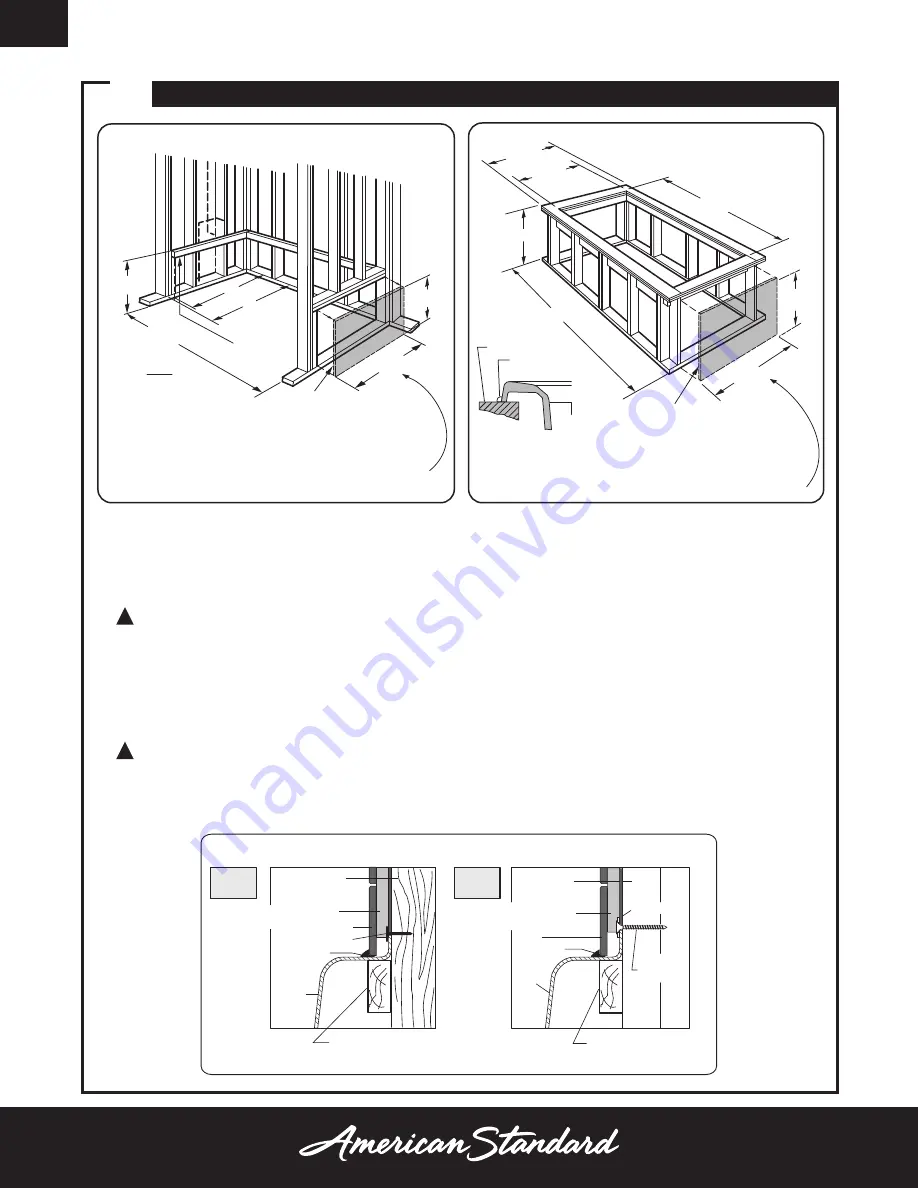
This bath must be supported along its entire bottom.

 Use mortar as bedding material (do not use sand or 

foam). Apply enough mortar to support the complete bottom of the bath. After the mortar has been poured, 
and before it sets, position whirlpool or bath within recess until the rim is leveled against the leveling stringers 
(see “Typical Recess Installation”) shown above. 

!


The rim of the bath 

must not

 support weight. Allow the mortar material to completely harden before  

applying weight to the rim or bottom of the bath. Any finish material such as tile or wall board must be 
self-supporting if it contacts the deck of the bath.

2948LHO/RHO 

Replace whirlpool and re-shim the integral support feet, shimming the entire length of the 

support feet. Secure the shims using construction adhesive, silicone, mortar or equivalent materials. While not 
a necessity, the use of a foundation base consisting of cement, mortar, or grout will help provide a solid and 
secure installation.

!


The rim of the bath 

must not

 support weight. If foundation base is used, allow the bedding material to 

completely harden before applying weight to the rim or bottom of the bath. Any finish material such as tile 
or wall board must be self-supporting if it contacts the deck of the bath.

TYPICAL PIER TYPE INSTALLATION

AS DESIRED

F

CUTOUT

AS DESIRED

G

CUTOUT

C

24

(610 mm)

12

(305 mm)

MOUNTING 

SURFACE

WATERPROOF
 SEALANT

BATH

TYPICAL RECESS INSTALLATION

24

(610 mm)

12

(305 mm)

C

E

D

W

LEVELING
STRINGERS

TILE

TILE

BEAD

STRIP

LEVELING STRINGER 

1 x 4 (not for support)

BATH

ADHESIVE

SEALANT

WALLBOARD

NOTE: Tile bead kit not included and  

            must be purchased separately.

C

TYPICAL INSTALLATION

FIGURE 1

ACCESS PANEL MUST BE LOCATED 
ON THE SAME SIDE AS THE MOTOR.
ALLOW OPEN FRAMING ON PUMP/MOTOR 
END FOR SERVICE.

ACCESS PANEL MUST BE LOCATED 
ON THE SAME SIDE AS THE MOTOR.
ALLOW OPEN FRAMING ON 
PUMP/MOTOR END FOR SERVICE.

FOR E & D DIMENSIONS SEE 

TABLE 1 ON PAGE 5.

FOR G & F DIMENSIONS SEE 

TABLE 1 ON PAGE 5.

NOTE: 
FRONT EDGE 
OF BATH MUST 
BE SUPPORTED BY 
STUD WALL OR 
AMERICAN STANDARD 
APRON KIT

UNLESS AN ACCESS OPENING OF AT LEAST 12" X 24" (305 X 610mm) 

IS PROVIDED, WARRANTY SERVICE WILL NOT BE PERFORMED.

UNLESS AN ACCESS OPENING OF AT LEAST 12" X 24" (305 X 610mm) 

IS PROVIDED, WARRANTY SERVICE WILL NOT BE PERFORMED.

(EXCEPT 2948 WHERE APRON IS PRIMARY ACCESS OPENING)

ACCESS PANELS NOT REQUIRED 

FOR BATH TUBS.

ACCESS PANELS NOT REQUIRED 

FOR BATH TUBS.

SUGGESTED WHIRLPOOL / BATH INSTALLATION METHOD

SECURE THE BATH TO THE STUDS AS SHOWN FOR WOOD OR STEEL STUD CONSTRUCTION. 

TYPICAL FLANGE MOUNTING DETAIL

STUD

WATERPROOF DRYWALL 
OR CEMENT BOARD

WATERPROOF DRYWALL 

OR CEMENT BOARD

TILE

SEALANT

TUB

ROOFING NAIL

   1 x 3 (25 x 76mm) WOOD

STRINGER FULL LENGTH

  1 x 3 (25 x 76mm) WOOD

STRINGER FULL LENGTH

STEEL

STUD

WASHER

TILE
SEALANT

TUB

4" (102mm)

DRYWALL

SCREW 

WOOD 

STUDS

STEEL

STUDS

Summary of Contents for Mainstream 2948LC-LHO.020

Page 1: ...ars We believe that while every home should appreciate in value we never forget the sentimental value that grows from enjoying life in the heart of home your kitchen and bath That s why we love your s...

Page 2: ...e Inspect the product and report any damages or missing parts immediately to customer care by calling 800 442 1902 Mainstream Whirlpool dimensions are nominal and meant for a standard 60 1524 mm alcov...

Page 3: ...the bathtub Never drop or insert any object into any opening Use this unit only for its intended use as described in this manual Do not use any attachments not recommended by American Standard The uni...

Page 4: ...tc the bath must be filled with water and operated to check for leaks that may have resulted from shipping damage or mishandling Do not make modifications to the whirlpool system or remove pump from f...

Page 5: ...for Field Installation Gallon to Overflow Whirlpool Operating Volume 2949LC 020 L 1524 mm 60 W 832 mm 32 3 4 H 502 mm 19 3 4 A 438 mm 17 1 4 B 216 mm 28 1 2 C 464 mm 18 1 4 1485 mm 58 1 2 X 794 mm 31...

Page 6: ...Mainstream 60x32 8 Jet Right Hand Outlet Shown 2948LC LHO 020 Mainstream 60x32 8 Jet Left Hand Outlet 9 229mm PUMP APRON IS PRIMARY ACCESS OPENING FOR MODELS RHO LHO ONLY C L OF DRAIN OUTLET CUT OUT...

Page 7: ...erflow of the bath extends below the bottom of the bath Note that this requires a cutout in the floor The floor structure beneath the bath must be able to support a total weight of bath water and bath...

Page 8: ...bath TYPICAL PIER TYPE INSTALLATION AS DESIRED F CUTOUT AS DESIRED G CUTOUT C 24 610 mm 12 305 mm MOUNTING SURFACE WATERPROOF SEALANT BATH TYPICAL RECESS INSTALLATION 24 610 mm 12 305 mm C E D W LEVEL...

Page 9: ...outed away from the pump body and heater if equipped GFCI CIRCUIT REQUIREMENTS The whirlpool should be installed on a 120 vac 15 amp dedicated GFCI circuit The circuit should be hard wired from the el...

Page 10: ...ress and whirlpool will start 4c Stop Whirlpool Depress and release button and whirlpool will stop 4d Air Volume Control Adjustments Water turbulence is determined by the amount of air mixed with the...

Page 11: ...household detergent cleaner Do not use Lestoil Lysol Disinfectant spray or concentrate or Lysol Basin Tub and Tile Cleaner Windex Mr Clean Dow Disinfectant Bathroom Cleaner or cleaning products in aer...

Page 12: ...e year after its initial purchase confirms that it is defective in materials or workmanship American Standard will repair or at its option exchange the product for a similar model This warranty applie...

Page 13: ...ericanstandard 755967 100 2 21 Great Tub 03 13 2018 06 52 29 CDT American Standard Bathtubs Saver 60 Inch by 34 Inch Integral Apron Bathtub Left Hand Drain Love the tub It is very roomy and would defi...

Reviews: