6
M965985 (11/18)
Fig. 4
DETECTION
ZONE
PROTECTIVE FILM
IMPORTANT: Do not
use sealent on threads
1
2
3
COLD
HOT
(3) INLINE
FILTER
Fig. 6
5
4
Fig. 5
1
9
8
7
5
3
D
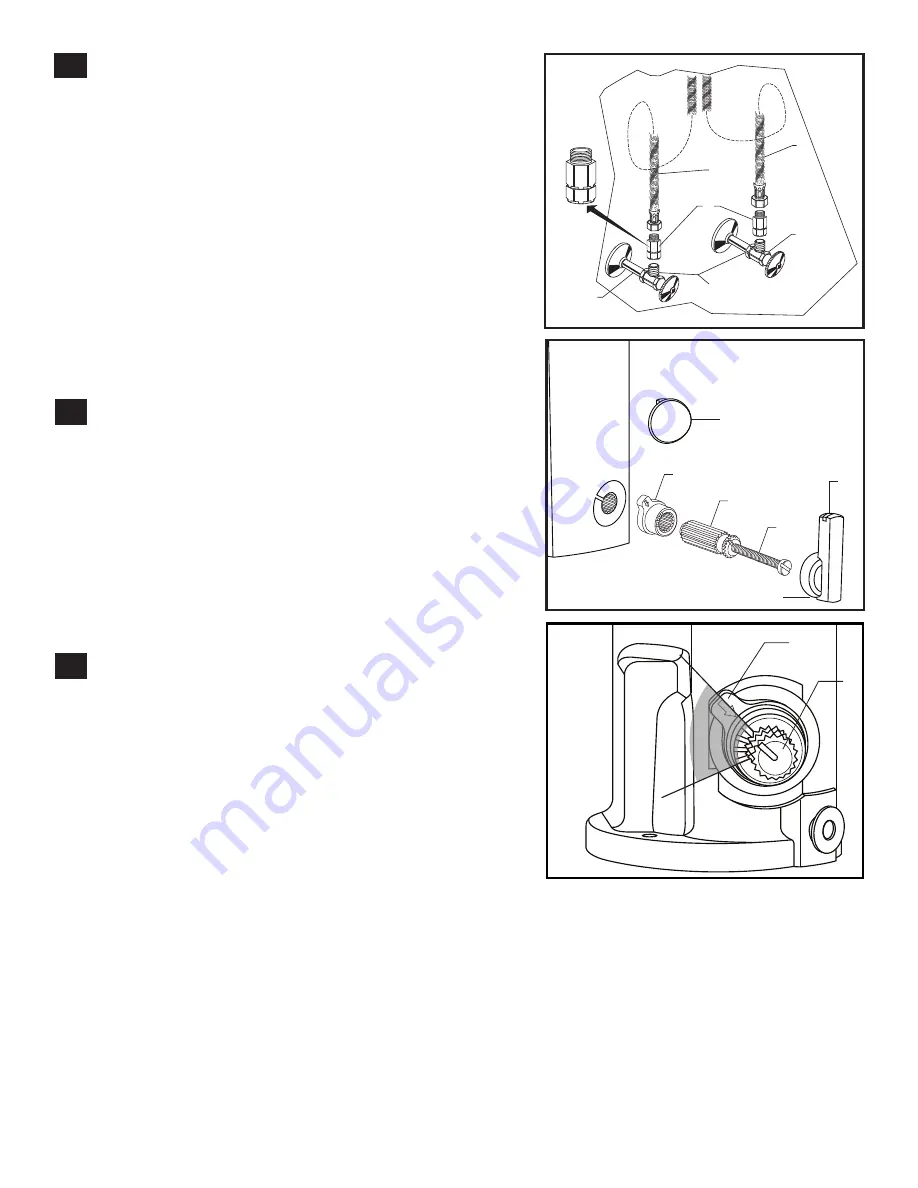
MAKE WATER SUPPLY
CONNECTIONS; Fig. 4
1. Turn off hot and cold water supplies before beginning.
2. Install INLINE FILTER (3) on each wall supply outlet. Be sure that
INLINE FILTER
(3) is inserted in the correct direction.
(See Illustration)
3. Connect HOT FLEXIBLE SUPPLY (marked with red stripe) (1) to
INLINE FILTER
(3) on hot water control stop (4). Connect COLD
FLEXIBLE SUPPLY (marked with blue stripe)
(2) to INLINE FILTER
(3) on cold water control stop (5). Use adjustable wrench to tighten
connections. Do not over tighten.
4. Faucet supplies are 24
"
long from faucet base.
Note; If additional supply length is required, installer must
purchase those parts separately.
Important; If SUPPLY HOSES (1, 2) are too long, loop as
illustrated to avoid kinking.
E
REMOVE MIXING HANDLE; Fig. 5
Note: Before removing the handle, preset the desired water
temperature and while disassembling make sure to keep the
SHAFT EXTENSION
(8) in place.
1. Unthread SET SCREW (3) and remove HANDLE (5).
2. Remove LIMIT STOP (1).
3. Using a Slotted screwdriver unthread SCREW (7) and remove
SHAFT EXTENSION
(8).
Note: Hold the extension in place while unthreading the screw.
4. Install CAP (9) onto the Body and press until you hear a click.
Note: Sharper side faces towards the back of the body.
F
ADJUST HOT LIMIT STOP; Fig. 5, 6
To reduce the amount of hot water that can mix with cold, the
installer can adjust hot limit stop (Four different settings).
1. Rotate LEVER HANDLE (5) counter-clockwise to its stop position
(100% cold).
2. Remove SET SCREW (3) and pull off the LEVER HANDLE (5).
3. Pull out LIMIT STOP (1) from the SHAFT EXTENSION (8).
4. Rotate LIMIT STOP (1) between the shaded area and insert back
onto SHAFT EXTENSION
(8).
5. Each notch on the LIMIT STOP (1) will reduce the amount of hot
water by approximately 3%. For example, the 2nd notch will have
97% of maximum temp, the 3rd notch will have 94% and the fourth
will be 91%.
6. Replace LEVER HANDLE (5), SET SCREW (3) and tighten.
1
2
Fig. 6


