2
Pub. No. 18-HD31D1-1
Installer’s Guide
© 2005 American Standard Inc. All Rights Reserved
edge of the wire opening hole in the subbase adjacent to
the top edge of the printed circuit board and wiring
connector. This should result in a sufficient amount of
wall material left between the top mounting and wiring
opening holes.
8. Use a pencil to mark both mounting holes. Remove the
subbase from the wall and drill two holes in the wall for
mounting. Gently tap anchors (provided) into the drilled
mounting holes until flush with the wall.
9. Position and level the subbase on the wall with the
thermostat wire through the wiring opening hole of the
subbase and with the mounting holes aligned with the
two anchors. Mount the subbase on the wall using the
provided mounting screws.
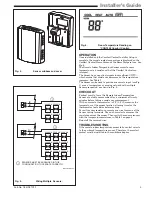
Wiring (Fig. 3,4,5)
Electrical Interference (Noise) Hazard.
Can cause erratic system operation.
Keep wiring at least one foot away from large inductive loads
such as motors, line starters, lighting ballasts and large power
distribution panels.
IMPORTANT
Erratic temperature readings from a sensor can occur as a
result of any of the wiring practices described below. Avoid
these practices to assure correct operation.
—Do not route temperature sensor wiring with building power
wiring, next to control contactors or near light dimming
circuits, electric motors or welding equipment.
—Avoid poor wiring connections.
—Avoid intermittent or missing building earth ground.
▲
CAUTION
!
Disconnect power supply before connecting wiring.
Failure to do so may cause equipment damage.
Wiring must comply with applicable codes, ordinances and
regulations.
1.
Strip 1/4-in. of insulation off two wires. Bend the bare
wire downward 90 degrees to easily insert into the
terminal block.
2.
Loosen terminal block screws. Insert two wires into the
terminal block.
3.
Securely tighten each terminal block screw.
4.
Push excess wire back into the hole.
5.
Plug the hole with nonflammable insulation to prevent
drafts from affecting the remote indoor sensor.
6.
Install the remote indoor sensor cover onto the subbase
by gently pressing the cover over the subbase until the
tabs snap into place.
Fig. 3. Wiring a single Sensor.
SINGLE A 402
IF MORE THAN ONE REMOTE SENSOR IS REQUIRED,
REFER TO FIGURE 5.
R
G
Y/
Y1
W1
B
24V
A
C
HO
T
24V
A
C
common
FA
N
SO
V
COOLING -1st
HEA
TING -1st
HEA
TING -2nd
W2
O
W3
HEA
TING -3r
d
Y2
COOLING-2nd
VS MODE -fan
BK
H2
Humidistat
H1
Humidistat
Outdoor Temp
OT1
Outdoor Temp
OT2
RS2
Remote Indoor Sensor
RS1
Remote Indoor Sensor
SENSOR
1
1
5 FEET
(1.5 METERS)
YES
NO
NO
NO
M4476 A
Fig. 2. Typical location for ZZSENSAL0400AA Sensor.


