8
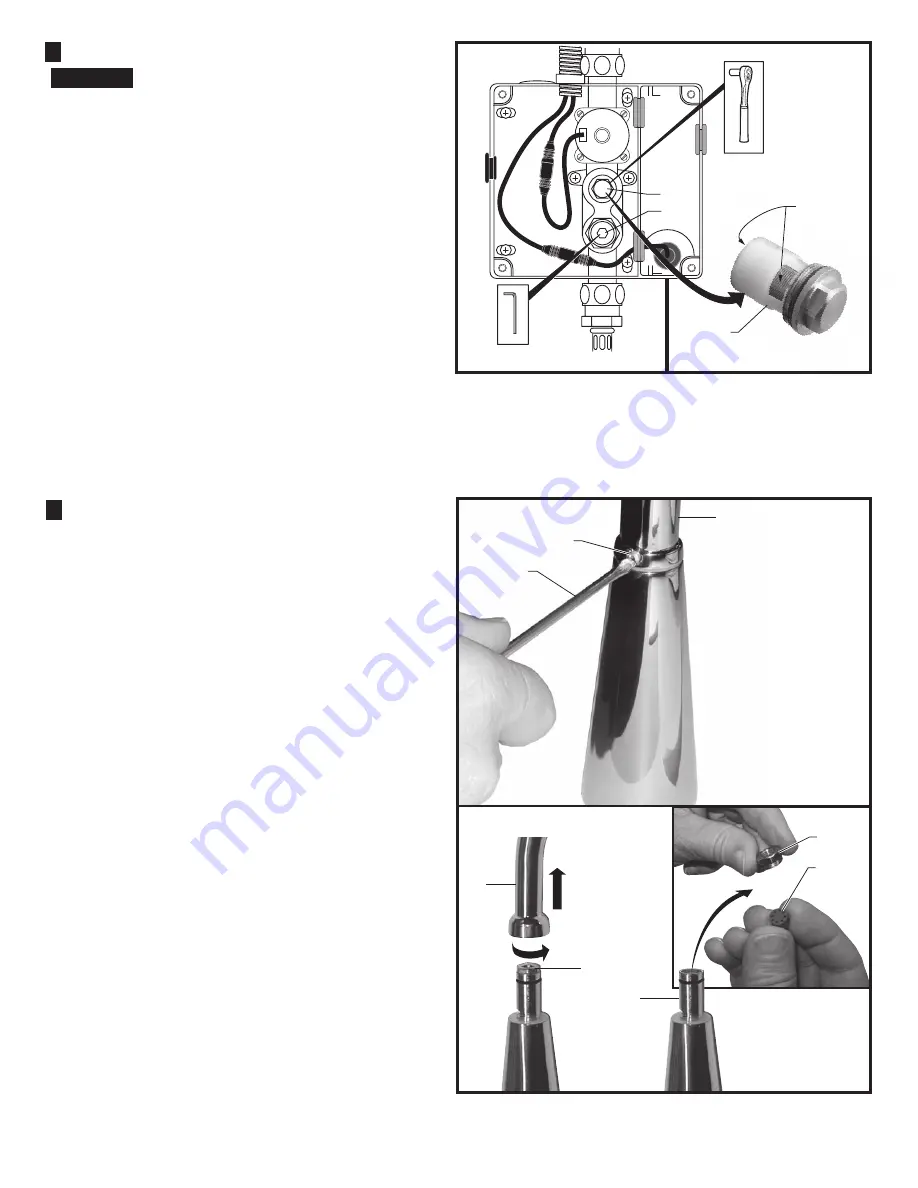
1.
Remove SET SCREW
(1)
with FLAT BLADE
SCREWDRIVER
(2)
. Pull off SPOUT
(3)
from faucet
base.
Fig. 5 & 5a.
2.
Remove HOUSING
(4)
and remove FLOW
RESTRICTOR
(5)
.
Fig. 5b.
3.
Rinse clean FLOW RESTRICTOR
(5)
. Reassemble
and install into SPOUT BASE
(6)
. Reassemble SPOUT
(3)
onto SPOUT BASE
(6)
and tighten SET SCREW
(1).
Fig. 5.
HOW TO CLEAN AND REMOVE
THE FLOW RESTRICTOR; Fig. 5
5
M 9 6 5 119 R E V. 1. 3
1
2
3
4
Fig.5
Fig.5a
Fig.5b
REMOVE SET SCREW (1)
PULL UP TO
REMOVE SPOUT
3
6
4
5
1.
Remove ENCLOSURE COVER.
2.
Close SUPPLY STOP
(1)
with 4mm Hex wrench.
Note: Keep water flowing out of faucet while shutting off.
3.
Unthread STRAINER
(2)
using a 7/16" socket.
4.
Pull out the STRAINER
(2)
and clean with an old
toothbrush. Rinse thoroughly with water.
5.
Install the STRAINER
(2)
back in its place and
tighten with a 7/16" socket.
Caution: do not over tighten strainer.
Note: It is recommended to clean strainer every 6
months.
6.
Open SUPPLY STOP
(1)
with 4mm Hex wrench.
7.
Replace ENCLOSURE COVER. Tighten cover
screws firmly.
HOW TO CLEAN FILTER; Fig. 4
4
Fig.4
CAUTION
Before opening ENCLOSURE
disconnect AC power supply.
3
1
2
7/16" SOCKET
CLEAN
SCREENS
4mm HEX WRENCH
Summary of Contents for SELECTRONIC 6055.193
Page 11: ...M965119 REV 1 3 ...


