background image

In Field Calibration Procedures for the TIM-600 Series Digital Meter 

Note: Due to various grades of oil and temperatures, every meter should be individually calibrated when installed. 

Purge the system of air by dispensing fluid until the flow is full and steady. Use an
accurate measuring container not less than 5 quarts.  A glass beaker will give the
most accurate reading.

During calibration dispense at the same flow used in normal dispensing.

Do not “choke” or “trickle” the flow to reach the exact volume.  The correct

technique is to stop and start at full flow as many times as needed to reach the
exact value in the container.

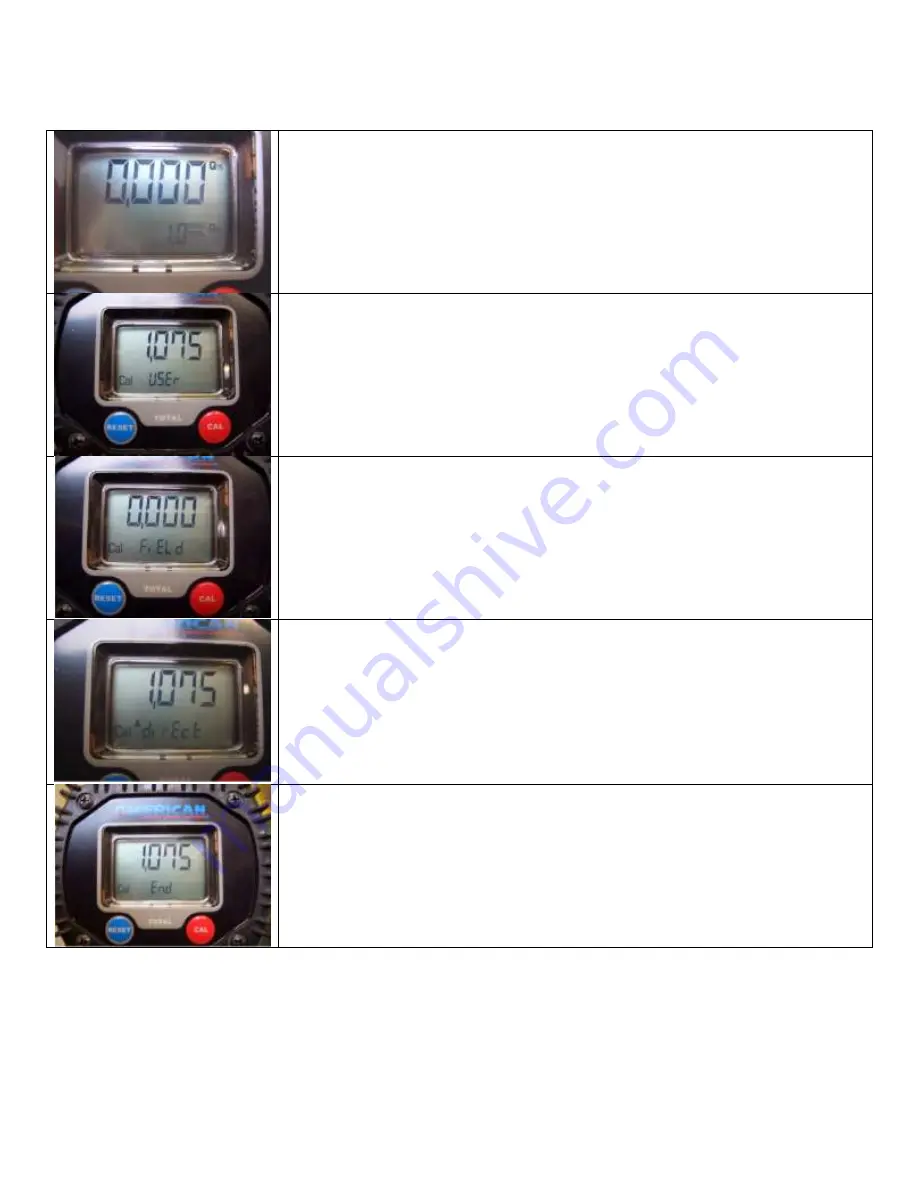
Firmly press and release the blue RESET Button.  Wait about 10 seconds.  The

word “reset” will disappear.  This will zero out the reading.

Press and hold the red CAL button.

If this is the first time for calibration it will read CAL-FACT.

If calibration has been done before it will read CAL-USER.

Press a

nd hold the RESET button until the display changes to “0.000” and the

letters CAL FIELD appear.

Dispense 4 quarts of oil into your container.  Start and stop the flow as needed to
reach the appropriate level in the container.

Press and hold the RESET button until an arrow appears in the lower left hand
corner of the display. It will read CAL Direct with an arrow pointing up. If the total
is under 4 quarts use this setting.

If the total is over 4 quarts press and release the RESET button to get the arrow to
point down.

The CAL button will move it in the direction you’ve chosen.

Press and hold the CAL button until the display reads “4.000” then release the

button.

Press and hold the RESET button until CAL END appears.  It will then show the
new CAL setting which will be stored in the memory.  After a few seconds the
meter will change back to normal operation mode.  The calibration process is now
complete and the meter is ready to dispense product.

Unit of Measure 

The TIM-615 meter features a menu which allows the user to change the unit of measure: quarts (Qts), pints (Pts), liters 
(L) and gallons (Gal). 

Please note that the gallons ‘odometer’, in the lower right hand corner, is not resettable.

1. Push and hold both the Reset and the Cal. Buttons.
2. Mete

r should display: “UNIT”

Summary of Contents for PRO TIM-615

Page 1: ...speed of change increases the longer the button is held If you accidentally program the wrong value repeat the operation starting from step number 6 8 Saving the New Calibration Factor Before performing this operation double check to make sure the display value on the meter is the same value that is in the calibrated container Press the RESET button for at least one second The TIM 615 calculates t...

Page 2: ...ies If you continue to use the meter without changing the batteries the second battery alarm level will eventually be reached preventing meter operation In this condition the battery icon will flash and will be the only item visible on the LCD You must change the batteries once the meter has reached this mode All dispensing data from this point forward will not be displayed or stored in the meter ...

Page 3: ...letters CAL FIELD appear Dispense 4 quarts of oil into your container Start and stop the flow as needed to reach the appropriate level in the container Press and hold the RESET button until an arrow appears in the lower left hand corner of the display It will read CAL Direct with an arrow pointing up If the total is under 4 quarts use this setting If the total is over 4 quarts press and release th...

Page 4: ...trigger to purge any air from your hose into the bucket 12 When you have a steady flow of oil coming out stop dispensing and close the non drip tip on the control handle 13 Dispose of the oil in the bucket into your waste drain Trouble Shooting Control Handles There is a display problem o Have you changed the batteries The meter is dispensing oil but not metering anything o Have you changed the ba...

Page 5: ...600 FMHF 7 Flex Manual Hi Flow TIM 743 1 TIM 600 RA 4 Rigid Automatic TIM 746 TIM 600 RM 2 Rigid Manual TIM 753 TIM 600 RMHF 6 Rigid Manual Hi Flow TIM 752 These tip assemblies have had their compression nuts Loctited at the factory during the assembly process We recommend placing a few drops of Loctite 680 Retaining Compound on the threads of the compression nut when replacing these tip assemblie...

Page 6: ...ng normal use Do not under any circumstances place Loctite on the threads that are used to fasten the tip assembly to the meter body Filter cleaning procedure 1 remove swivel 2 remove clean reinstall filter 3 reinstall swivel Model Number Tip Style Description Tip Assembly TIM 601 FA 3 Flex Automatic TIM 747 TIM 601 FM 1 Flex Manual TIM 743 TIM 601 RMGO 5 Swivel 90º Rigid Manual TIM 742 TIM 601 FM...

Page 7: ...airable The TIM 715 meter can be replaced with a new TIM 615 meter You can reuse your old extension nozzle and old control handle with the TIM 615 Please call 410 252 9300 and press 3 for pricing and availability The upper of numbers reset to zero after a battery replacement and should count up as oil is pumped through the meter The number in the lower right corner is not resettable ...

Reviews: