background image

SHOOTING RAIL • PLATFORM

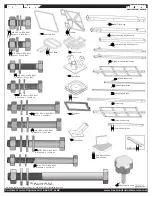
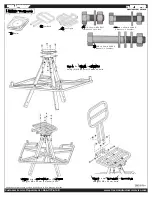
Step 8:  Assemble SHOOTING RAIL by inserting

LOWER SHOOTING RAIL SUPPORTS into ports on corners

of PLATFORM and secure using (4) M8 x 40mm bolts.

Step 9:  Lie SHOOTING RAIL on ground and install UPPER

SHOOTING RAIL SUPPORTS using (4) M8 x 55mm bolts.

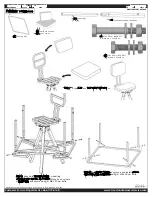
THE 

13’ TRIPOD

Model #5413D / #51016

Step 7: 

Slide SEAT and SEAT BACK CUSHION on.

NOTE:

NOTE:

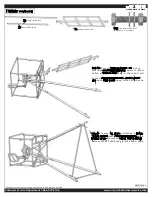
You will need:

(1)

Seat Back Cushion

(1)

Seat Cushion

(1)

Shooting Rail

(4)

Lower Shooting Rail Supports

(3)

Upper Legs

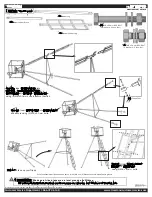
(4)

M8 x 55mm HEX BOLT

(2 Washers, 1 Lock-Nut)

(4)

M8 x 40mm HEX BOLT

(2 Washers, 1 Lock-Nut)

Customer Service Department 1-866-972-6168

Distributed by Primal Vantage Company Inc. 685 Route 10 East, Randolph, NJ 07869

www.treestandcustomerservice.com

©2011 (rev 06/11)

Summary of Contents for GRIZZLY 51016

Page 1: ...ling installing or utilizing this product DO NOT USE THIS PRODUCT BEFORE FULLY UNDERSTANDING ALL SAFETY WARNINGS AND INSTRUCTIONS IF YOU HAVE QUESTIONS ARE UNSURE ABOUT ANY INFORMATION OR NEED ADDITIO...

Page 2: ...towards the ground bows arrows knives or any other equipment to your tree stand once you have reached your desired hunting height ONLY pull up hunting equipment after the tree stand has been secured t...

Page 3: ...important to exercise the legs by pushing against the tree or doing other forms of continuous leg exercises to avoid blood pooling while being suspended Hunters with varying degrees of physical fitnes...

Page 4: ...t allows the tree to be unstable Check the ground under TREE LADDER STAND to ensure it is firm and level Be sure you have a level stand platform Your tree must not lean or have any irregular shape Tre...

Page 5: ...NCH 2 4 Adjustment Knobs 1 Shooting Rail 1 Platform 1 Seat Back 1 Seat Frame 1 Seat Base 1 Swivel 4 Lower Shooting Rail Supports 2 Outer Ladder Brace 4 Upper Shooting Rail Supports 1 Seat Back Cushion...

Page 6: ...M Do not insert bolts yet Step 2 Insert top of UPPER LEGS into SEAT BASE Secure using 6 M8 x 50mm bolts 2 bolts per leg Step 3 Bolt UPPER LEGS to PLATFORM using 3 M8 x 110mm bolts 6 M8 x 50mm HEX BOLT...

Page 7: ...1 Washer 1 Lock Nut 1 Swivel 1 Seat Back 1 Seat Frame Step 4 Bolt SWIVEL to SEAT BASE using 4 M8 x 20mm 1 washer bolts 2 M8 x 60mm HEX BOLT 3 Washers 1 Lock Nut NOTE NOTE You will need SEAT ASSEMBLY T...

Page 8: ...mm bolts THE 13 TRIPOD Model 5413D 51016 Step 7 Slide SEAT and SEAT BACK CUSHION on NOTE NOTE You will need 1 Seat Back Cushion 1 Seat Cushion 1 Shooting Rail 4 Lower Shooting Rail Supports 3 Upper Le...

Page 9: ...PPORTS Use 4 ADJUSTMENT KNOBS to connect both halves together 2 M8 x 70mm HEX BOLT 2 Washers 1 Lock Nut 4 Adjustment Knobs NOTE NOTE You will need 1 Trap Door Loosen all four knobs to adjust Shooting...

Page 10: ...make sure legs are in proper holes Tabs should appear as shown diagram 1 Insert 1 MIDDLE LADDER LEG into remaining Upper Leg and secure using 2 M8 x 50mm bolts per leg 6 M8 x 50mm HEX BOLT 2 Washers 1...

Page 11: ...DLE LEGS using 2 M8 x 40mm bolt Connect MIDDLE LADDER LEG to SHORT UPPER LEG below TRAP DOOR using 2 M8 x 40mm bolts Step 14 Connect ALL LEGS by attaching 2 LONG TRIPOD BRACES from MIDDLE LADDER LEG b...

Page 12: ...nd BOTTOM LEG into BOTTOM of MIDDLE LEG using 6 M8 x 50mm bolts to secure them all 2 Lower Leg NOTE NOTE You will need 9 M8 x 50mm HEX BOLT 2 Washers 1 Lock Nut 4 M8 x 20mm HEX BOLT 2 Washers 1 Lock N...

Page 13: ...der not to climb or have any condition that would impair your ability to climb up or down or use tripod as it could result in serious injury or death NEVER remove or deface tripod warning labels Repla...

Page 14: ...ithin thirty days of purchase for all missing or damaged parts requests Your registration information is strictly to activate limited warranty coverage and for all important product updates only Your...

Page 15: ...y way other than those directed by official instructions or if any attempt is made to repair the product without prior authorization b As the use of this product is dependent upon conditions and facto...

Page 16: ...Harness everytime I use this product You must complete and return the registration card below within thirty 30 days of the date of purchase in order to activate limited warranty coverage Registration...

Reviews: