S
SE
ET
T U
UP
P IIN
NS
ST
TR
RU
UC
CT
TIIO
ON
NS
S
PLEASE NOTE:
Images used are for demonstration purposes only and may not depict the actual product.
A
A m
m e
e rr ii s
s tt e
e p
p ®
® II n
n c
c .. 9
9 0
0 1
1 T
T a
a c
c o
o m
m a
a C
C tt .. •
• P
P .. O
O .. B
B o
o xx 1
1 8
8 9
9 •
• C
C ll ii o
o ,, M
M II 4
4 8
8 4
4 2
2 0
0 (( 8
8 1
1 0
0 )) 6
6 8
8 6
6 -- 4
4 0
0 3
3 5
5 w
w w
w w
w .. a
a m
m e
e rr ii s
s tt e
e p
p .. c
c o
o m
m
©2008
(rev 4/08)
Page 2
T
T H
H E
E
O
O U
U T
T H
H O
O U
U S
S E
E
™
™
B
B L
L II N
N D
D
Model #804
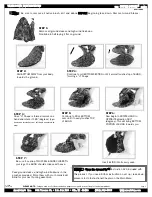
Remove pouch containing high wind tie-downs.
Remove BLIND from carrying case.
Step 2:
Let the other two pop open.
Step 3:
Spread your BLIND and stake
down. High wind tie-downs are
included (if needed)
The lightest fully enclosed Blind.
N
No
o o
otth
he
err b
blliin
nd
d d
de
elliiv
ve
errs
s tth
he
e lle
ev
ve
ell o
off ttrra
an
ns
sp
po
orrtta
ab
biilliittyy a
an
nd
d
c
co
on
nc
ce
ea
allm
me
en
ntt tth
ha
att yyo
ou
u''llll ffiin
nd
d iin
n tth
he
e o
orriig
giin
na
all A
Am
me
erriis
stte
ep
p®
®
O
Ou
utth
ho
ou
us
se
e™
™ B
Blliin
nd
d
Step 1:
Hold one of the 2 ring sets of steel.
N
NE
EW
W !!
N
NE
EW
W !!
““
F
Frro
om
m tth
he
e G
Grro
ou
un
nd
d U
Up
p””™
™ Instruction DVD included
with this product. If you need further instruction on set up /
take down, please refer to Instructional Chapter on the Main
Menu.


