background image

                                           FOR USE AS AN LP GAS STOVE 


  DANGER  

-


NEVER use Charcoal, Wood or Canned Gel Fuel while using Grill as an LP Gas Stove. 


FOLLOW STEPS 1 & 2.


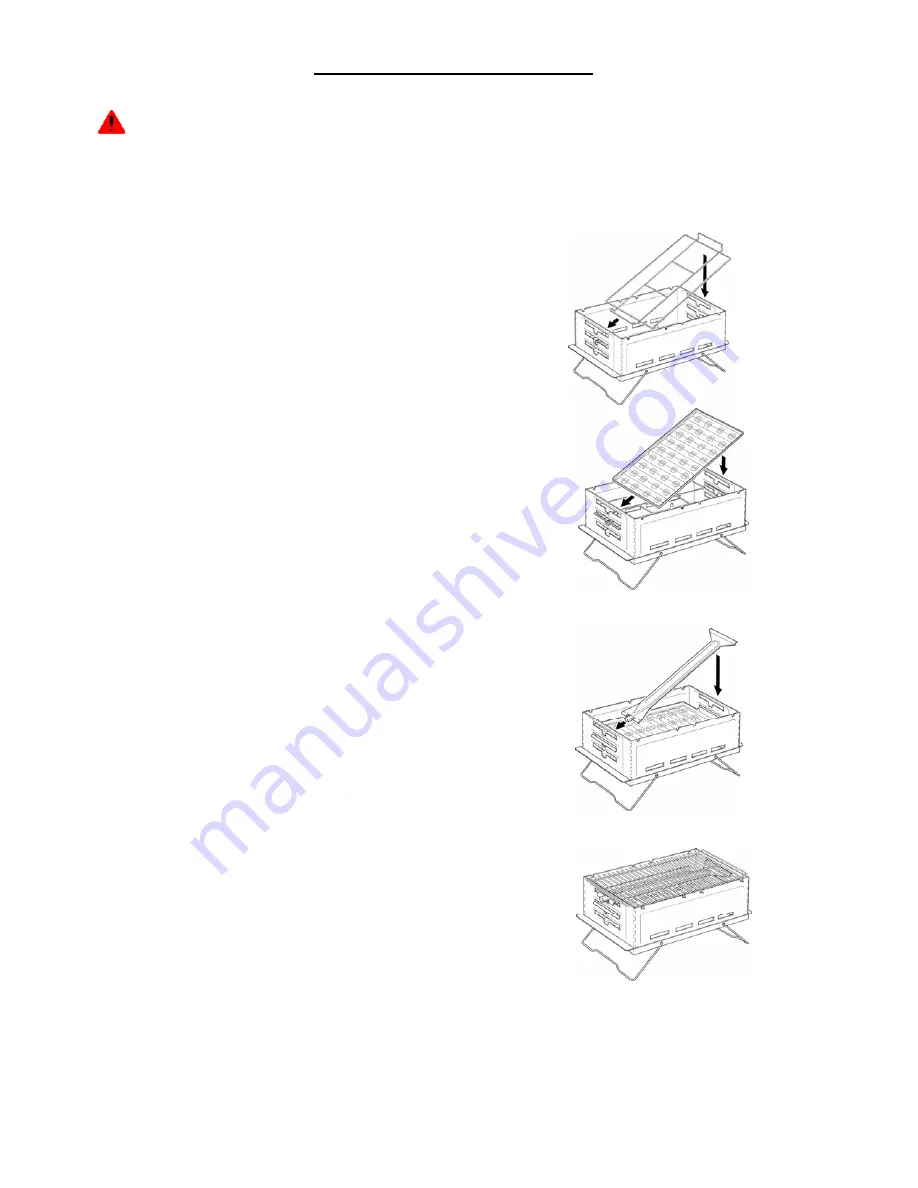
Step 3. 
FUEL TRAY RACK INSTALLATION:


Hold FUEL TRAY RACK in upright position.   
Insert FUEL TRAY RACK into Body at a 45-degree  
angle, through the MIDDLE level of the END WALL  
slot so that the FUEL TRAY RACK rests securely  
on the edge of the END WALL.  Lower the opposite end  
of the FUEL TRAY RACK and slide it into place 
over the opposing MIDDLE level END WALL slot.  
Make sure the FUEL TRAY RACK fit is secure. 


Step 4. 
FUEL TRAY PLATE INSTALLATION:  

With the vent hole flaps placed in the upward position.  
Insert the FUEL TRAY PLATE on top of the FUEL TRAY RACK. 
Press down gently to insure a snug fit. 


Step 5. 
BURNER BAR INSTALLATION:


Hold BURNER BAR at a 45-degree angle with  
the gas vent holes and the Valve nozzle end  
in down position.  From inside the Grill, slide 
the Valve nozzle end through the TOP level 
END WALL slot past the END WALL edge.  Lower  
the opposite end of the BURNER BAR and slide  
it into position on the opposing TOP level  
END WALL edge.  Make sure that the  
BURNER BAR fit is secure with each end  
resting firmly on the END WALL edges. 


Step 6.  
COOKING GRATE: 

Install COOKING GRATE.


  9

Summary of Contents for 182269002015

Page 1: ...TM PORTABLE BARBECUE STOVE O W N E R S M A N U A L Assembly and Use Instruction Guide TM...

Page 2: ...on are determined to be defective under normal use and service Ameritrax will at its option repair or replace any product or part found to be defective during the warranty period Ameritrax may require...

Page 3: ...DAMAGE TO PROPERTY Any improper use of Grill or failure to adhere to all Owner s Manual instructions may be hazardous and may result in injury or death and will void warranty If you have any questions...

Page 4: ...n Burner Bar is installed NEVER attempt to move the Fuel Tray while hot or in use ALWAYS use Grill Mitts or Hot Pads to protect hands and arms while using Grill ALWAYS store fuel tanks in a well venti...

Page 5: ...EVER store or place any items on top of Grill or Storage Bag during transportation or while in storage ALWAYS utilize Grill as a Stove or Barbecue only Grill is not intended for any other use NEVER al...

Page 6: ...ee number 1 866 888 3088 or visit us on line at www ameritraxgroup com You should have received the following contents 1 Grill Owner s Manual PN OM 141222 1 Storage Bag Not pictured PN BG 011188 1 Bot...

Page 7: ...at a 45 degree angle through the LOWEST level of the END WALL slot so that the FUEL TRAY RACK rests securely on the edge of the END WALL Lower the opposite end of the FUEL TRAY RACK and slide it into...

Page 8: ...ition From inside the Grill slide the Valve nozzle end through the MIDDLE or BOTTOM level END WALL slot past the END WALL edge Lower the opposite end of the BURNER BAR and slide it into position on th...

Page 9: ...UEL TRAY RACK fit is secure Step 4 FUEL TRAY PLATE INSTALLATION With the vent hole flaps placed in the upward position Insert the FUEL TRAY PLATE on top of the FUEL TRAY RACK Press down gently to insu...

Page 10: ...With other hand firmly grasp LP Gas bottle with Regulator Valve dial control pointed downward Line up the notch in Regulator Valve with the detent located inside the nozzle end of the Burner Bar and i...

Page 11: ...heck for damaged threads dirt or debris on the Regulator Valve and the LP Gas Tank bottle REPLACE LP Gas Tank bottle or Regulator Valve if the threads are damaged LIGHTING INSTRUCTIONS DANGER NEVER us...

Page 12: ...s brushes solvents abrasive cleansers or corrosive detergents on any part of your Grill DO NOT store your grill in a damp or wet Storage Bag FOR FAST AND EASY CLEAN UP WE RECOMMEND THE FOLLOWING CLEAN...

Reviews: