background image

Check all the solder connections carefully. 

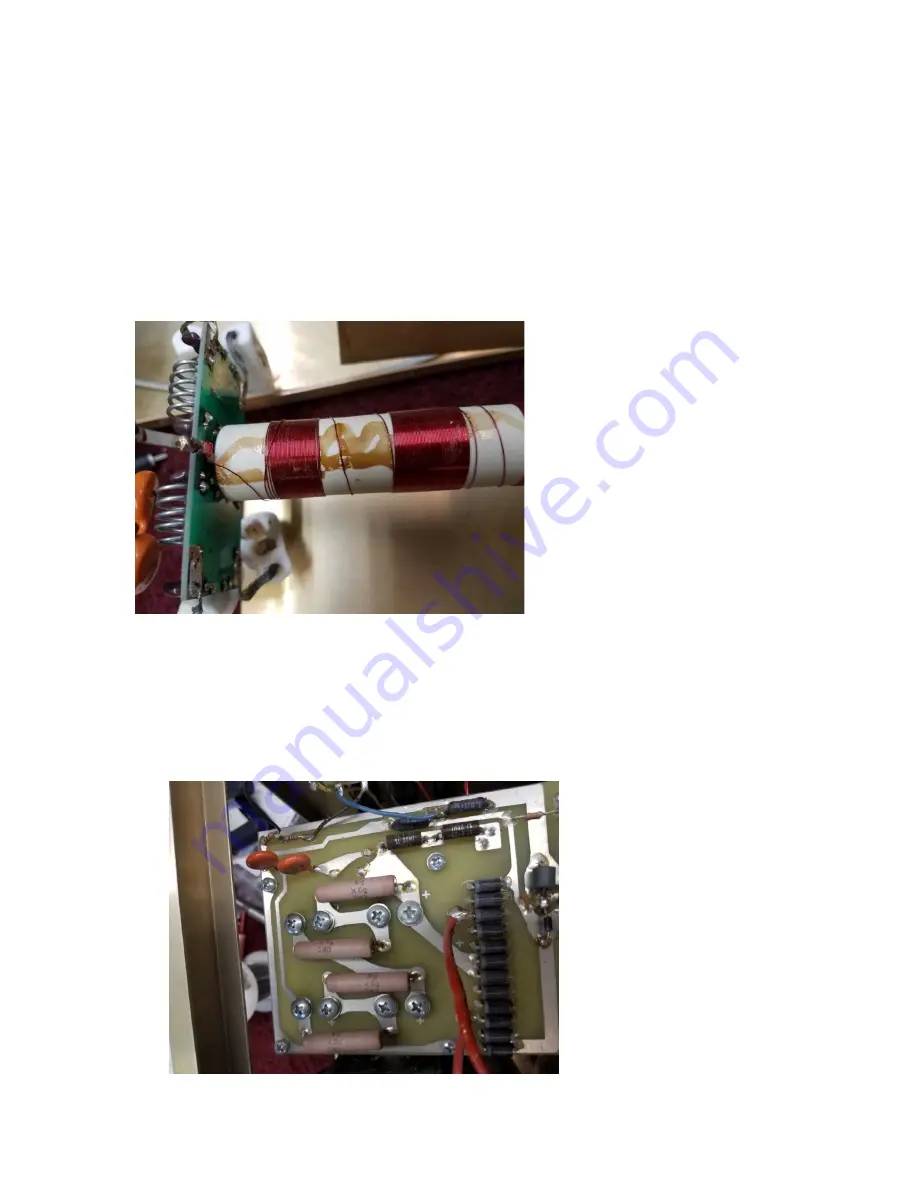
If the plate choke has loose or overlapped wires it needs to be “re-glued”. You can make your own Q-dope 
from a mix of lacquer thinner or Xylene and white styrofoam “peanuts” used for packing. Dissolve the white 

packing peanuts or other Styrofoam in thinner until it is a thick paste.  Paint the paste on the coil to hold the 
windings in position and allow it to dry.  A dot of Gorilla Glue is fairly good end-glue at winding ends.  


 (Fig. 19)

If your amplifier has tan or sand color bleeder resistors, they should be changed.  The bleeders have proven to 
be failure prone. When they fail they ruin all four electrolytic filter capacitors.  A 50k to 100K higher reliability 
resistor of suitable wattage must be used.  I sell suitable resistors and superior filter capacitors in a kit.
The small meter protection diode on the very center far right below the ferrite bead gets changed to a larger 
diode that is supplied in the kit.


Summary of Contents for AL-811H

Page 1: ...er multiplier resistors These resistors also correct a slight meter error Protection Kit 811KP 1 three application tested GDT tubes 2 one large 6A meter protection diode 3 one 100k 2 watt resistor 4 two 3 9V 5 watt Zener diodes 5 10 ohm 9 watt CCS 10kV rated fault resistor Add on part 811R200K 200 ohm 25 watt non inductive load resistor kit with hardware Information in this modification manual is ...

Page 2: ...tween 10 and 15M nulls with 10M having priority Major Concerns There have been dozens of instances of hard faults in tubes damaging radios This has been blamed on many things by many people including ALC and relay lines The actual damage is from tube arcs from gas or debris in tubes The damage comes from the tube arc energy making it out the RADIO coax connector through that coax and into the radi...

Page 3: ...nt from damaging high voltage transients induced by lightning inductive switching or electrostatic discharge This limits transient to about 350 volts absolute peak Any substitute GDT s should be vetted for performance GDT s do not clamp GDT s ionize at a certain voltage becoming a near short once ionized 2 Instructs you to directly ground grids in older version that had grid equalizing resistors T...

Page 4: ...nything worthwhile in protection and MOV s are failure prone They are too far downstream and beyond the choke to do any good for your exciter If they fail they can cause problems The AL811 three tube model normally does not require dropping the back panel unless it has defective MOV s to service The 811H back panel almost always has to be dropped This is not a big deal if your particular unit was ...

Page 5: ...Y removing the very front screw of the coupling The front screw will be a hex or Philips screw normally of standard 6 32 thread Remember to remove the front screw ONLY If you remove the rear screw you will have to re index the rear switch wafer Refer to Fig 4 Fig 4 Remove the side rails on each side Fig 5 ...

Page 6: ...ately is very inconsistent Properly wired the back panel will drop just like this only removing small screws in side rails and the rear bottom panel lip This is a properly wired panel which saves you considerable time Correctly wired panels have long transformer leads that allow rear panels to drop without removing any wiring with the exception of output coax Fig 6 Note Incorrectly wired panels wi...

Page 7: ... wire to melt free You do not want to lift foil pads off the boards from excess heat Heat the wire end with a wetted tip flat against the wire do not heat the foil This is an incorrectly wired panel The transformer leads are too short to allow the panel to fully lay down and must be unsoldered for input board or tube chassis service Fig 7 Fig 7 After rear panel removal remove any MOV s They will b...

Page 8: ... Fig 9 Fig 10 Remove MOV s do not remove capacitors ...

Page 9: ...00K resistor In these amplifiers the 100K 2 watt resistor goes from anyplace on the filament system to chassis ground Gen II board Look for the small capacitor near dual relays Fig 12 and remove it if installed The string of 6 large forward connected rectifier diodes add about 4 volts of bias ...

Page 10: ...ping MOV use The actual production board may have been altered from this layout once it left my control Fig 13 This is the working position for all back panels This is a correctly wired back panel The back panel easily slips backwards off the switch drive without any wire removal This is a two relay board and it has the string of bias diodes Fig 14 ...

Page 11: ...ft back into the switch It is a few minutes job to fix this now and it save headaches later Fig 15 Remove the tubes the terminal strip or lug in this spot by the load capacitor and the two orange 1000 pF high voltage blocking capacitors from the RF choke at the capacitor end that solders to the tank circuit above the tune capacitor Fig 16 ...

Page 12: ...osely twisted as the photo shows Fig 18 The optional 200 ohm 25 watt resistor requires drilling a 4 clearance hole deburring the hole and using heatsink compound and proper hardware 6x32 bolt with the lockwasher and a nut on it to mount the resistor The resistor connects across the neutralizing capacitor Fig 18 Lead lengths are not especially critical Ground the tube grids directly using solder lu...

Page 13: ... position and allow it to dry A dot of Gorilla Glue is fairly good end glue at winding ends Fig 19 If your amplifier has tan or sand color bleeder resistors they should be changed The bleeders have proven to be failure prone When they fail they ruin all four electrolytic filter capacitors A 50k to 100K higher reliability resistor of suitable wattage must be used I sell suitable resistors and super...

Page 14: ...acitor bank negative This diode allows the any arc energy to get from the chassis to the capacitor bank negative harmlessly bypassing meters There is plenty of room to solder The large rectifier diode in this kit replaces D16 D16 is located near the tank coil The kit diode has thick leads It can lay solder on top of the board It does not need to fit through holes Refer to Fig 22 ...

Page 15: ...as They are safe to 1 5 amperes continuous when in open air I suggest you use one Zener diode in addition to the 6 rectifiers used by Ameritron for a total of about 7 3 volts or two Zener diodes in series if your amplifier does not have any bias rectifiers There will not be any noticeable increase in IMD from the additional bias and the tubes will run a lot cooler Please look at this dissipation g...

Page 16: ...ing the white wire near the fan Strip both ends slide large heat shrink over the white wire well away from the diode s Make hook leads in the diodes Crimp and solder them to make connections Use either one or two diodes as required Fig 23 ...

Page 17: ...s necessary to keep GDT s from ticking or clicking on receive on some bands with some tubes The 100K resistor s position on the Zener is meaningless so long as the other lead can reach a ground point The resistor can also go underneath the amplifier tube chassis or on the input board In order my preferred places would be Fig 25 or 26 depending on the board s generation 1 Between a 24V pick point a...

Page 18: ...for this 100K resistor on the later boards The tap point I provided for bias or accessory use can be identified by looking for two small rectifier diodes near one of two small electrolytic capacitors If you have the back panel down and can access these points they are a slightly better point for the 100K resistor This is NOT a mandatory point it was just an intended production point when we were h...

Page 19: ...Early two relay board with 24V point for resistor Fig 26 Zener location note Zener band is toward the transformer diode is in air stream This diode has the 100K resistor elsewhere Fig 27 ...

Reviews: