background image

13 

ameriwoodhome.com

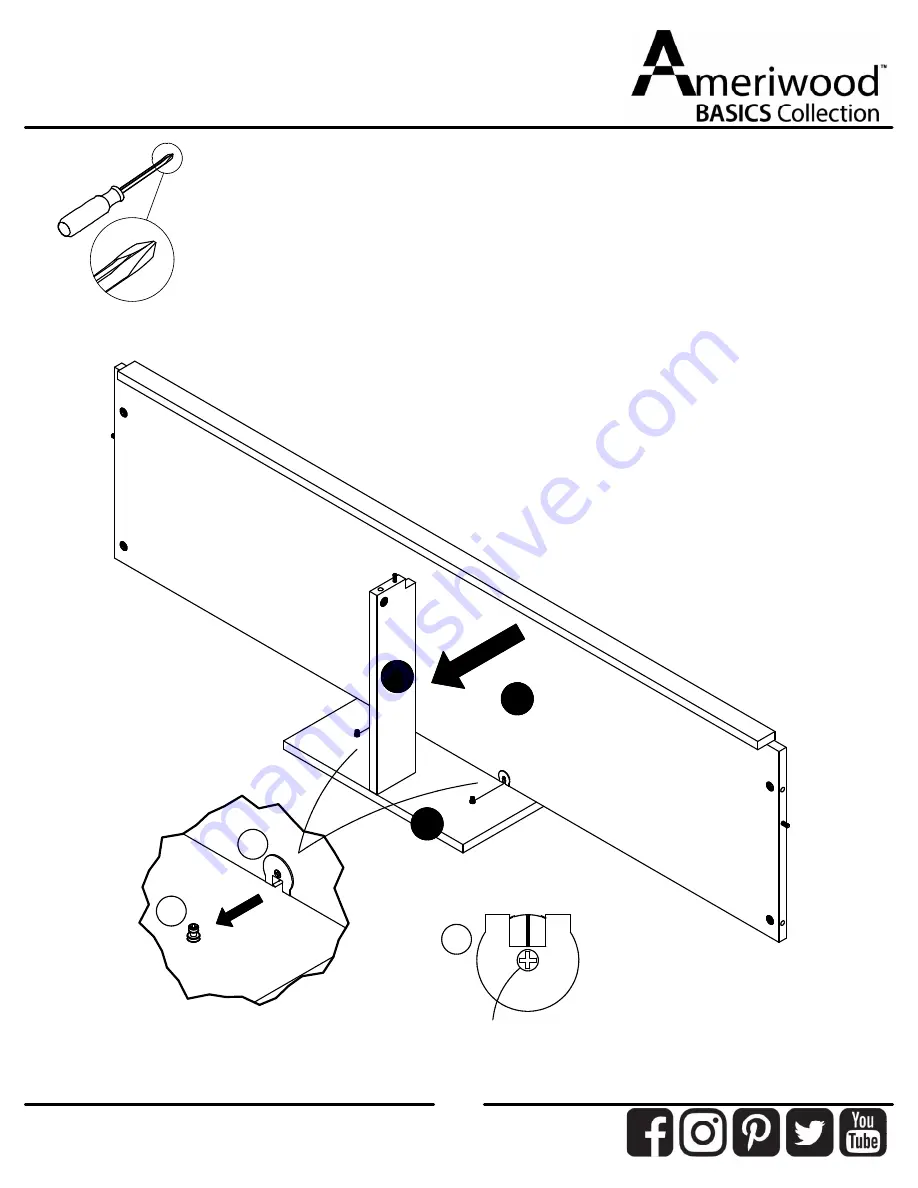
STEP7

G

F

D

4

Turn screw clockwise 

to lock in place.

4

3

Position component (F&G) from previous step as shown. Position the 

bottom (D) as shown. Press down so the connectors (4) in the bottom (D) 

engage the connector bolts (3) in the back (G). Turn the screw in the center 

of the connectors clockwise to lock in place.


The help of another person would be helpful in this step.

Summary of Contents for 1844335COM

Page 1: ...___ Lot Number Assembly Difficulty Meter Easy Tough Do Not Return This Product Contact our customer service team for help first Call 1 800 489 3351 toll free Monday Friday 9am 5pm CST Visit www ameriw...

Page 2: ...t and count the parts before attempting assembly Compression dowels are lightly tapped in with a hammer Slides are labeled with a R right and L left for proper placement Make sure to always face the p...

Page 3: ...tep carefully and follow the proper order Separate and count all your parts and hardware Give yourself enough room for the assembly process Have the following tools Flat Head Screwdriver 2 Phillips He...

Page 4: ...Left Panel 31844335010 Right Panel 31844335020 Support 31844335060 Back 31844335070 Top 31844335030 Bottom 31844335040 TV Rail 31844335050 Kick 31844335100 Top Rail 31844335110 x2 Vertical Molding 318...

Page 5: ...5 ameriwoodhome com Board Identification Not actual size A B C D E F G H H I J K...

Page 6: ...cam bolt x2 A22910 connector bolt x2 A22920 connector x7 A53510 angle bracket x4 A53840 angle bracket small x38 A12210 8 x 7 16 pan head x2 A12930 8 x 1 1 8 pan head x2 A23030 confirmat screw x6 A216...

Page 7: ...tion of CAM LOCK Tip Assembly Quick x3 A22620 x2 A22610 x2 A53510 x4 A12120 x1 A21660 1 2 10 2 2 1 1 5 7 7 10 A H Be sure the outside edge of the vertical molding H overlaps the front edge of the left...

Page 8: ...tion of CAM LOCK Tip Assembly Quick 1 x3 A22620 x2 A22610 x2 A53510 x4 A12120 x1 A21660 Be sure the outside edge of the vertical molding H overlaps the front edge of the right panel B so no raw board...

Page 9: ...9 ameriwoodhome com STEP3 1 3 1 10 x2 A22620 x2 A22910 x1 A21660 3 1 10 3 G G rear surface front surface Proper orientation of CAM LOCK Tip Assembly Quick...

Page 10: ...10 ameriwoodhome com STEP4 1 10 x1 A22620 x1 A21660 Proper orientation of CAM LOCK Tip Assembly Quick 1 10 F...

Page 11: ...tor 4 with a hammer to fully insert Be sure the connector is positioned as shown before pushing into hole 1 1 4 x4 A22620 x2 A22920 x4 A53840 x8 A12120 x2 A21660 6 7 7 4 4 Be sure the edge of the kick...

Page 12: ...12 ameriwoodhome com STEP6 9 x2 A23030 9 F G...

Page 13: ...onent F G from previous step as shown Position the bottom D as shown Press down so the connectors 4 in the bottom D engage the connector bolts 3 in the back G Turn the screw in the center of the conne...

Page 14: ...14 ameriwoodhome com STEP8 UNLOCK LOCK D A B...

Page 15: ...l E as shown Using four connecting plates 11 and screws 7 attach these two parts together Screw in two cam bolts 2 into the TV rail E and six cam bolts 2 into the top C as shown C E 2 2 2 2 2 2 2 When...

Page 16: ...STEP10 x3 A53600 x6 A12210 C E K K 7 7 7 7 5 5 Attach the top rail K to the TV rail E as shown with angle brackets 5 and screws 7 When attaching push top rail K back until it meets the connecting pla...

Page 17: ...ameriwoodhome com STEP11 UNLOCK LOCK With the help of another person position the component from step 8 onto the top C and TV rail E as shown Turn the cam locks 1 clockwise to lock in place C E A B G...

Page 18: ...x1 A22610 2 8 I F K Attached cam bolt 2 to the center molding I as shown Press the center molding I against the support F turn the cam lock 1 to lock in place Attach the center molding I to the top ra...

Page 19: ...19 ameriwoodhome com STEP13 With the help of another person stand your unit upright...

Page 20: ...3 3 This product is distributed by Dorel Home Furnishings Inc 410 East First Street South Wright City MO 63390 636 745 3351 4 Site of Manufacture Dowagiac MI 5 See front page of instruction manual for...

Page 21: ...als and discount codes Quick and easy replacement part service To register your product visit ameriwoodhome com Visit your local retailer s website rate your purchased product and leave us some feedba...

Page 22: ...l punto locaizado en la parte superior de bloqueador de leva este volteadohacia borde exterior Utilizar todos los clavos para el panel de atras y distribuirlos por igual El panel de atras debe utiliza...

Page 23: ...P gina 15 Posicione la parte superior C y la gu a de TV E como se indica Usando las cuatro placas conectoras 11 y los tornillos 7 una estas dos partes Atornille dos pernos de eje de levas 2 en la gu...

Page 24: ...ncia de pesos y l mites de televisores P gina 21 Registre su producto para recibir lo siguiente Detalles de nuevas tendencias Vistazo a lo nuevo Encuestas alec su voz entre su comunidad C digos de ofe...

Page 25: ...t Assurez vous toujours de faire face la pointe situ sur le haut de la Serrure de Came vers le bord ext rieur Utiliser tous les clous fournis pour le panneau arri re et les r partir galement Le pannea...

Page 26: ...15 Placez le haut C et la traverse de la t l vision E comme indiqu En utilisant quatre plaques de raccordement 11 et des vis 7 fixez ces deux parties ensemble Visser deux boulons came 2 dans la traver...

Page 27: ...t l vision actuelles et futures Page 21 Enregistrez votre produit pour recevoir les l ments suivantes D tails sur les nouvelles tendances un aper u sur les nouveaut s Sondages avoir une voix au sein d...

Reviews: