B349402328WPT0
0
7 /8
?? www.ameriwood.com ??
6
product collapse, and/or serious injury.
S’il-vous-plaît assurez-vous que les PANNEAUX
ARRIÈRES sont attachés solidement. Tous les clous
doivent être enfoncés perpendiculairement et solidement
dans les parties. Sinon le meuble peut devenir instable,
s’effondrer subitement et/ou causer des blessures graves.
tightened firmly. Failure to do so could cause instability,
All nails must be driven into the parts straight and
Please make sure that the Backs are attached securely.
AVERTISSEMENT
WARNING
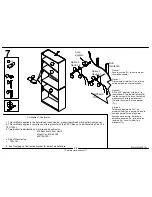
-Flush the edge of the back panel with the bottom edge of the shelf. Align squarely and
nail straight through into back edges.
-Alinie el borde del panel trasero con el borde inferior del estante. Alinee en ángulo recto
y clave derecho dentro o en los bordes traseros.
Fasten LOWER BACK PANEL (K)
second.
Use 6 nails on each side and 4 nails at
the top and bottom.
Fije en PANEL TRASERO INFERIIOR (K) segundo.
Use 6 clavos adelante cada lateral Y 4 clavos a la
cima y fondo.
Fasten UPPER BACK PANEL (L) first.
Use 8
nails on each side and 4 at the top only.
Fije el PANEL TRASERO SUPERIOR (L) primero. Use
8 clavos adelante cada lateral y 4 clavos a la cima sólo.
raw surface
superficie cruda
surface crue
raw surface
superficie cruda
surface crue
F
A
2nd
1st
L
K
x40
-Flush the edge of the
back panel with the top
edge of the shelf. Align
squarely and nail straight
through into back edges.
-Alinie el borde del panel
trasero con el borde
superior del estante.
Alinee en ángulo recto y
clave derecho dentro o
en los bordes traseros.
4
4
Summary of Contents for 9402328WP
Page 2: ......


