background image


Operation


Alu Ramp


Page 31 of 56 


WARNING! 

Risk of injury if the electrically operated belts loosen when 
driving. 

If the electrically operated belts are unevenly tensioned,
they can become loose when driving. There is a risk of the
passenger in the wheelchair and of the other occupants in
the vehicle being injured. 

Therefore: 


Push the wheelchair into the centre of the vehicle. 


Make sure that the electrically operated belts leave the
belt reels at the same angle as one another. 


If this is not the case, re-position the wheelchair. 

Ö


Attach the retractor belts to the wheelchair. 

Ö


Clip the retractor belts onto the fittings in the rear area of 

the floor of the vehicle (see Figure 4, page 18). 

Ö


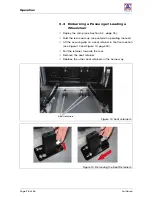
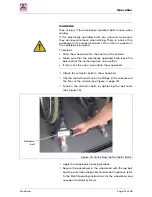
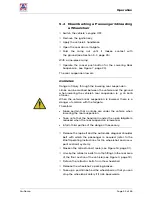
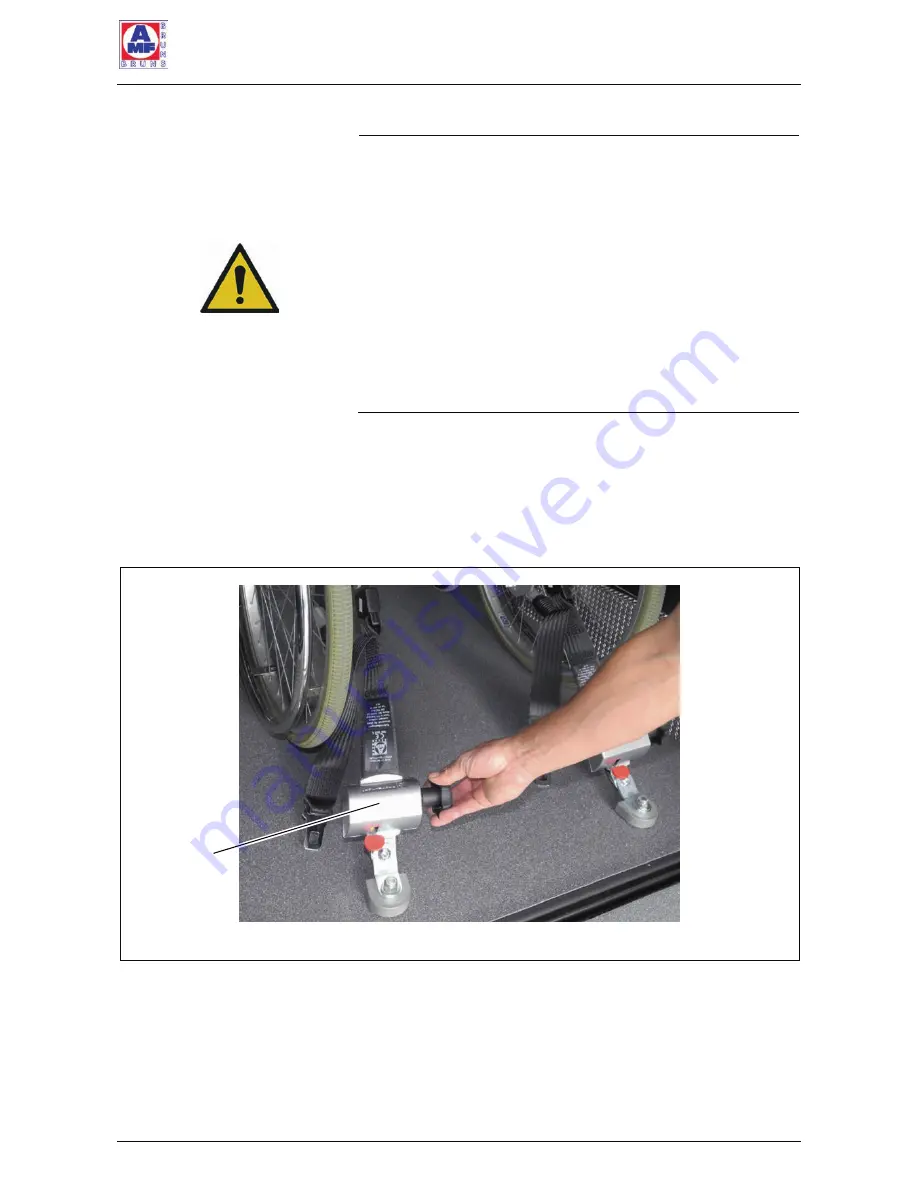
Tension the retractor belts by tightening the belt reels 

(see Figure 16). 


Figure 16: Tensioning the Retractor Belts

Ö


Apply the wheelchair's parking brakes. 

Ö


Secure the passenger in the wheelchair with the lap belt 

and the automatic diagonal shoulder belt (optional, refer 

to the Brief Operating Instructions for the wheelchair and 

occupant restraint system).  

Retractor 

belt


Summary of Contents for Alu Ramp

Page 1: ...Operating Instructions WHEELCHAIR ACCESS VEHICLE WITH REAR CUT OUT www amf bruns de CITRO N BERLINGO PEUGEOT PARTNER WITH AMF BRUNS ALU RAMP...

Page 2: ......
Page 3: ...e If you sell the vehicle hand these Operating Instructions over to the new owner All details figures and dimensions contained in these Oper ating Instructions are non binding No claims in any form ca...

Page 4: ...ill lead to serious or fatal injuries if not avoided WARNING warns of a potentially dangerous situation which will lead to serious or fatal injuries if not avoided CAUTION warns of a potentially dange...

Page 5: ...pose These are identified as follows Lists Instructional text e g a sequence of activities 3 Meaning of directions If directions are given in the text in front of front behind rear right left these di...

Page 6: ...sal 14 2 Description 15 2 1 Layout and Function 15 2 1 1 Ramp 16 2 1 2 Floor section 17 2 1 3 Belts and belt anchorages 18 2 2 Hydraulic Lowering Rear Suspension 19 2 3 Rating Plate 19 2 4 Operating C...

Page 7: ...sting the Electrically Operated Belts 37 6 4 Yearly Inspection 38 6 5 Maintenance and Inspection Record 39 7 De Commissioning and Conservation 40 8 Faults and Troubleshooting 41 8 1 Alu Ramp 41 8 2 Lo...

Page 8: ...handling and trouble free operation of the Alu Ramp and optional Lowering Rear Suspension is a thorough knowledge of the applicable safety information and the safety regulations It is therefore impera...

Page 9: ...n is used exclu sively to temporarily lower and raise the vehicle s rear sus pension By doing this a gentler gradient for a one piece Alu Ramp is achieved via which persons in wheelchairs can be embar...

Page 10: ...quirements The Alu Ramp and the optional Lowering Rear Suspension must only be handled by persons who have been instructed in how to operate the Alu Ramp and Lowering Rear Suspension have read and und...

Page 11: ...ly be carried out with the prior agree ment of AMF Bruns GmbH Co KG The costs of such work will not be accepted by AMF Bruns without prior agreement 1 5 Danger Zone The danger zone is the area behind...

Page 12: ...trol 1 7 Safety and Accident Prevention Regulations Adhere to the following notes in order to prevent personal injuries and material damage For commercial use also ad here also to the relevant safety...

Page 13: ...st be inspected by a technical expert at intervals of not more than 1 year after commissioning During inspection faults affecting the safety should be systematically identified and remedial action tak...

Page 14: ...Disposal When the Alu Ramp the Lowering Rear Suspension and ve hicle s useful life has expired they must only be be disposed of by qualified specialists The manufacturer will accept no liability for d...

Page 15: ...the Alu Ramp are the ramp the floor section belts and belt anchorages for securing the wheelchair The aim of this chapter is to illustrate the construction and function of the Alu Ramp To this end th...

Page 16: ...econd section effectively lessens the gradient of the ac cess ramp when it is extended In the deployed position the access ramp provides a slope via which wheelchairs can be easily pushed or driven in...

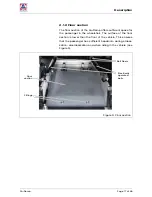
Page 17: ...passenger in the wheelchair The surface of the floor section is lower than the floor of the vehicle This ensures that the passenger has sufficient headroom during embar kation disembarkation and when...

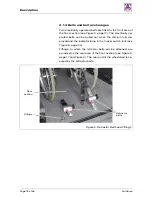
Page 18: ...an be pulled out when the ramp is fully de ployed and the indicator lamp in the rocker switch is lit see Figure 6 page 20 Fittings to which the retractor belts can be attached are provided on the rear...

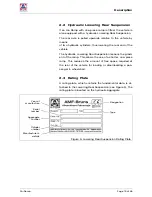
Page 19: ...spension lessens the gradi ent of the ramp This allows the use of a shorter one piece ramp This reduces the amount of free space required at the rear of the vehicle for loading or disembarking a pas s...

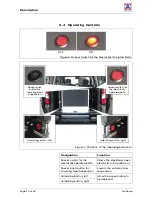
Page 20: ...electrically operated belts Allows the electrically oper ated belts to be pulled out Rocker push button for Lowering Rear Suspension Lowers the vehicle s rear suspension Unlatching button left Allow t...

Page 21: ...ing Rear Suspension Designation Lowering rear suspension Permissible operating pressure 80 bar Raise through own spring pressure Lower Power aggregate Lifting speed adjustable Operating control voltag...

Page 22: ...e vehicle Such risks can not only occur during installation but also as a result of installation not being carried out correctly Therefore Installation must only be carried out by specialist person ne...

Page 23: ...erial damage if the Alu Ramp is oper ated by unauthorised persons Dangerous operating conditions may be caused if the Alu Ramp is operated by unauthorised persons Therefore The Alu Ramp must only be o...

Page 24: ...k of injury if there is insufficient space to operate the Alu Ramp If there is insufficient space to leave or to get onto the ac cess ramp there is a risk of being injured by the access ramp or other...

Page 25: ...hicle s engine OFF Remove the ignition key Apply the vehicle s handbrake Open the rear doors tailgate Press the unlatching buttons at both sides of the ramp see Figure 8 Figure 9 and Figure 7 page 20...

Page 26: ...he ramp There is a risk of injuries to the legs and feet if the ramp is allowed to fall to the ground out of control The ramp can be damaged There is a risk of crushing between the two sections of a t...

Page 27: ...n Limbs can be crushed between the vehicle and the ground when lowering the vehicle s rear suspension e g on kerb stones When the vehicle s rear suspension is lowered there is a danger of collision wi...

Page 28: ...ear seats up see vehicle s operating manual Lift the securing clip on a seat retainer in the floor section see Figure 12 and Figure 13 page 28 Pull the retainer towards the rear Remove the seat retain...

Page 29: ...n the glove compartment Accompany the wheelchair to a position in front of the deployed ramp Switch the motor of an electrically driven wheelchair OFF Operate the rocker switch for the electrically op...

Page 30: ...s out DANGER Risk of injury through the wheelchair rolling backwards The floor section and the access ramp form a slope via which the wheelchair can roll back out of control The passenger in the wheel...

Page 31: ...eave the belt reels at the same angle as one another If this is not the case re position the wheelchair Attach the retractor belts to the wheelchair Clip the retractor belts onto the fittings in the r...

Page 32: ...lu Ramp When stowing the ramp there is a risk of crushing fingers and hands between the frame of the ramp and the vehicle s rear bumper Therefore Do not reach into the gap between the frame of the ram...

Page 33: ...ere is a danger of collision with the tailgate Therefore Make certain that no limbs are under the vehicle when lowering the rear suspension Take note that the headroom under the open tailgate is reduc...

Page 34: ...switch such that the indicator lamp in the rocker switch lights up see Figure 6 page 20 Accompany the passenger out of the vehicle Detach the electrically operated belts from the wheel chair Allow the...

Page 35: ...or repair pur poses WARNING Risk of injury and material damage if maintenance and repair work is not carried out correctly Therefore Only allow specialist personnel to carry out maintenance and repai...

Page 36: ...ny unusual noises during operation and jud dering when raising or lowering the hydraulic lowering rear suspension Initiate repairs if necessary yearly Inspect the hydraulic hoses Check that all fasten...

Page 37: ...he rocker switch for the electrically operated belts such that the indicator lamp in the rocker switch goes out Try to pull the electrically operated belts out Operate the rocker switch for the electr...

Page 38: ...covers the following the condition of all components and devices an inspection for any modifications that may have been made to the Alu Ramp and the Lowering Rear Suspen sion if fitted the completenes...

Page 39: ...Maintenance and Repair Alu Ramp Page 39 of 56 6 5 Maintenance and Inspection Record Maintenance work carried out Date Signature Remarks work carried out...

Page 40: ...issioning and Conservation Page 40 of 56 Alu Ramp 7 De Commissioning and Conserva tion For queries regarding de commissioning and conservation contact our customer services department see Chapter 12 p...

Page 41: ...table 8 1 Alu Ramp Fault possible Cause Remedial Measures The ramp does not de ploy or stow correctly Foreign objects blocking the latching mechanisms Inspect the latching mecha nisms and remove fore...

Page 42: ...The electrical or hydraulic sys tem is defective Have the lowering rear sus pension checked in a special ist workshop The vehicle does not raise The lowering valve is jammed or defective Have the low...

Page 43: ...technical expert is someone who by virtue of their tech nical training and experience has sufficient knowledge in the field of access ramps for disabled vehicles and the hy draulic lowering rear susp...

Page 44: ...Inspection Log Master Data Sheet Alu Ramp Master Data Sheet Serial No Type Number plate Owner Year built Commissioned on Lowering Rear Suspension Master Data Sheet Serial No Type Number plate Owner Ye...

Page 45: ...Functional test and visual inspection of the condition of the entire Alu Ramp Hydraulic system Power and hydraulic aggregate Functional check of the valves Hydraulic hoses Inspect all hydraulic hoses...

Page 46: ...mmissioning To be observed if installed by a third party company Installation inspection for Ser No Type Alu Ramp Ser No Type Lowering Rear Suspension Number plate Installation has been carried out co...

Page 47: ...Lowering Rear Suspension if fitted was subject to a periodic inspection in accordance with the check list a re inspection on No the following defects were found There are no issues to preclude continu...

Page 48: ...Lowering Rear Suspension if fitted was subject to a periodic inspection in accordance with the check list a re inspection on No the following defects were found There are no issues to preclude continu...

Page 49: ...Lowering Rear Suspension if fitted was subject to a periodic inspection in accordance with the check list a re inspection on No the following defects were found There are no issues to preclude continu...

Page 50: ...Lowering Rear Suspension if fitted was subject to a periodic inspection in accordance with the check list a re inspection on No the following defects were found There are no issues to preclude continu...

Page 51: ...Lowering Rear Suspension if fitted was subject to a periodic inspection in accordance with the check list a re inspection on No the following defects were found There are no issues to preclude continu...

Page 52: ...Lowering Rear Suspension if fitted was subject to a periodic inspection in accordance with the check list a re inspection on No the following defects were found There are no issues to preclude continu...

Page 53: ...Figure 18 Electrical Circuit Diagram 40 A 100 A Door contact switch Battery 12 V Electrically operated belts Rocker switch for the electrically operated belts Lower rocker push button Solenoid valve C...

Page 54: ...Hydraulic Circuit Diagram Page 54 of 56 Alu Ramp 11 Hydraulic Circuit Diagram Figure 19 Hydraulic Circuit Diagram Vehicle floor left right...

Page 55: ...problems or queries The address is AMF Bruns GmbH Co KG Hauptstra e 101 D 26689 Apen Tel 49 0 44 89 72 72 30 Fax 49 0 44 89 62 45 service hubmatik amf bruns de www amf bruns de NOTE Guarantee work on...

Page 56: ...Art No 10022356 04 2017 AMF Bruns GmbH Co KG Hauptstra e 101 26689 Apen Telephone 49 0 4489 72 72 30 Fax 49 0 4489 62 45 service hubmatik amf bruns de www amf bruns de Reg No Q1 0105027...

Reviews: