6
C
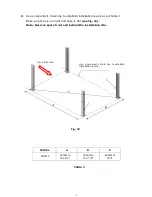
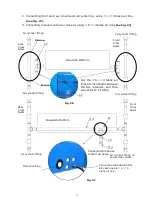
. Use a carpenter’s chalk line to establish installation layout as per Table 1
Make sure the size is right and base is flat
(see Fig. 10).
Note:
Reserve space front and behind the installation site.
Table 1
MODEL
A
B
C
PRO-14
5500mm
216 1/2”
3324mm
130 7/8”
6426mm
253”
Use a carpenter’s chalk line to establish
installation layout
Car in Direction
Fig. 10
Summary of Contents for PRO-14
Page 1: ...FOUR POST LIFT PRO 14...
Page 2: ......
Page 4: ......
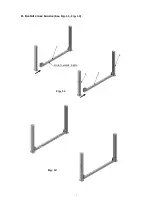
Page 11: ...7 D Install cross beams See Fig 11 Fig 12 Fig 11 Hole towards inside 1 3 2 3 Fig 12...
Page 25: ...21 O Install spring and safety cover of cross beam See Fig 34 Fig 34 3 3 3 8 40 3 2 Fig 33...
Page 27: ...23 IV EXPLODED VIEW Model PRO 14 Fig 36...
Page 28: ...24 3 73 74 CROSS BEAM CYLINDERS Fig 37 Fig 38...
Page 29: ...25 MANUAL POWER UNIT Fig 39 220V 50HZ 1 phase 380V 50HZ 3 phase...
Page 39: ......


