background image

8.  Check   that  the voltage   (230V  ~50  Hz)  stated   on  the  rating  plate  is   consistent  with  the
parameters your house’s electricity supply, and that the supply is marked as ~ (AC).
ATTENTION: before connecting the cooker hood to the power supply, always check that the
power lead is correctly attached and has NOT been crushed by the hood during installation.
9. If the power lead is damaged, it should be replaced by a qualified electrician.
10.   The   appliance   was   properly   packaged   for   transportation   to   prevent   damage.   After
unpacking   it,   please   dispose   of   the   packaging   elements   in   an   environmentally   friendly
manner.
None of the materials used in the packaging are harmful to the natural environment. They are
100% recyclable and are marked with the appropriate symbol. 

Important! The packaging materials (polythene bags, foam plastic, etc.) should be kept away
from children during unpacking.
11. This appliance is not intended for use by persons (including children) of limited physical,
sensory or mental capacity, or by those inexperienced or unfamiliar with the appliance, unless
under supervision or in accordance with the operating instructions as explained to them by
those responsible for their safety.
Children must not be allowed to play with the hood.

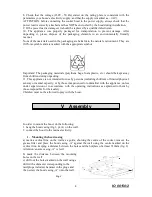
In order to mount the hood, do the following:
1. hang the hood casing (fig.1, pt. A) on the wall,
2. connect the hood to the mains electricity.

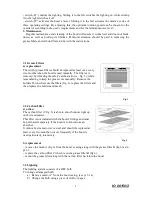
1. Mounting the hood casing 

a) mark a vertical line on the wall as a guide, showing the centre of the cooker, remove the
grease filter and place the hood casing „A” against the wall using the centre marked on the
vertical line, keeping a distance between the holes and the hotplate of at least 710mm (fig. 2).
Attention: ensure casing „A” is level.

b)   mark   the   distance   between   the   mounting
holes on the wall
c) drill out the holes marked on the wall using a
drill with a diameter corresponding to the
rawlplugs included, hammer in the plugs and
then screw the hood casing „A” onto the wall. 


Fig.3

IO  00150


 /2


V

Assembly

5

Summary of Contents for OSC 5458 I

Page 1: ...OPERATING AND MAINTENANCE MANUAL COOKER HOOD OSC 6468 W OSC 5468 W OSC 6458 I OSC 5458 I IO 00150 2 ...

Page 2: ...IO 00150 2 2 ...

Page 3: ...perating instructions The function of the OSC 6468 W OSC 5468 W OSC 6458 I OSC 5458 I is to extract or neutralise kitchen fumes and it is designed to be permanently mounted over a gas or electric cooker To operate in fume extraction mode it requires an off take pipe to be fitted to transport the fumes outside This pipe ø 120 mm should be no longer than 4 5 m After installing an active carbon filte...

Page 4: ... from the burner the flame should be turned down to a minimum 4 Food should not be cooked on fat or oil without constant supervision as these may catch fire when overheated 5 The cloth grease filter should be replaced or aluminium filter cleaned depending on the model at least once every two months owing to the risk of fire saturated fat is flammable 6 The hood must be unplugged prior to cleaning ...

Page 5: ...e is not intended for use by persons including children of limited physical sensory or mental capacity or by those inexperienced or unfamiliar with the appliance unless under supervision or in accordance with the operating instructions as explained to them by those responsible for their safety Children must not be allowed to play with the hood In order to mount the hood do the following 1 hang the...

Page 6: ... an additional carbon filter should be installed fig 6 see below In addition the mode change switch should be positioned downwards so that the cleansed air is passed back onto the cooker This switch is found on the side of the front part of the motor body inside the hood 1 Safe Operation Follow the safety instructions given in part IV Cloth grease filters and carbon filters used in absorption mode...

Page 7: ... safety catches arrows fig 5 while remembering to keep the pins secure manually Remove the holders D which secure the filters fig 6 replace the filters and then replace the holders and mesh Fig 5 3 2 Carbon Filter a action The carbon filter C fig 6 is able to absorb odours right up until it is saturated This filter is not included with the hood s fittings and must be purchased separately if the ho...

Page 8: ...he cooker hood do not use solvents or alcohol as they may tarnish lacquered surfaces corrosive or abrasive substances particularly when cleaning stainless steel surfaces It is best to use a damp cloth or neutral liquid cleaning agents IO 00150 2 8 ...

Page 9: ...ce to recycling collection center you show that you care about nature Ask your local environmental care authority for information on location of such facilities Manufacturer s declaration The manufacturer hereby declares that the appliance fulfils the requirements of the following European directives The Low Voltage Directive 2006 95 EC The Electromagnetic Compatibility Directive 2004 108 EC and t...

Reviews: