background image

     www.amico.com     

15

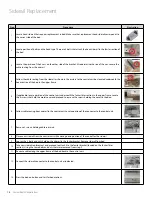
Siderail Replacement

Step

Procedure

 Illustration

14

Raise fowler section completely up to ensure that no wires are caught during the motion of the fowler.

15

Zip tie all loose cables as needed.

16

If applicable, place control unit back in place and proceed to close with 4 screws that were removed in step 5.

17

After completion, switch siderail on again and test bed motions.

Safety Tips

BRAKES


WARNING: 

Unless transporting the patient, always set the brakes when the bed is occupied. Reconfirm that 

the brakes are set before any patient transfer. Failure to do so may result in injury or equipment damage. 

Patients often use the bed for support when getting out of the bed and could be injured if the bed moves 

unexpectedly. After setting the brakes, push and pull the bed to make sure it is stable.

SIDERAILS/RESTRAINTS/PATIENT MONITORING

 WARNING:

 Evaluate patients for entrapment risk according to facility protocol and monitor patients 

appropriately. Make sure that all siderails are fully latched when in the raised position. Failure to do either of 

these could result in serious injury or death.

NOTE:

 Siderails are intended to be a reminder to the patient of the bed’s edge, not a patient-restraining device. When 

appropriate, Amico recommends that medical personnel determine the proper methods necessary to make sure a 

patient remains safely in the bed.

Siderails may serve several beneficial uses including providing an edge reminder and bed exit assist. The uses of 

siderails may also provide a sense of security. The use of siderails in any position should be appropriate for the 

patient’s need, after assessing any risk factors according to the facility protocols for safe positioning. 

When raising the siderails, a click indicates that the siderails are completely raised and locked in place. Once the click is 

heard, gently pull on the siderail to make sure it is latched correctly in position.

 WARNING: 

Patient restraints are not intended as substitutes for good nursing practices. Physical restraints, 

even properly installed, can result in entanglement, physical injury, or death, particularly with agitated and 

disoriented patients. Monitor patients when using physical restraints in accordance with legal requirements 

and facility protocols.

1.  Develop guidelines for all patients, indicating:

•  Which patients may need to be restrained and the appropriate restraint to utilize.
•  The proper method to monitor a patient, whether restrained or not, including time interval, visual check of 

restraint, etc.

Summary of Contents for B-E-AC802

Page 1: ...Operation Maintenance Manual ICU Series B E AC802 Bed...

Page 2: ...Headboard Footboard 10 Central Locking System 11 Locking the Bed 11 Unlocking the Bed 11 Using the CPR Release Lever 11 Siderails 11 Lowering Siderails 11 Raising Siderails 11 Electrical 12 Standard F...

Page 3: ...he caregivers The battery back up system provides peace of mind during transportation or unexpected power outages allowing the bed positions to be adjusted accordingly This Manual provides instruction...

Page 4: ...h way the bed will move when the pedal is pressed Stretcher up control Shows which way the bed will move when the pedal is pressed Trendelenburg control Puts the bed in the Trendelenburg position Reve...

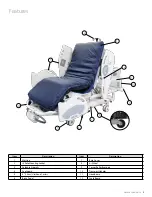
Page 5: ...0 11 Item Description Item Description 1 Mattress 7 Base Cover 2 IV Pole Mounting Socket 8 5th Wheel 3 Foldable Siderails 9 Corner Roller Bumpers 4 Footboard 10 Transport Handles 5 5 13 cm Urethane Ca...

Page 6: ...including the bed surface is 500 lbs 227 kg WARNING Entering and exiting the bed has to be done at the side with the side rails lowered completely WARNING Avoid sitting at the extreme ends of the bed...

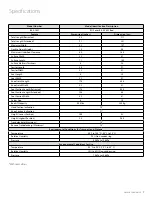
Page 7: ...44 5 Knee Gatch Width 32 81 Foot Section Length Retracted 17 5 44 5 Foot Section Length Extended 25 5 65 Foot Section Width 32 81 Caster Size 6 15 Bed Lift Capacity 550 lbs 250 kg Head Section Inclina...

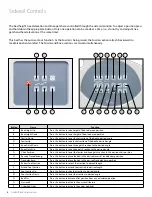
Page 8: ...wler section of the bed to desired angle E Knee Gatch Down Press this button to lower knee gatch section to the desired angle F Knee Gatch Up Press this button to raise knee gatch section to the desir...

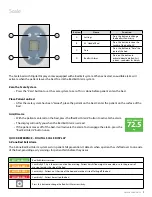
Page 9: ...Disarm With the patient centered on the bed press the Bed Exit Alarm button to activate the alarm The display will notify you when the Bed Exit Alarm is armed If the patient moves off of the bed it wi...

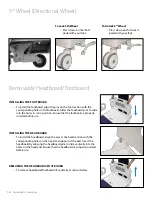
Page 10: ...e use INSTALLING THE HEADBOARD To install the headboard align the pins at the head section with the corresponding holes on the head end support of the bed Insert the headboard by allowing the headboar...

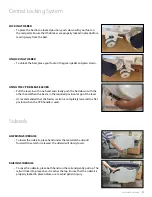
Page 11: ...r hand When the bed is in the required position let go of the lever It s recommended that the fowler section is completely lowered to a flat position when the CPR handle is used Siderails LOWERING SID...

Page 12: ...and Down Chair Position This product also comes with a battery backup system which is made up of two sealed lead acid 12 V batteries located in the control unit box The backup battery is rechargeable...

Page 13: ...djustors for signs of loosening or damage If the adjustors are loose tighten them down If the adjustors have been damaged have them replaced immediately d If problem persists please contact your Amico...

Page 14: ...unit underneath the fowler litter section in the upper frame Locate the 4 screws that hold the metal cover and proceed to remove the screws holding the cover to the bed 6 Follow cable routing from sid...

Page 15: ...r to the patient of the bed s edge not a patient restraining device When appropriate Amico recommends that medical personnel determine the proper methods necessary to make sure a patient remains safel...

Page 16: ...AUTION Before moving the bed make sure that power cords hoses and other equipment are properly stored Failure to do so could result in equipment damage CAUTION Do not push or pull the bed by IV poles...

Page 17: ...ce WARNING Only facility authorized personnel should service the B E AC802 bed Servicing performed by unauthorized personnel could result in personal injury or equipment damage The B E AC802 bed requi...

Page 18: ...eing applied to the product strictly adhere to the Bleach Cleaning Instructions Do not use a water temperature of more than 50 C or F All Surfaces For mattresses please refer to mattress cleaning inst...

Page 19: ...additional period of two 2 years three 3 years from the date of shipment Within this period Amico Beds Corporation will replace any part which is proven to be defective at no charge Shipping and Inst...

Page 20: ...o com AB IM B E AC802 ICU BED 08 18 2022 Amico Beds Corporation 85 Fulton Way Richmond Hill ON L4B 2N4 Canada Toll Free Tel 1 877 462 6426 Tel 905 764 0800 Fax 905 764 0862 Email info amico com www am...

Reviews: