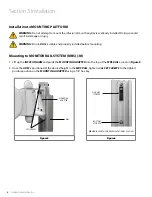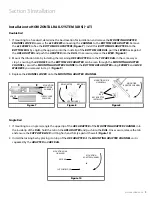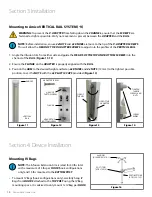
12
Amico Accessories Inc.
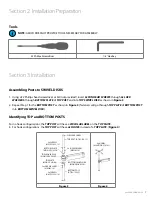
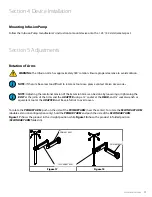
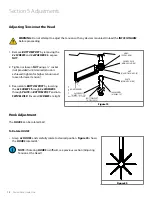
1. Remove
BOTTOM POST
by removing the
3x SCREWS
and
3x
WASHERS
to expose
NUT
.
2. Tighten or loosen
NUT
using a ½
"
socket
(not provided) until desired tension is
achieved (tighten for higher tension and
loosen for lower tension).
3. Reassemble
BOTTOM POST
by inserting
the
3x
SCREWS
through
3x
WASHERS
through
PLATE
in
BOTTOM POST
and into
SWIVEL DISK
. Ensure all
SCREWS
are tight.
Section 5: Adjustments
Hook Adjustment
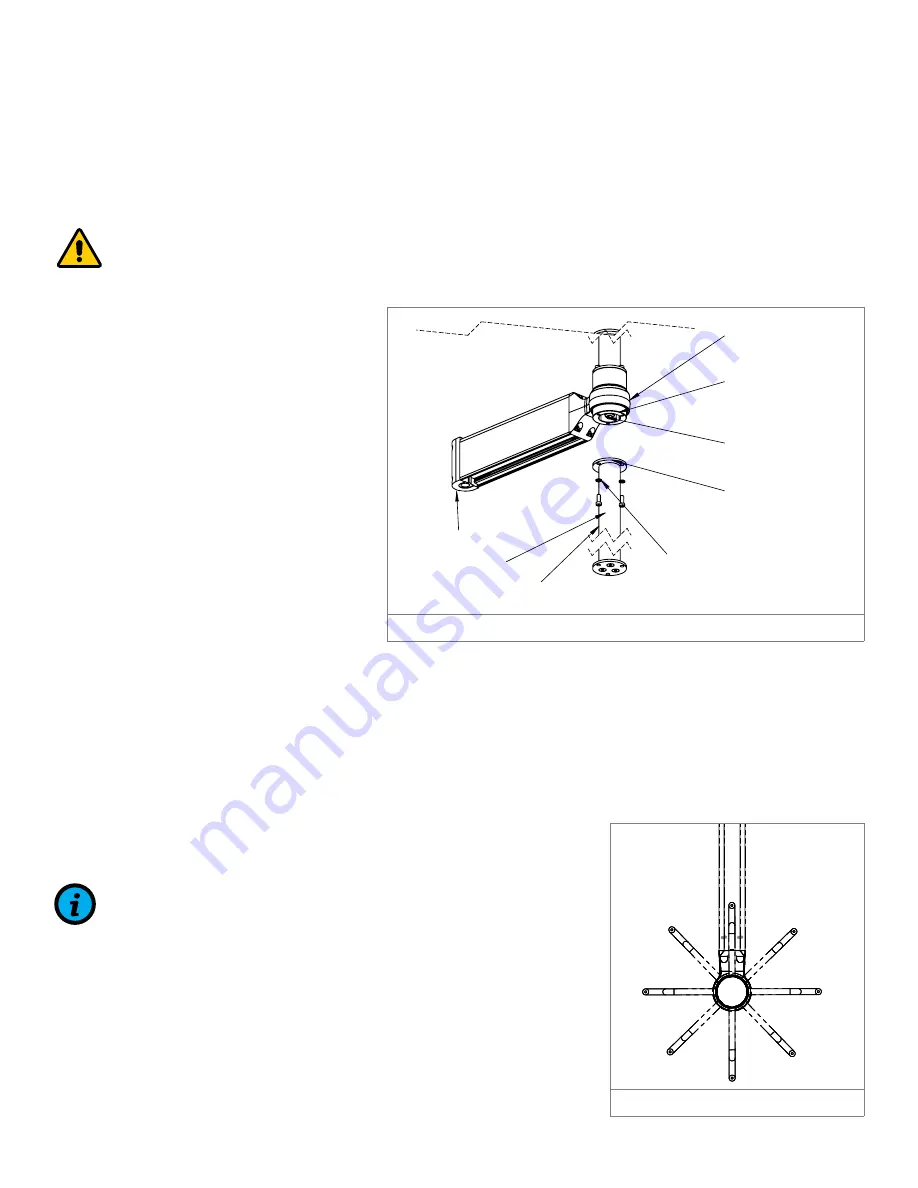
The
HOOKS
can be rotated 360°.
To Rotate
HOOKS
• Grasp
2x HOOKS
and carefully rotate to desired position.
Figure 20
shows
the
HOOKS
rotated 45°.
NOTE:
If rotating
HOOKS
is difficult, see previous section (Adjusting
Tension at the Head).
HEAD
[X-LPM-ADA]
BOTTOM POST
[X-TRI-125-12]
3 x SCREWS
[H-MPF-1032-12]
3 x WASHERS
[H-WLM-10]
PLATE
[MON-CPU-DISK]
SWIVEL DISK
[MON-SWIV-DISK]
NUT
[H-LNUT-M8-NYL-FL]
ADAPTER END
PROJECT #: 617
FOR USE WITH INE-___-12-12-__
CUSTOMER
Adjustments:
WARNING: The
INE ARM(s)
has approximately 180 rotation. Ensure proper clearance to avoid collision.
NOTE: If the arm becomes difficult to rotate, or too loose, please contact Amico Accessories: 1-877-264-2697
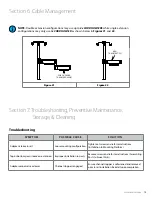
NOTE: Adjusting the rotational tension of the extension arms can be done by loosening or tightening the bolt at
the joints of the arms and the adapter using a 1/2" socket at the
HEAD
and 3/4” socket wrench or equivalent tool at the adapter
end. Be careful not to overloosen.
Adjusting Tension at the
HEAD
:
WARNING: Do not attemp to adjust the tension with any devices mounted to the
INE,
unload the
INE
before proceeding.
Remove
BOTTOM POST
by removing the 3 x
SCREWS
and 3 x
WASHERS
to expose
NUT
.
1.
Tighten or loosen
NUT
using a 1/2" socket (not provided) until desired tension is achieved (tighten for higher tension and
2.
loosen for lower tension).
Reassemble
BOTTOM POST
by inserting the 3 x
SCREWS
through 3 x
WASHERS,
through
PLATE
in
BOTTOM POST
3.
and into
SWIVEL DISK
. Ensure all
SCREWS
are tight.
.
5
4
3 2
1
DESCRIPTION:
PART NO:
SCALE:
DRAWN BY:
CHECKED BY:
SHT.
OF
DRAWING NO:
NTS
4
6
PRIVATE AND CONFIDENTIAL
THIS PRINT IS PROPERTY OF AMICO ACCESSORIES
AND IS LOANED IN CONFIDENCE SUBJECT TO RETURN
UPON REQUEST AND WITH THE UNDERSTANDING THAT
NO COPIES ARE TO BE MADE WITHOUT THE CONSENT
OF AMICO ACCESSORIES
ALL RIGHTS TO DESIGN OR INVENTION ARE RESERVED
DATE:
DATE:
-
HP
2018-01-19
-
-/-/-
85 Fulton Way
Richmond Hill, Ontario
L4B 2N4, Canada
Toll Free: 1.877.264.2697 (T)
Tel: (905) 763.7778
Fax: (905) 763.8587
-
INE-___-12-12-__-__
20180119-4415
PROJECTION
www.amico.com
HEAD
[X-LPM-ADA]
BOTTOM POST
[X-TRI-125-12]
3 x SCREWS
[H-MPF-1032-12]
3 x WASHERS
[H-WLM-10]
PLATE
[MON-CPU-DISK]
SWIVEL DISK
[MON-SWIV-DISK]
NUT
[H-LNUT-M8-NYL-FL]
ADAPTER END
PROJECT #: 617
FOR USE WITH INE-___-12-12-__
CUSTOMER
Adjustments:
WARNING: The
INE ARM(s)
has approximately 180
rotation. Ensure proper clearance to avoid collision.
NOTE: If the arm becomes difficult to rotate, or too loose, ple
ase contact Amico Accessories: 1-877-264-2697
NOTE: Adjusting the rotational tension of the extension arms ca
n be done by loosening or tightening the bolt at
the joints of the arms and the adapter using a 1/2" socket at t
he
HEAD
and 3/4” socket wrench or equivalent tool at the adapter
end. Be careful not to overloosen.
Adjusting Tension at the
HEAD
:
WARNING: Do not attemp to adjust the tension with any devices m
ounted to the
INE,
unload the
INE
before proceeding.
Remove
BOTTOM POST
by removing the 3 x
SCREWS
and 3 x
WASHERS
to expose
NUT
.
1.
Tighten or loosen
NUT
using a 1/2" socket (not provided) until desired tension is ach
ieved (tighten for higher tension and
2.
loosen for lower tension).
Reassemble
BOTTOM POST
by inserting the 3 x
SCREWS
through 3 x
WASHERS,
through
PLATE
in
BOTTOM POST
3.
and into
SWIVEL DISK
. Ensure all
SCREWS
are tight.
.
5
4
3
2
1
DESCRIPTION:
PART NO:
SCALE:
DRAWN BY:
CHECKED BY:
SHT.
OF
DRAWING NO:
NTS
4
6
PRIVATE AND CONFIDENTIAL
THIS PRINT IS PROPERTY OF AMICO ACCESSORIES
AND IS LOANED IN CONFIDENCE SUBJECT TO RETURN
UPON REQUEST AND WITH THE UNDERSTANDING THAT
NO COPIES ARE TO BE MADE WITHOUT THE CONSENT
OF AMICO ACCESSORIES
ALL RIGHTS TO DESIGN OR INVENTION ARE RESERVED
DATE:
DATE:
-
HP
2018-01-19
-
-/-/-
85 Fulton Way
Richmond Hill, Ontario
L4B 2N4, Canada
Toll Free: 1.877.264.2697 (T)
Tel: (905) 763.7778
Fax: (905) 763.8587
-
INE-___-12-12-__-__
20180119-4415
PROJECTION
www.amico.com
ADAPTER END
3x SCREWS
[H-MPF-1032-12]
BOTTOM POST
[X-TRI-125-12]
3x WASHERS
[H-WLM-10]
PLATE
[MON-CPU-DISK]
NUT
[H-LNUT-M8-NYL-FL]
SWIVEL DISK
[MON-SWIV-DISK]
HEAD
[X-LPM-ADA]
Figure 19
HEAD
[X-LPM-ADA]
BOTTOM POST
[X-TRI-125-12]
3 x SCREWS
[H-MPF-1032-12]
3 x WASHERS
[H-WLM-10]
PLATE
[MON-CPU-DISK]
SWIVEL DISK
[MON-SWIV-DISK]
NUT
[H-LNUT-M8-NYL-FL]
Figure 1
PROJECT #: 617
FOR USE WITH INE-___-12-12-F4-__
CUSTOMER
Adjustments:
HOOK Adjustment:
The HOOKS can be rotated 360 .
To rotate HOOKS:
Grasp 2 HOOKS and carefully rotate to desired position. Figure 1 shows the HOOKS rotated 45
1.
NOTE: If rotating HOOKS is difficult, see section "Adjusting Tension at the HEAD" from previous page.
5
4
3 2
1
DESCRIPTION:
PART NO:
SCALE:
DRAWN BY:
CHECKED BY:
SHT.
OF
DRAWING NO:
NTS
5
6
PRIVATE AND CONFIDENTIAL
THIS PRINT IS PROPERTY OF AMICO ACCESSORIES
AND IS LOANED IN CONFIDENCE SUBJECT TO RETURN
UPON REQUEST AND WITH THE UNDERSTANDING THAT
NO COPIES ARE TO BE MADE WITHOUT THE CONSENT
OF AMICO ACCESSORIES
ALL RIGHTS TO DESIGN OR INVENTION ARE RESERVED
DATE:
DATE:
-
HP
2018-01-19
-
-/-/-
85 Fulton Way
Richmond Hill, Ontario
L4B 2N4, Canada
Toll Free: 1.877.264.2697 (T)
Tel: (905) 763.7778
Fax: (905) 763.8587
-
INE-___-12-12-__-__
20180119-4415
PROJECTION
www.amico.com
Figure 20
WARNING:
Do not attempt to adjust the tension with any devices mounted. Unload the
INFUSION ARM
before proceeding.
Adjusting Tension at the Head

