background image

 
The following mechanical safety devices have been applied:  

1.  bowl lid transparent plastic. 


The following electrical safety devices have been applied:  

1.   start up with start/stop  button that must be pressed again to restart the machine after an outage of 

power main; 

2.  microswitch on the head as preventing machine startup when the high head. 


INSTALLATION AND FUNCTIONING TESTS 

 
Open the carton and make sure that all components are intact. 
Place  the  machine  on  a  suitably  plane,  smooth  and  dry  surface  sufficiently  strong  to  support  the  machine 
weight.  
Install near an outlet complying to EU and derived from an electrical system made to current regulations.  
Before completing the connections, check that the mains correspond to the data shown on the plate.  
 

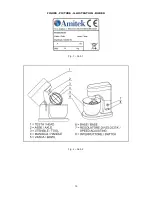
AVAILABLE CONTROLS (Fig. 2) AND MACHINE USE 


1.  STOP BUTTON(rif.8 fig.2): press the button to stop the operation of the machine; 
2.  START BUTTON(rif.8 fig.2): press the button to start the machine; the startup is enabled only when 

the head down;  

3.  KNOB SPEED CHANGE(rif.7 fig.2): allows to adjust the speed of rotation of the tool as a function of 

the processing to be performed (continuous adjustment from minimum to maximum speed); 

4.  LEVER HEAD LIFT(rif.4 fig.2): allows you to unlock and lock the head to raise or lower the head. 

 
PLACEMENT BOWL AND TOOL 

1.  Raise the head by turning the lever side. 
2.  Place the bowl in seat and turn it clockwise to lock it. 
3.  Insert the tool on the shaft. Then lock it by rotating it counter-clockwise. 
4.  Lower the head by turning the lever side. 

 
MACHINE USE 

1.  Select a speed with the knob in function of the type of processing: for hard dough select a low speed 

(1), for soft dough select a high speed (2 or 3).  

2.  Start the machine by pressing the START button. 
3.  At the end of the process to stop the machine by pressing the STOP button. 
4.  Turn the lever side to raise the head, release it to discharge the product worked. 
5.  After processing, rinse the tank and the tool with warm water and detergent. 
6.  Clean the lid with a damp sponge. 


CLEANING THE MACHINE  

 
The machine must be carefully cleaned at least once a day or more often as necessary.  
To clean the machine use only a cloth soaked in water and non-lathery detergent for dishes with pH at 7-8 
and at least at + 30° C. Do not use steel wool or abrasive cleaning products. 
 

TROUBLESHOOTING 


In  the  event of  breakdowns  or malfunctioning, turn  off  the main wall switch and  contact  your  local Dealer

’s 

After-sales service. Do not disassemble any internal machine parts. 

The Manufacturer declines all responsability for any tampering!


LONG PERIODS OF INACTIVITY 

 
If  the  machine  is  to  be  left  idle  for  long  periods  of  time,  turn  off  the  main  wall  switch,  thoroughly  clean  the 
machine and cover it with a sheet to protect it from dust. 


Summary of Contents for AP5

Page 1: ...netaria Installation operating and service instructions revolving mixer Manuel d installation utilisation et entretien mixeur planetaire Handbuch zur Installation Bedienung und Wartung Planeten R hrmi...

Page 2: ...la sua capacit vedere ALLEGATI DATI TECNICI 9 tenere la macchina fuori dalla portata dei bambini GARANZIA E RESPONSABILIT DEL COSTRUTTORE La garanzia di buon funzionamento e di piena rispondenza delle...

Page 3: ...aterale 2 Inserire la vasca nell apposita sede e ruotarla in senso orario per bloccarla 3 Inserire l utensile sull albero ruotandolo in senso antiorario per agganciarlo 4 Abbassare completamente la te...

Page 4: ...l suo smaltimento seguendo le procedure previste dal sistema di raccolta dei RAEE Nel caso del solo smaltimento dell apparecchiatura sul territorio italiano contattare il produttore il quale fornir le...

Page 5: ...roducts to work do not overload the machine to exceed its capacity see ANNEXES TECHNICAL DATA 9 keep the machine out of children s reach WARRANTY AND MANUFACTURER LIABILITY Correct functioning and ful...

Page 6: ...PLACEMENT BOWL AND TOOL 1 Raise the head by turning the lever side 2 Place the bowl in seat and turn it clockwise to lock it 3 Insert the tool on the shaft Then lock it by rotating it counter clockwis...

Page 7: ...ealer or distributor The dealer may dispose of the utensil following the procedures set by the RAEE collection system In the event the user disposes of the utensil without purchasing a new one in Ital...

Page 8: ...er la machine audel de sa capacit voir PIECES JOINTES INFORMATIONS TECHNIQUES 9 tenir la machine hors de port e des enfants GARANTIE ET RESPONSABILITE DU CONSTRUCTEUR La garantie de bon fonctionnement...

Page 9: ...la t te MONTAGE CUVE ET OUTIL 1 Levez la t te travers la rotation du levier lat ral 2 Ins rez la cuve dans la si ge et le tourner dans le sens horaire pour le verrouiller 3 Ins rer l outil sur l arbre...

Page 10: ...e de son limination en suivant les proc dures pr vues par le syst me de ramassage Dans le cas de l limination de l appareil sur le territoire fran ais contacter le Minist re de l Environnement ou le r...

Page 11: ...ber ihre siehe ANLAGEN TECHNISCHE DATEN 9 Kapazit t hinaus f llen die Maschine f r Kinder unzug nglich aufbewahren GARANTIE UND HAFTUNG DES HERSTELLERS Die Garantie des einwandfreien Betriebes und die...

Page 12: ...ellbar von Minimum bis Maximum Geschwindigkeit 4 HUBHEBEL KOPFES rif 4 abb 2 Erm glicht Ihnen entsperren und sperren den Kopfes zu heben oder senken den Kopf ANBRINGEN VON SCH SSEL UND WERKZEUG 1 Hebe...

Page 13: ...ten WEEE System vor Beim Kauf eines neuen Ger ts verpflichtet sich der Nutzer dieses nicht als unsortierten Siedlungsabfall zu entsorgen sondern dem H ndler oder Verteiler im Verh ltnis eins zu eins z...

Page 14: ...205h Peso netto Kg Net weight Kg 13 15 Peso lordo Kg Gross weight Kg 15 5 17 5 Velocit rpm Speed rpm 40 250 Utensile Tool Prodotto Product AP5 AP7 Uncino Hook Pizza Pizza 800 g 1 Kg Pane Bread 800 g 1...

Page 15: ...FIGURE PICTURE ILLUSTRATION BILDER Fig 1 Abb 1 Fig 2 Abb 2 15...

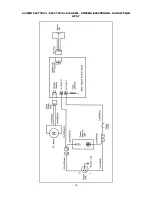
Page 16: ...SCHEMI ELETTRICI ELECTRICAL DIAGRAM SCH MA LECTRIQUE SCHALTPLAN AP5 7 16...

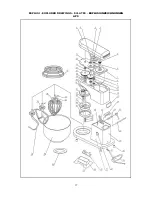
Page 17: ...ESPLOSI EXPLODED DRAWINGS CLAT E EXPLOSIONZEICHNUNGEN AP5 17...

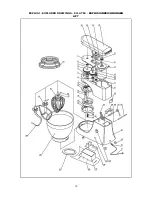
Page 18: ...ESPLOSI EXPLODED DRAWINGS CLAT E EXPLOSIONZEICHNUNGEN AP7 18...

Page 19: ...19...

Page 20: ...escription Beschreibung IMPASTATRICE PLANETARIA AP5 230 1N 50 Anno Year Ann e Jahr 2013 Matricola Serial number Num ro de s rie Seriennummer 23110068 E conforme alle direttive Is in compliance with th...

Reviews: