background image

OPERATING INSTRUCTIONS

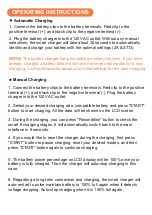
Automatic Charging

1. Connect the battery clips to the battery terminals. Red clip to the 

positive terminal (+), and black clip to the negative terminal (-).
2. Plug the battery charger into the 120V AC outlet. Without any manual 

selections, the smart charger will take about 30 seconds to automatically 

identify and charge your battery with the optimal settings (2A & STD).

NOTE:

 The battery charger has prior-setting memory function. If you have 

already charged a battery before and have not reset new modes for a new 

charging, it will automatically adopt your initial settings for the new charging.

Manual Charging

1. Connect the battery clips to the battery terminals. Red clip to the positive 

terminal (+), and black clip to the negative terminal (-). Plug the battery 

charger into the 120V AC outlet.

2. Select your desired charging rate, compatible battery and press "START" 

button to start charging. All the data will be shown on the LCD screen.

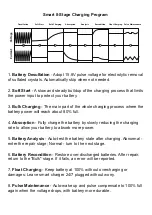
3. During the charging, you can press "Recondition" button to check the 

smart 8 charging stages. It will automatically switch back to the main 

interface in 5 seconds.

4. If you would like to reset the charger during the charging, first press 

"START" button to pause charging, reset your desired modes, and then 

press "START" button again to continue charging.

5. The battery power percentage on LCD display will be 100% once your 

battery is fully charged. Then the charger will auto-stop charging in this 

case.

6. Regarding a long-term connection and charging, the smart charger will 

auto-restart to pulse maintain battery to 100% full again when it detects 

voltage dropping. Auto-stop charging when it is 100% full again.

Summary of Contents for BC0253

Page 1: ...BC0253 Know Batteries Better Smart Battery Charger 12V 2A 10A 25A AUTOMATIC ...

Page 2: ...even death Electrical Shock The battery charger is an electrical device that may shock and cause serious injury Do not use the charger if the power cords are damaged Do not submerge in water or get wet Explosion Do not attempt to charge any frozen damaged incompatible batteries Never try to charge lithium batteries with high voltage shock Apply the charger only to batteries with recommended voltag...

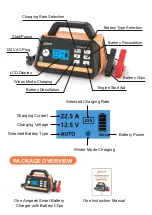
Page 3: ... Charging Battery Power PACKAGE OVERVIEW One Ampeak Smart Battery Charger with Battery Clips One Instruction Manual LCD Display Start Pause Charging Rate Selection Battery Type Selection Winter Mode Charging Battery Recondition Battery Desulfation Engine Start Aid Battery Clips 120V AC Plug ...

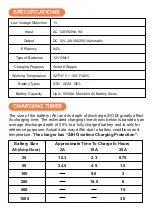
Page 4: ...ed on an average discharge depth of 50 to a fully charged battery and is only for reference purposes Actual data may differ due to battery conditions and temperature The charger has 24H Overtime Charging Protection Battery Size Approximate Time To Charge In Hours Ah Amp Hour 2A 10A 25A 25 12 3 2 3 0 75 50 24 5 4 5 1 5 100 200 1000 500 9 0 3 18 0 6 15 30 1V AC 120V 60Hz 9A DC 12V 2A 10A 25A Automat...

Page 5: ...lip to the negative terminal Plug the battery charger into the 120V AC outlet 2 Select your desired charging rate compatible battery and press START button to start charging All the data will be shown on the LCD screen 3 During the charging you can press Recondition button to check the smart 8 charging stages It will automatically switch back to the main interface in 5 seconds 4 If you would like ...

Page 6: ...llow your battery to absorb more power 5 Battery Analysis Auto test the battery state after charging Abnormal enter the repair stage Normal turn to the next stage 6 Battery Recondition Restore over discharged batteries After repair return to the Bulk stage If it fails an error will be reported 7 Float Charging Keep battery at 100 without overcharging or damages Leave smart charger 24 7 plugged wit...

Page 7: ...he initial charging voltage better boosts your battery activity and charges more thoroughly in low temperature situations Battery Recondition With the repair completed you can directly press START button to start charging Or you just wait for about 30 seconds the battery charger will automatically switch to the charging status BATTERY IN REPAIR NOW REPAIR COMPLETED The Recondition function is for ...

Page 8: ...d to wait Battery Desulfation BATTERY IN DESULFATION NOW DESULFATION COMPLETED With the desulfation completed you can directly press START button to start charging Or you just wait for about 30 seconds the battery charger will automatically switch to the charging status PLEASE START YOUR ENGINE PLEASE START YOUR ENGINE Engine Start PLEASE WAIT FOR 100 SECS The smart battery charger will identify a...

Page 9: ...eed to wait until the count down is over and show the prompt picture again for a third attempt If you fail to start your car in the three attempts above the LCD display will show as follows This is the whole working cycle for the Engine Start function In this case if you still want to have a try again press Engine Start and START buttons again then repeat previous steps PLEASE START YOUR ENGINE En...

Page 10: ... be dead check the battery condition Replace battery if needed Correct the polarity to the right connection The temperature of the charger is too high or the internal temperature sensor of the charger fails Make sure the vents are unblocked The charger will recharge automati cally after cooling down If the charger has been unable to restore charging the tempera ture sensor failure by a professiona...

Page 11: ...y lasts so the above limitations may not apply to you The limited warranty is void under the following conditions Notice All information in this manual is based on the latest information available at the time of publication and no warranty can be made for its accuracy or completeness Ampeak reserves the right to make changes at any time without notice Abnormal charging current Disconnect the AC po...

Reviews: