background image

11

V2.3 03.11.20

11

•  Check the chain tension – if it has slackened over time (it looks 

saggy), get it adjusted. If you feel you are not right for the job, you 
can easily get it done in your local bicycle shop. 

•  Replace he chain before the wear is reached to 0,75%
•  Making sure your chain is lubed will prevent unexpected and pre-

mature wear to the drivetrain.

•  If the chain feels a little dry, clean it with a rag and then add some 

chain lubricant. Spin the pedals around a couple of times to spread 
the lubricant evenly.

•  A carbon belt drive does not need any oil, however needs to be 

cleaned after riding in dirty conditions with water. You can apply a 
thin coating of dry silicone spray to the tooth side of the belt if 
necessary. 

•  Avoid using the lubricant on brake pads, rotors or rims. Spray is not 

recommended, use liquid oil. 

•  Check the brakes regularly – they should be cleaned and adjusted. 
•  Over time the disc brakes get less effi cient at breaking. To stay safe, 

get your brakes inspected, serviced and changed if necessary by a 
professional workshop.

•  Squeezing your brakes down should feel solid and consistent – the 

lever should not touch the handlebar. If you feel that your brakes 
aren’t effective, get a professional to check them out. 

•  Take a good look at the brake pads on your bike every few weeks to 

see how they are holding up. There shouldn’t be any dirt or oil on 
the pads. Often times, the brakes will make a howling noise if 
there’s oil on them. 

•  Check the brake hoses for wear and tear – if you can see that the 

house is crumbling or broken in any place, get it checked immedia-
tely by a professional. 

•  After fi rst couple of weeks check the bolts and nuts. If there is too 

much play in the bolts, tighten them up a little bit and see if you can 
identify the cause of the looseness. Don’t tighten the bolts too far.

•  Re-tighten the bolts on the handlebar if needed.
•  Check the crank bolts (8 mm hex key, not included), tighten them if 

needed.
Re-tighten the pedals, using the key that came with the bike.

•  Re-tighten the bottom bracket eccentric bolts.

•  If you’re not riding and charging your bike consistently, charge it 

every fi ve–six week or so to maintain the state of the battery. Due 
to Bluetooth the bike has a little power consumption even when 
switched off.

•  Do not keep the bike in blazing sun or freezing cold over the exten-

ded period if it is not being used.

•  Make sure the charging socket and the magnetic plug are dry and 

clean before you plug in the charger. 

• 

Store the bike in a dry place over the winter

 – it doesn’t need to be 

heated, however below 0 is not recommended.

•  Charging the battery should take place indoors (above 0 degrees) or/

and in dry environment. Do not keep the charger outside.

Check the brakes

Motor and battery maintenance

Keep the bolts tight

Maintenance

Check the chain  

Summary of Contents for Stellar 2020

Page 1: ...V2 3 03 11 20 Ampler Manual Stellar 2020...

Page 2: ...0 2 Table of Content 3 What s in the box 3 Frame number 4 Assembly 7 Using the Power Button 9 Ampler Bikes app 10 Maintenance 13 Electric system support 16 Charger safety manual 17 Trailer adapter 18...

Page 3: ...ut Frame number The bike will arrive at your doorstep in a big cardboard box Inside this you will find Your new Ampler bike bike passport 4 mm hex key 6 mm hex key Pedals with reflectors Charger Bicyc...

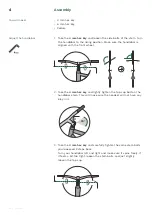
Page 4: ...and lightly tighten the top cap bolt on the handlebar stem This will make sure the headset will not have any play in it 90 3 Take the 4 mm hex key and carefully tighten the same stem bolts you loosene...

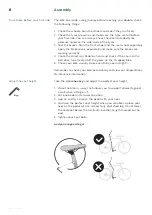
Page 5: ...y at the end of the thread if the pedal is hard to thread in from the beginning then the threads must be inspected L R left right 1 Clamp the white front reflector below the front light 2 Attach the r...

Page 6: ...drive runs freely Shift the gears on the 10 speed bike 5 Check your bike visually Does everything seem alright Remember to check your bike occasionally and view our Ampler Bikes Maintenance informatio...

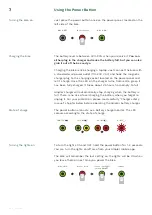
Page 7: ...fully charged It takes about 2 5 hours from empty to full Ampler charger will automatically stop charging when the battery is full There is no risk of overcharging the battery when you forget to unpl...

Page 8: ...as the button turns orange After releasing the button it will blink ONCE if it changes to Normal Mode assist mode 1 or TWICE if it changes to Boost Mode assist mode 2 You can also change the support...

Page 9: ...Register with your Facebook account or e mail 3 Pair your bike with your phone over a Bluetooth connection Ampler Bikes App To connect the bike with the app Stay informed about your bike s electronic...

Page 10: ...washers as the pressure driven water will get dirt sand and dust particles inside tiny compartments causing rust and problems later down the line Check tyre pressure regularly the recommended tyre pr...

Page 11: ...to see how they are holding up There shouldn t be any dirt or oil on the pads Often times the brakes will make a howling noise if there s oil on them Check the brake hoses for wear and tear if you can...

Page 12: ...everything is working as it should After that have the bike service regularly every 3000 km If you ride often and don t count the riding distance make sure to take it to a professional bike shop for...

Page 13: ...ur bike s torque sensor every 3 6 months or in case the bike feels over or underpowered Torque sensor calibration is done via the Ampler app 1 Adjust the left crank forward parallel to the ground 2 Co...

Page 14: ...app If your bike is connected to the app you will get a notification in your app about the new available Firmware Please go to the Vehicle settings to update your Firmware Before starting the update m...

Page 15: ...hen back ON under settings 5 Open the Ampler app 6 Pair your bike with your smartphone 7 Check if the update is available and complete the update If a new firmware version becomes available in the fut...

Page 16: ...re the charger in a cool and dry place Always check that the magnetic charging plug and connector are clean and dry Any electrically conducting particles at the connection can damage the charger or th...

Page 17: ...pout located next to the motor Do not remove the motor torque washer from the dropout keep it attached to the axle 2 Attach the Ampler motor axle adapter to the frame Use a 19 mm wrench and make sure...

Page 18: ...mmetrical 18 mm rims w sealed bearing hubs 36H Tyres Continental Top Contact II 42 622 mm Wheels 28 Weight 17 2 kg Electronics Assist speed 25 km h Range 45 100 km depending on terrain and assist mode...

Reviews: