background image

AMVX1908 


29

TROUBLESHOOTING

Before sending your LCD monitor for servicing, please check the troubleshooting list below
to see if you can self-diagnose the problem.

s

m

e

l

b

o

r

P

s

u

t

a

t

S

t

n

e

r

r

u

C

y

d

e

m

e

R

o

N

e

r

u

t

c

i

P

N

O

D

E

L

o

t

t

s

a

r

t

n

o

c

d

n

a

s

s

e

n

t

h

g

i

r

b

t

s

u

j

d

a

,

D

S

O

g

n

i

s

U

.

s

g

n

i

t

t

e

s

t

l

u

a

f

e

d

r

i

e

h

t

o

t

t

e

s

e

r

r

o

m

u

m

i

x

a

m

F

F

O

D

E

L

.

h

c

t

i

w

s

r

e

w

o

p

e

h

t

k

c

e

h

C

y

l

r

e

p

o

r

p

s

i

d

r

o

c

r

e

w

o

p

C

A

f

i

k

c

e

h

C

.

r

e

t

p

a

d

a

C

A

e

h

t

o

t

d

e

t

c

e

n

n

o

c

g

n

i

k

n

i

l

B

D

E

L

y

l

r

e

p

o

r

p

s

i

e

l

b

a

c

l

a

n

g

i

s

o

e

d

i

v

f

i

k

c

e

h

C

.

r

o

t

i

n

o

m

f

o

k

c

a

b

e

h

t

t

a

d

e

t

c

e

n

n

o

c

.

N

O

s

i

m

e

t

s

y

s

r

e

t

u

p

m

o

c

o

t

r

e

w

o

p

e

h

t

f

i

k

c

e

h

C

l

a

m

r

o

n

b

A

e

r

u

t

c

i

P

e

r

u

t

c

i

P

e

l

b

a

t

s

n

U

r

e

t

p

a

d

a

s

c

i

h

p

a

r

g

f

o

n

o

i

t

a

c

i

f

i

c

e

p

s

e

h

t

f

i

k

c

e

h

C

e

b

y

a

m

h

c

i

h

w

e

c

n

a

i

l

p

m

o

c

n

i

s

i

r

o

t

i

n

o

m

d

n

a

.

h

c

t

a

m

s

i

m

y

c

n

e

u

q

e

r

f

l

a

n

g

i

s

t

u

p

n

i

e

h

t

g

n

i

s

u

a

c

s

i

y

a

l

p

s

i

D

r

e

t

n

e

c

,

g

n

i

s

s

i

m

l

l

a

m

s

o

o

t

r

o

,

t

f

i

h

s

n

i

e

g

r

a

l

o

o

t

r

o

e

z

i

s

y

a

l

p

s

i

d

y

a

l

p

s

i

d

l

l

i

t

s

f

i

,

n

o

t

t

u

b

p

u

t

e

S

o

t

u

A

g

n

i

s

U

,

K

C

O

L

C

t

s

u

j

d

a

n

e

h

t

e

r

u

t

c

i

p

l

a

m

r

o

n

b

a

-

V

d

n

a

N

O

I

T

I

S

O

P

-

H

,

E

S

A

H

P

-

K

C

O

L

C

.

s

l

a

n

g

i

s

d

r

a

d

n

a

t

s

-

n

o

n

h

t

i

w

N

O

I

T

I

S

O

P

n

e

e

r

c

s

-

l

l

u

f

g

n

i

s

s

i

m

f

o

e

s

a

c

n

i

,

D

S

O

g

n

i

s

U

r

u

o

y

n

i

n

o

i

t

u

l

o

s

e

r

r

e

h

t

o

t

c

e

l

e

s

e

s

a

e

l

p

,

e

g

a

m

i

r

o

)

T

N

,

8

9

/

5

9

s

w

o

d

n

i

W

(

m

e

t

s

y

S

g

n

i

t

a

r

e

p

O

.

g

n

i

m

i

t

h

s

e

r

f

e

r

l

a

c

i

t

r

e

v

r

e

h

t

o

g

n

i

t

s

u

j

d

a

r

e

t

f

a

s

d

n

o

c

e

s

w

e

f

a

r

o

f

t

i

a

w

t

s

u

M

r

o

g

n

i

g

n

a

h

c

e

r

o

f

e

b

e

g

a

m

i

e

h

t

f

o

e

z

i

s

e

h

t

e

h

t

F

F

O

g

n

i

r

e

w

o

p

r

o

l

a

n

g

i

s

e

h

t

g

n

i

t

c

e

n

n

o

c

s

i

d

.

r

o

t

i

n

o

m

Summary of Contents for AMVX1908

Page 1: ...ITAL CONTROL LCD COLOR MEDICAL MONITOR AMVX1908 Operation Manual For future reference record the serial number of your display monitor in the space below Serial Number The serial number is located on the back of the monitor ...

Page 2: ... i t a p e h t o t e g a m a d y t r e p o r p N O I T U A C f o s r e s u e h t m r o f n i o t d e s u s i N O I T U A C e l t i t e h T h g u o h t l a s t n e i t a p e h t t c i l f n i d l u o c t a h t s e s u a c e l b i s s o p s h t a e d e s u a c o t h g u o n e e r e v e s t o n t h g i m t i E T O N s m e t i f o s r e s u e h t m r o f n i o t d e s u s i E T O N e l t i t e h T n o...

Page 3: ...ment Function 16 DDC 17 Installation 17 Display for Video and Image Play Back 18 Connecting with Video Equipment 18 User Controls 19 OSD Screen Basic Section VGA 20 OSD Screen Basic Section DVI 22 OSD Screen Basic Section C Video or S Video 24 OSD Function Description UnderAnalog Display 26 OSD Function Description Under Digital Display 27 OSD Function Description Under C Video or S Video Display ...

Page 4: ...ress right button on a Mouse to execute the Pop up menu 2 Press Properties to execute the Display Properties 3 Press Setting and change the resolution to 1280 x 1024 4 Press Apply or OK to select and press OK to keep the selected resolution 5 Go back to Display Properties Setting Advanced properties Adapter 6 On Adapter property change the refresh rate to 60Hz 70Hz 72Hz or 75Hz If you don t have t...

Page 5: ...quency information To change the resolution to its factory recommended preset 1 On a Windows NT 4 0 press right button on a Mouse to execute the Pop up menu 2 Press Properties to execute the Display Properties 3 Press Setting and change the resolution to 1280 x 1024 4 Change Refresh Frequency to 60Hz 70Hz 72Hz or 75Hz 60Hz recommended Screen Adjustment Procedure 1 Press the AUTO button 2 If you st...

Page 6: ...sh the APPLE icon on the upper left corn and execute Control Panel Monitors Sound Select Thousands for the Color Depth Select 1280X1024 60Hz 70Hz 72Hz or 75Hz for the Resolution 60Hz recommended On some Apple G3 or newer systems you may not need to use the Macintosh Adapter Screen Adjustment Procedure 1 Press the AUTO button on the monitor ...

Page 7: ...allow creative use in conjunction to product application The monitor is able to properly function even in case of upgrade video cards or software because of the wide auto scanning compatibility range without requiring to buy a new monitor The internal microprocessor digitally controls auto scanning For horizontal scan frequencies between 24 8 KHz and 60 2 KHz and vertical scan frequencies between ...

Page 8: ...d save the packing materials in case you will need to ship or transport the monitor in future AMVX1908 LCD Monitor and two video cable 1 VGA HDDB15 cable 1 DVI D cable AC Power cord AC Adapter Composite Video BNC Jack Cable and Super Video Cable User Manual CAUTION Manufacturer Ault Korea Model No MW116 ...

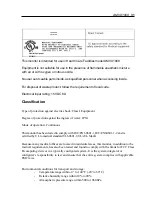
Page 9: ...stallation of the relevant operating room complies with the applicable IEC and CE requirements Warning Federal law United States ofAmerica restricts this device to use by or on order of a physician TheAmpronixAMVX1908 monitor has been tested under UL 60601 1 standard and UL listed for Medical application Ampronix reserves the right to make improvements in the product s described herein Product s t...

Page 10: ...to comply with the limits for medical devices in IEC 601 1 2 2003 These limits are designed to provide reasonable protection against harmful interference in a typical medical installation This equipment generates uses and can radiate radio frequency energy and if not installed and used in accordance with the instructions may cause harmful interference to other devices in the vicinity However there...

Page 11: ...t is designed for operation in a horizontal position Never operate the unit in a vertical position 15 Keep the unit away from equipment with strong magnets i e a large loudspeaker 16 Do not expose the monitor to moisture or excessive dust 17 Equipment with SIP SOP connectors should either comply with IEC 60601 1 and or IEC 60601 1 1 harmonized national standard or the combination should be evaluat...

Page 12: ...AMVX1908 11 Symbol Definitions IPX1 Degrees of protection against the ingress of water ...

Page 13: ...tion ithasnofan For optimum performance do not block the cooling vents Whileunpackingthemonitor inspectitandotherpackagecontentsforshipping damage that could cause a fire or shock hazard Immediately report any shipping damage to the carrier or transportation company and contact customer service for monitorinthefutureorincaseofreturn Afteryouunpackthemonitor makesurethefollowingitemsareincluded Mon...

Page 14: ...er to optimize the best viewing position you can adjust the tilt of the monitor by using both of your hands to hold the edges of the monitor as shown in the figure below The moni tor can be adjusted to 28 degrees up as indicated by arrow below 28 ...

Page 15: ...cratch to the screen as screen is fragile CLEANING YOUR MONITOR No specific liquid or chemical necessary when cleaning this LCD monitor However we suggest to clean the monitor with non abrasive cloths and cleaning solutions used in hospitals to clean similar equipment We recommend using 70 Isopropyl alcohol for the screen surface and warm water and a mild detergent for all other surfaces Other acc...

Page 16: ... 67 5 75 23 1280 x 960 60 60 24 1280x1024 63 9 60 25 1280x1024 79 75 PRESET MODES To reduce the need for adjustment for different modes the monitor has default setting modes that are most commonly used as given in the table below If any of these display modes are detected the monitor automatically adjusts the picture size and centering When none of the mode is matched the user can store their pref...

Page 17: ...onitor goes into power off mode when the vertical and horizontal sync signals are off for about 10 seconds In this mode the screen goes off and the power LED blinks for 1 seconds On and 1 second Off The screen is displayed after the vertical and horizontal sync signals are restored PowerManagementSystem TheAMVX1908 Medical Monitor complies with the VESADPMS power management proposal The VESA DPMS ...

Page 18: ...r and the other end to AC power outlet 4 Then turn the computer on and then the monitor 5 If the monitor still does not function properly please refer to the troubleshooting section to diagnose the problem CONNECTING the POWER CORD Check first to make sure that the power cord you use is the correct type required for your area This monitor has an universal AC adapter that allows operation in either...

Page 19: ... plug one end of a BNC cable into the video out port on the video equipment then connect the other end to the monitor video input port 4 For S video plug one end of the S video cable into the video out port on the video equipment then connect the other end to the monitor S video input port 5 Connect the DC power to the DC power connector on the monitor 6 Connect one end of AC power cord into the A...

Page 20: ...brightness directly when OSD menu is not activated 7 Right To decrease the value of the parameter in the OSD you have selected for adjustment To increase the brightness directly when OSD menu is not activated 8 Auto Button One touch Auto adjust Hold 1 Sec or Exit OSD menu Standard OSD Operation 1 Press Up button to activate the OSD 2 Use Select Up or Down keys to move up or down through the menu T...

Page 21: ...cal then push Select Use Left or Right button to adjust Push Up or Down button to select between OSD Hor Pos OSD Ver Pos OSD Background or User Timeout then push Select Use Left or Right button to adjust Push Left or Right to select Color Temp between Default System 1 System 2 System 3 or System 4 then push Select If System 1 2 3 or 4 were slected push Up or Down button to select between Red Green...

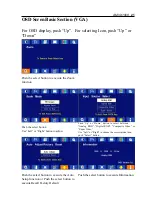
Page 22: ...ormation Push the select button to execute the Zoom function Push Up or Down button to select between Analog RGB Digital RGB Composite Video or Super Video Use Left or Right to choose the correct mode then push Select button OSD Scren Basic Section VGA For OSD display push Up For selecting Icon push Up or Down Push the select button Use Left or Right button to adjust ...

Page 23: ...ser Timeout then push Select Use Left or Right button to adjust Push Up or Down button to select between DPMS Auto Source Select or Freeze Frame then push Select Use Left or Right button to adjust Push the select button to execute the Zoom function Push Left or Right to select Color Temp between Default System 1 System 2 System 3 or System 4 then push Select If System 1 2 3 or 4 were slected push ...

Page 24: ...ion Push Up or Down button to select between Analog RGB Digital RGB Composite Video or Super Video Use Left or Right to choose the correct mode then push Select button OSD Scren Basic Section DVI For OSD display push Up For selecting Icon push Up or Down Push the select button Use Left or Right button to adjust ...

Page 25: ... or User Timeout then push Select Use Left or Right button to adjust Push Select button then Up or Down Push Left or Right button to adjust For OSD display push Up For selecting Icon push Up or Down Push Up or Down button to select between DPMS Auto Source Select Freeze Frame or ADC Calibration then push Select Use Left or Right button to adjust Push Left or Right to select Color Temp between 5000...

Page 26: ... execute Information Push the select button Use Left or Right button to adjust Push the select button Use Left or Right button to adjust Push the select button Use Left or Right button to adjust OSD Scren Basic Section C Video or S Video For OSD display push Up For selecting Icon push Up or Down ...

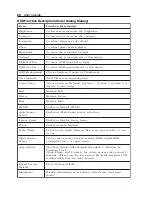
Page 27: ... c n a l a B S M P D S M P D e l b a s i D r o e l b a n E e c r u o S o t u A t c e l e S n o i t c e l e s e c r u o s o t u a e l b a s i d r o e l b a n E e m a r F e z e e r F e m a r f e z e e r f e l b a s i D r o e l b a n E m o o Z n o i t c n u f n i m o o z e l b a n E e d o M e l a c S e n o r o o i t a r t c e p s a n e e r c s l l i f n e e w t e b e d o m e l a c s e s o o h C e n o...

Page 28: ... 2 m e t s y S 1 m e t s y S t l u a u f e D n e e w t e b e s o o h C p m e t r o l o c 4 m e t s y S d e R d e R e c n a l a B n e e r G n e e r G e c n a l a B e u l B e u l B e c n a l a B S M P D S M P D e l b a s i D r o e l b a n E e c r u o S o t u A t c e l e S n o i t c e l e s e c r u o s o t u a e l b a s i d r o e l b a n E e m a r F e z e e r F e m a r f e z e e r f e l b a s i D r o...

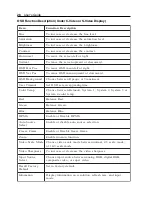
Page 29: ... r o l o C r o 3 m e t s y S 2 m e t s y S 1 m e t s y S t l u a u f e D n e e w t e b e s o o h C p m e t r o l o c 4 m e t s y S d e R d e R e c n a l a B n e e r G n e e r G e c n a l a B e u l B e u l B e c n a l a B S M P D S M P D e l b a s i D r o e l b a n E e c r u o S o t u A t c e l e S n o i t c e l e s e c r u o s o t u a e l b a s i d r o e l b a n E e m a r F e z e e r F e m a r f e...

Page 30: ...p a r g f o n o i t a c i f i c e p s e h t f i k c e h C e b y a m h c i h w e c n a i l p m o c n i s i r o t i n o m d n a h c t a m s i m y c n e u q e r f l a n g i s t u p n i e h t g n i s u a c s i y a l p s i D r e t n e c g n i s s i m l l a m s o o t r o t f i h s n i e g r a l o o t r o e z i s y a l p s i d y a l p s i d l l i t s f i n o t t u b p u t e S o t u A g n i s U K C O L C ...

Page 31: ... a e d o m 8 6 7 x 4 2 0 1 t a z H 5 8 o t P U z H 5 8 0 5 4 2 0 1 x 0 8 2 1 t a z H 5 7 e z i S y a l p s i D V x H m m 1 0 3 x m m 6 7 3 9 1 1 x 8 4 1 s e l a c S y a r G o i t d a R t s a r t n o C s s e n t h g i r B s s e n t h g i r B x a M 2 m d c 0 5 4 o i t a R t s a r t n o C p y T 1 0 0 9 s e l a c S y a r G s p e t s 6 5 2 o t p U r o t c e n n o C t u p n I l a n g i S o e d i V o e d...

Page 32: ...ntinuous This monitor has been tested to comply with IEC EN 60601 1 IEC EN60601 1 2 and is certified by UL to medical standard UL60601 1 UL cUL Mark Because many medical offices are located in residential areas this monitor in addition to the medical requirements has also been tested and found to comply with the limits for FCC Class B computing devices in a typically configured system It is the sy...

Page 33: ... e l E n o i t a r a l c e D s r e r u t c a f u n a M d n a e c n a d i u G w o l e b d e i f i c e p s t n e m n o r i v n e c i t e n g a m o r t c e l e e h t n i e s u r o f d e d n e t n i s i 8 0 9 1 X V M A n a h c u s n i d e s u s i t i t a h t e r u s n e d l u o h s 8 0 9 1 X V M A f o r e s u e h t r o r e m o t s u c e h T t n e m n o r i v n e 1 1 R P S I C s n o i s s i m e F R 1 p...

Page 34: ...4 0 0 0 1 6 C E I z H M 0 8 o t z H K 0 5 1 s m r V 3 z H G 5 2 o t z H M 0 8 m V 3 V 3 m V 3 F R e l i b o m d n a e l b a t r o P t n e m p i u q e s n o i t a c i n u m m o c o t r e s o l c o n d e s u e b d l u o h s 8 0 9 1 X V M A e h t f o t r a p y n a s e l b a c s t i g n i d u l c n i m e t s y s d e d n e m m o c e r e h t n a h t e c n a t s i d n o i t a r a p e s n o i t a u q e e ...

Page 35: ...u q e r f o t g n i d r o c c a m e c n a t s i d n o i t a r a p e S z H M 0 8 o t z H k 0 5 1 p 7 1 1 d z H M 0 0 8 o t z H M 0 8 p 7 1 1 d z H G 5 2 o t z H M 0 0 8 p 3 3 2 d 1 0 0 2 1 0 2 1 0 3 2 0 1 0 7 3 0 7 3 0 4 7 0 1 7 1 1 7 1 1 3 3 2 0 1 0 7 3 0 7 3 7 3 7 0 0 1 0 7 1 1 0 7 1 1 0 3 3 2 d e d n e m m o c e r e h t e v o b a d e t s i l t o n r e w o p t u p t u o m u m i x a m a t a d e t ...

Page 36: ... A l a n g i S n i P t n e m n g i s s A l a n g i S n i P t n e m n g i s s A l a n g i S 1 2 a t a D S D M T 9 1 a t a D S D M T 7 1 0 a t a D S D M T 2 2 a t a D S D M T 0 1 1 a t a D S D M T 8 1 0 a t a D S D M T 3 4 2 a t a D S D M T d l e i h S 1 1 3 1 a t a D S D M T d l e i h S 9 1 5 0 a t a D S D M T d l e i h S 4 4 a t a D S D M T 2 1 3 a t a D S D M T 0 2 5 a t a D S D M T 5 4 a t a D S...

Page 37: ...36 User s Guide ...

Page 38: ......

Reviews: