background image


Page 

33

 of 

34


American Mine Research 

12187 North Scenic Highway 

Rocky Gap, VA 24366 


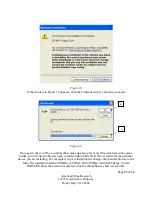
Figure 10 

 If the window in Figure 10 appears, click the Continue Anyway button to proceed. 


Figure 11 


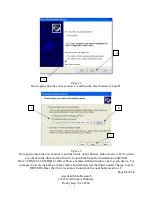
Once again, there will be a window that comes up aksing for more files which are in the same 

folder, you will need to browse back to folder within Mine Net’s Driver folder for the paticular 

device you are installing. For example if you are installing the charge comm board, browse to the 

Mine Net installation folder\USB Driver\CDM 2.06.00 WHQL Certified\ Charge_Comm 

DRIVERS. Once the location is entered, click the OK button as shown at arrow B. 

A

Summary of Contents for 180-0621

Page 1: ...Mine Net Text Messenger User Manual Model MN 6210 AMR Part Number 180 0621 Version I This user manual contains all the guidelines and steps in order to operate the Mine Net Text Messenger ...

Page 2: ...e indicator 6 LED Color Guide 7 Table 4 LED Color Guide 7 Turning on the messenger 7 Resetting the messenger 8 Main Menu 8 Figure 2 Image of the Main Menu 9 Date and Time 9 Section One How to Use the Contact List 10 First Contact List Screen 10 Narrow Contacts by Subgroups 10 Search for a Contact by Last Name 10 Second Contact List Screen 10 Using the Contact List 10 Section Two How to Send a Mess...

Page 3: ... How to Change User Options 20 Display Backlight Timeout Period 20 Text Entry Timeout Period 20 Display Brightness Level 21 Auto Acknowledgment Messages 21 Section Seven How to Use the Sent Menu 22 Section Eight How to Charge the Messenger 23 Section Nine How to Update the User Information 24 Software setup on Computer 24 Figure 3 Messenger Charge Comm Program 25 Update Contact List on the Messeng...

Page 4: ...n avoid touching it with any type of tools Basic Troubleshooting The MN 6210 Text Messenger is a sophisticated device that is designed to be repaired and serviced by the manufacturer or authorized agents only If there are any reasons to believe the messenger has malfunctioned then contact AMR at 276 928 1712 for repair If the text messenger appears to be frozen or locked up then you can reset the ...

Page 5: ...andby Idle no usage 2 93 63 Hours Standard Usage 80 10 10 3 59 hours display at the lowest brightness setting 56 Hours display at the medium brightness setting 51 Hours display at the highest brightness setting Range Messaging4 450 to 525 Tag Tracking4 130 to 150 1 Calculations only not tested 2 100 idle no transmission reception or other usage 3 Defined as 80 idle 10 transmitting 10 receiving 4 A...

Page 6: ... the buttons to be generic and have multiple uses in order to reduce key count and make it easier to use There are two buttons on the keypad that are dedicated and they are the up arrow space button and the down arrow backspace button Figure 1 below shows the keypad layout of the messenger with letter overlays they are not actually on the messenger just in the image along with their descriptions r...

Page 7: ...utton D Up arrow Used to navigate lists moving the arrow up Space Used when writing messages to add a space E Down arrow Used to navigate lists moving arrow the down Backspace Used when writing messages to delete the previous character F Bottom middle button G Upper right button H Middle right button I Bottom right button Table 1 Buttons versus Reference in Manual ...

Page 8: ...t is assured that it is within a close proximity to a Mine Net reader or a Mine Net wireless PAD device Refer to box three in Figure 2 on page 9 to find to location of the signal strength meter Signal Strength Symbol Description No signal detected Weak signal detected There is one signal bar that has an orange color Low signal detected There are two signal bars that have a yellow color Medium sign...

Page 9: ... battery level indicator Battery Level Symbol Description Less than 1 4th capacity 1 4th capacity to less than 2 4th capacity 2 4th capacity to less than 3 4th capacity Greater than 3 4th capacity Table 3 Battery Level Symbols and their Descriptions New message indicator The new message indicator on the menus is located to the upper left corner of the display When the messenger receives a new mess...

Page 10: ... the messenger is charging in the charge rack 2 Will flash green when a new message has been received Blue Charging The blue LED will be on while the messenger is quick charging while on the charge rack Violet UNUSED UNUSED Light Blue UNUSED UNUSED Yellow Charge Communication Will flash yellow when data has been received and verified while on the charge rack White Flashlight mode Flashlight on off...

Page 11: ...ger is ready to use and it is ready to receive messages Resetting the messenger If at any time the messenger seems to become unresponsive like in the situation that the messenger will not wake up on a button press the messenger can be reset by pressing the power button to turn it off Then press the power button one more time until it clicks into place to turn the unit back on Main Menu The main me...

Page 12: ...this is often referred to as military time The messenger does not feature a backup battery circuit for the clock so if the messenger is turned off and then turned back on at a later time then the date and time will be the same as when it was turned off The time and date is there for convenience it is not required to remain up to date for the functionality of the messenger The date and time can be ...

Page 13: ...ld press the bottom middle button View One of the subgroups is listed as general list which will display the entire contact list if that would be easier to navigate to the end user Search for a Contact by Last Name If the user doesn t want to browse the list by a sub group then they can search for a person in the contact list by LAST name To use the search feature press the bottom left button Spel...

Page 14: ...page the user will have to press the page down button to move to the next page Once the contact is found the user can either set that person as the user of the messenger press the middle right button search for their tag press the bottom left button or select the contact bottom middle button to address a message with their ID number If searching for a name or browsing a group that does not have an...

Page 15: ...s in another menu when the display timed out then it will return to that previous menu in order to write a message the user will have to return to the main menu This next window is the screen where the custom message is written The message length is fixed at 32 characters and the messenger will keep count on the screen for the user This will prevent the user from typing anything over 32 characters...

Page 16: ...om message has been entered and the send msg button has been pressed or a preset message is selected the next screen is where messages can be configured to send to certain groups or sent to a person from the contact list The next step would be to press the top right button Send Message which will transmit the message By default the message will be set up to be sent to the surface system or Mine Ne...

Page 17: ...s of the Electricians group When this type is selected the message will be sent to all Electrician members there is no need to select an address Emergency Message Global to all devices and surface When this type of message is selected every device will receive the message including Mine Net There is no need to select an address To All Foremen To all members of the Foremen group When this type is s...

Page 18: ...lay text showing how many times it has tried to send the message If the messenger receives an acknowledgement from another device in the appropriate time frame then the screen will say Message has been sent If the messenger never receives an acknowledgement after three tries the screen will say Message was not sent please try again If the message failed the user may go to the sent message menu acc...

Page 19: ...essages that have been previously read will be displayed as grey text To read a message press one of the two buttons that have vertical arrows printed on them these buttons are the dedicated up down buttons to control the arrow movement To the upper right of the read menu the user will find the page number formatted as current page over the total number of pages If the total number of pages is mor...

Page 20: ...lity to delete individual messages instead of deleting the entire inbox To reply to the message with a custom message press the bottom right button Pressing this button will bring up the text entry menu just like writing a message from this point on refer to Section Two How to Send a Message for more details on sending and configuring a cutom message To reply to the message with a preset message p...

Page 21: ...hen it will display a list of the found tags The tags will be listed with a name number if the tag identification number is in the contact list and if the identification number is not in the contact list then it will be listed with just the number Use the up down buttons to move the red arrow to a number or use the page up page down buttons to move to another page Once the desired tag to track is ...

Page 22: ...right button to apply that tags address and matching name to the messenger A temporary window will pop up confirming that the ID has been changed In the main menu the user should see that the name and number has been changed Steps to Change the Identification Number through the Contact List Menu To change the messenger identification number through the contact list enter the contact menu and then ...

Page 23: ... using the arrow up down buttons to either increase or decrease the time When the setting has been changed the user will press the middle bottom button to save the setting This setting will be saved to memory and be restored the next time the messenger is reset Text Entry Timeout Period When the user is entering a custom message there is a period of time that the user must wait when hitting the sa...

Page 24: ...owledgment messages users will be able to receive and read messages telling them that the message they sent has been received or read by the person to which it was sent When the Auto send a read acknowledgement message option is selected the messenger will automatically send a message to the source address with a message Message Read when reading a new message When the Auto send a received acknowl...

Page 25: ...by pressed the bottom left button Sent Box To resend a message find the desired message in the list by using the up down buttons or the page up page down buttons on the left side and press the bottom middle button Resend Message to resend the stored message The messenger will immediately send the message out To forward a message find the desired message in the list by using the up down buttons or ...

Page 26: ...was plugged in then the LED at the top of the messenger will become blue Troubleshooting 1 If there is no LED activity when the messenger is plugged in first check to make sure the charge rack has power a If the charge rack has power but the messenger doesn t show LED activity then there may be a hardware issue with the messenger and American Mine Research should be contacted for service 2 If ther...

Page 27: ...e click on the MessengerData exe file Figure 3 below shows the main screen for MessengerData exe at the time of this manual The top four buttons of the program are controls to send data to a messenger The bottom three buttons are controls to edit and save the preset messages and emergency information Editing and saving of the preset messages or emergency information is the same so this will focus ...

Page 28: ...nnel database Upon successfully receiving the data the messenger will blink the LED yellow and it will also blink the LED yellow consecutively while building up the new contact list Update Preset Message List on the Messenger The preset messages are updated in the messenger by running the MessageData exe and clicking on the Preset Messages button under Send Data Pressing this button will packetize...

Page 29: ...sages but the user will click on the Emg Procedures button in the MessengerData exe program Upon successfully receiving the data the messenger will blink the LED yellow Update the Date Time The date and time is easily updated by pressing the Sync Date button under Send Data Upon successfully receiving the data the messenger will blink the LED yellow ...

Page 30: ...he top left button Emerg Proc The next menu press the top left button again Emerg Info in order to view the list Once the use user is done with this menu press the upper right button Return three times to return to the main menu If the screen s backlight times out while looking at the list it will restore to the list menu the next time the messenger is awakened Flashlight The flashlight mode is fo...

Page 31: ...1 When the new device is found windows will display a message saying it found the new hardware device and the Found New Hardware Wizard will show up Follow figures one through 13 for a visual step by step guide on installing the drivers Figure 1 Click the circle pointed to by arrow A and then the Next button pointed to by arrow B A B ...

Page 32: ...click the next button pointed to by arrow B Figure 3 Click the box at arrow A then browse to the desired driver folder located in the Mine Net installation folder USB Driver CDM 2 06 00 WHQL Certified There are three different folders one for each device For example if you are installing a charge comm board then select the folder A B B A C ...

Page 33: ...e 5 There will be a window that comes up aksing for more files which are in the same folder you will need to browse back to folder within Mine Net s Driver folder for the paticular device you are installing For example if you are installing the charge comm board browse to the Mine Net installation folder USB Driver CDM 2 06 00 WHQL Certified Charge_Comm DRIVERS Once the location is entered click t...

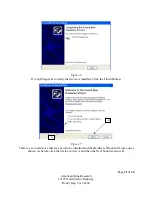
Page 34: ...24366 Figure 6 If everything went correctly the device is installed Click the Finish Button Figure 7 There is a second device that may need to be installed and the Hardware Wizard will come up as shown As before click the circle at arrow A and then the Next button at arrow B B A ...

Page 35: ...A and then click on the Browse button at arrow B You want to go back to the driver folder which is found in the Mine Net installation folder USB Driver CDM 2 06 00 WHQL Certified There are three different folders one for each device For example if you are installing a charge comm board then select the folder named Charge_Comm DRIVERS Once the driver location is found click the next button at arrow...

Page 36: ...dow that comes up aksing for more files which are in the same folder you will need to browse back to folder within Mine Net s Driver folder for the paticular device you are installing For example if you are installing the charge comm board browse to the Mine Net installation folder USB Driver CDM 2 06 00 WHQL Certified Charge_Comm DRIVERS Once the location is entered click the OK button as shown a...

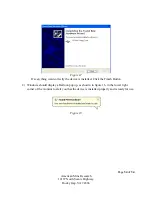
Page 37: ...4366 Figure 12 If everything went correctly the device is installed Click the Finish Button 2 Windows should display a Balloon pop up as showin in figure 16 in the lower right corner of the monitor to alert you that the device is installed properly and is ready for use Figure 13 ...

Reviews: