background image


  Chapter Two - 12 


Operating Information 

Chapter2 - Operating Information 


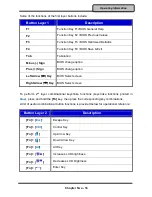
  Start Using Your Tablet Computer    


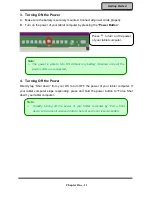
Always turn on your tablet  computer by using the power button. This is the  standard 

operating procedure to start using your tablet computer. After turning on the power of your 

tablet computer, it will start with the Operating System (OS) installed. 
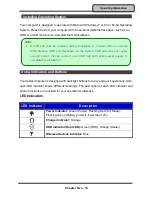
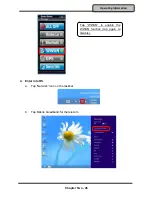
 

Boot Up 

 
When  you turn on the power, your computer  will start to  load the OS  into the system 

memory. This start-up procedure is called “boot up”. 

 
Power On Self-Test (POST) 
 

Each time your computer is turned on, the  BIOS will automatically perform a self-test of 

CPU, memory, hardware devices, and so on. 


Summary of Contents for rocky DK10

Page 1: ......

Page 2: ...ademarks of their respective companies Regulatory Information Disclaimers Installation and use of this computer must be in strict accordance with the instructions included in the user documentation pr...

Page 3: ...on the user is encouraged to try to correct the interference by one or more of the following measures Re orient or relocate the receiving antenna Increase the separation between the equipment and rec...

Page 4: ...4 2 EN61000 4 3 EN61000 4 4 EN61000 4 5 EN61000 4 6 EN61000 4 8 EN61000 4 11 EN61000 3 2 EN61000 3 3 Generic Immunity Standard LVD EN 60950 1 2006 A11 2009 A1 2010 A12 2011 IEC 60950 1 2005 AM1 2009...

Page 5: ...rective 2004 108 EC Low voltage Directive 2006 95 EC and the procedures given in R TTE Directive 99 5 EC The equipment was passed and the equipment test was performed according to the following Europe...

Page 6: ...ng product safety Please do not neglect the importance of this mechanism If you are unable to access a compatible outlet please hire a qualified electrician to install a compatible outlet for you When...

Page 7: ...rself For battery service or replacement please contact your service representatives Please dispose of damaged battery promptly and carefully Explosion or leakage may occur if the battery is exposed t...

Page 8: ...o the eco system and to minimize the pressure on the natural environment you are encouraged to reuse or recycle most of the materials in a safe way after the product s service life For more informatio...

Page 9: ...RDS 17 USING EXPRESSCARDS 18 INTEL RAPID START TECHNOLOGY 19 USING THE TOUCH SCREEN 20 OPERATING WIRELESS DEVICES 22 USING DOCKLIGHT DL10 OPTION 30 CHAPTER3 MANAGING POWER 32 AC ADAPTER 32 BATTERY 33...

Page 10: ...2ND GIGABIT LAN OPTION 56 WIFI OPTION 57 BLUETOOTH OPTION 57 GPS OPTION 58 WWAN OPTION 59 TPM OPTION 60 CHAPTER 6 SPECIFICATIONS 61 PLATFORM 61 CPU 61 PCH 61 MEMORY 61 TOUCH SCREEN 61 HARD DISK DRIVE...

Page 11: ...EXTERNAL USB KEYBOARD 67 MINI KEYBOARD KBD 68 STAND UNIT 69 CHAPTER 8 MAINTENANCE AND SERVICE 70 CLEANING 70 TROUBLESHOOTING 70 RMA SERVICE 71...

Page 12: ...hapter 1 Getting Started Unpacking The following components come with your computer If anything is missing or damaged please notify the dealer immediately Computer unit AC Adapter AC Power Cord Utilit...

Page 13: ...rotation area etc Dust or high humidity If this tablet computer is required to work in a hostile environment please maintain your tablet computer regularly by cleaning dust water and etc to keep it in...

Page 14: ...es The D sub connector cap is for dust and shock protection only The connector itself is sealed internally Other I O ports and devices must have caps tightly closed or cable inlets sealed while expose...

Page 15: ...tors 3 Buttons Left to Right Button Layer 1 Button Layer 2 Function Key F1 Esc Key Function Key F2 Ctrl Key Function Key F3 Down Arrow Key Function Key F4 Alt Key Note The following illustrations show...

Page 16: ...e Key Power Button Fn Key Plus Sign Enter Key Left Arrow Key Decrease Brightness Right Arrow Key Increase Brightness Track Pointer Function Backlight Left Mouse Button For more information on Buttons...

Page 17: ...Chapter One 6 Getting Started Rear 1 HDD or optional SSD 2 Secondary battery connector 3 Stylus holder 1 2 3...

Page 18: ...Chapter One 7 Getting Started Left 1 Battery 2 GLAN RJ45 3 USB 3 0 x 1 Left USB 2 0 with Fast Charger x 1 Right 4 Multi Bay ExpressCard Top SIM Card SD Card Bottom 1 2 3 4...

Page 19: ...in for DK10I 3 pin for DK10M 2 Serial port DB9 COM1 Default RS232 Note The External COM1 port default is RS232 and it can be selected by BIOS RS232 RS422 RS485 Please refer to IT 8783F Super IO Config...

Page 20: ...Chapter One 9 Getting Started Top 1 Optional WWAN Wi Fi Antenna 2 Optional Wi Fi BT GPS Antenna Bottom 1 Docking connector 1 1 2...

Page 21: ...or using it 1 Mounting the Battery A Mount the battery into the battery bay B Close the cover turn clockwise and lock firmly with a flat head screwdriver or a coin 2 Connecting the AC Adapter A Insert...

Page 22: ...ur OS to turn OFF the power of your tablet computer If your tablet computer stops responding press and hold the power button to Force Shut down your tablet computer Note Directly turning off the power...

Page 23: ...g your tablet computer After turning on the power of your tablet computer it will start with the Operating System OS installed Boot Up When you turn on the power your computer will start to load the O...

Page 24: ...save your work into the computer s RAM If you want to start your computer again please press the power button to resume You can enter this mode by directly tapping Swipe in from the right edge of the...

Page 25: ...cally In emergency situations you can skip the heating process by pressing and holding the power button for 9 11 seconds then release The speaker will beep with a special sound to signify that the hea...

Page 26: ...indicator shows different meanings The description of each LED indicator and button functions are provided for your operational reference LED Indicators LED Indicator Description Power Indicator Green...

Page 27: ...n BIOS change option Left Arrow Key BIOS Select screen Right Arrow Key BIOS Select screen To perform 2nd layer combinational keystroke functions keystroke functions printed in blue press and hold the...

Page 28: ...SD Cards Your tablet computer is equipped with a SD card slot The SD card slot supports SDHC SDXC UHS 1 To avoid damages caused by misinsertion please insert your SD card into the card slot properly w...

Page 29: ...ile the computer is running The computer automatically detects the card To install an ExpressCard Hold the card with the top side of the card Slide the card into the slot until the card is completely...

Page 30: ...QM67 Express Chipset based desktop board Intel Sandy Bridge i7 2610UE Solid State Drive SSD Operating system Microsoft Windows 7 or 8 32 or 64 bit edition Note Intel Rapid Storage Technology Driver sh...

Page 31: ...ive touch screen allowing you to navigate on the touch screen easily without using other external devices Before using the touch screen please follow the instructions below to calibrate your stylus pe...

Page 32: ...p the touch screen twice with your stylus pen Drag and Drop To drag tap and hold the object gently with your stylus pen Without moving your stylus pen away from the touch screen move your stylus pen u...

Page 33: ...oth driver first Read from the Utility DVD and find the directory listed in the readme file to finish installation b Install the Device Power Manager application Read from the Utility DVD and find the...

Page 34: ...ease tap Bluetooth to enable the Bluetooth function tap again to disable Once the Bluetooth function starts up the wireless LED indicator color blue will turn on and the Bluetooth icon will show up in...

Page 35: ...st Read from the Utility DVD and find the directory listed in the readme file to finish installation b Then install the Device Power Manager application Read from the Utility DVD and find the director...

Page 36: ...ead from the Utility DVD and find the directory listed in the readme file to finish installation 2 Insert the SIM card a Turn OFF your tablet computer b Pull down the rubber lock cover c Insert the SI...

Page 37: ...Chapter Two 26 Operating Information 4 Enter into OS a Tap Network icon on the taskbar b Tap Mobile broadband for the telecom Tap WWAN to enable the WWAN function tap again to disable...

Page 38: ...Chapter Two 27 Operating Information c Tap Connect for connection d Tap Disconnect to end the connection...

Page 39: ...from the Utility DVD and find the directory listed in the readme file to finish installation b Install the GPS driver GPS Driver Read from the Utility DVD and find the directory listed in the readme f...

Page 40: ...n on the Device Power Manager will be colored in yellow background and with a prohibition marker The following illustration shows that WWAN and GPS devices are disabled through BIOS To turn on please...

Page 41: ...the docking connector 2 Align the docking connector 3 Attach Docklight 4 Fix the screws Docklight ports Top 1 Docking connector Bottom and Left 2 3 4 5 6 7 8 1 Audio jacks Microphone Speaker 2 RGB DB...

Page 42: ...hapter Two 31 Operating Information Note The combination of DK10 DL8 or DK8 DL10 is not fully compatible A few functions including audio modem and surge protector are incompatible in these combination...

Page 43: ...adapter Use a properly grounded AC outlet Use one AC outlet exclusively for the computer Having other appliances on the same line may cause interference Use a power strip with built in surge protecti...

Page 44: ...indows Power Options Lower the intensity of the display by brightness control Turn the computer into standby by Sleep or Power button when it is temporarily not in use Shut down the computer when it w...

Page 45: ...Battery simply install it into the computer and attach the AC adapter The internal charger will first charge the Primary battery and then Secondary one Optional Multi Battery Charger can charge Prima...

Page 46: ...Windows this feature will allow you to reduce the power consumption and conserve energy By supporting ACPI the AC adapter LED and the Power indicator LED will show in different ways The followings are...

Page 47: ...compatible devices But note fast charging is not supported in every power mode The following table shows details for USB Charging information Mode USB 2 0 Charging Features Power off AC Fast charging...

Page 48: ...22 2012 System Time 16 19 20 Access Level Administrator Choose the system default language Select Screen Select Item Enter Select Change Opt F1 General Help F2 Previous Values F3 Optimized Defaults F...

Page 49: ...ve Exit Trusted Computing SATA Configuration Intel R Rapid Start Technology USB Configuration IT8783F Super IO Configuration RF Device Control EC Thermal Control Trusted Computing Setting Select Scree...

Page 50: ...erve Port 0 Hot Plug Intel R Rapid Start Technology Disabled Enabled Allows the system to skip certain tests while booting This will decrease the time needed to boot the system USB Configuration Disab...

Page 51: ...TA controller s operate Select Screen Select Item Enter Select Change Opt F1 General Help F2 Previous Values F3 Optimized Defaults F4 Save Exit ESC Exit SATA Configuration Sub Menu Selections You can...

Page 52: ...xit USB Configuration Sub Menu Selections You can make the following selections on the USB configuration sub menu Feature Options Description Legacy USB enabled Disabled Enabled Enables Legacy USB sup...

Page 53: ...timized Defaults F4 Save Exit ESC Exit IT8783F Super IO Configuration Sub Menu Selections You can make the following selections on the IT8783F super IO configuration sub menu Feature Options Descripti...

Page 54: ...nter Select Change Opt F1 General Help F2 Previous Values F3 Optimized Defaults F4 Save Exit ESC Exit RF Device Control Configuration Sub Menu Selections You can make the following selections on the R...

Page 55: ...Control Sub Menu Aptio Setup Utility Advanced EC Thermal Control Thermal cooling trip point 87 C EC Thermal Control Setting Select Screen Select Item Enter Select Change Opt F1 General Help F2 Previo...

Page 56: ...n make the following selections on the Chipset sub menu Feature Options Description System Agent SA Configuration System Agent SA Parameters PCH IO Configuration PCH Parameter PCH IO Configuration Sub...

Page 57: ...Configuration sub menu Feature Options Description PCH LAN Controller Disabled Enabled Enable or disable onboard NIC Wake on LAN Disabled Enabled Enable or disable integrated LAN to wake the system US...

Page 58: ...ious Values F3 Optimized Defaults F4 Save Exit ESC Exit The system will try to boot from device on top then the 2nd and so on If there is more than one device in each category only the device on top o...

Page 59: ...ord User Password HDD Security Configuration HDD 0 INTEL SSDSC2 Set Administrator Password Select Screen Select Item Enter Select Change Opt F1 General Help F2 Previous Values F3 Optimized Defaults F4...

Page 60: ...Reset Discard Changes and Reset Save Options Save Changes Discard Changes Restore Defaults Save as User Defaults Restore User Defaults Boot Override PO INTEL SSDSC2CW180A3 IBA GE Slot 00C8 v1365 Real...

Page 61: ...n Setup exe in the directory of Drivers Windows 7 64 bit Intel_Chipset and then follow the instructions to install Windows 7 Ultimate 32 bit Run Setup exe in the directory of Drivers Windows 7 32 bit...

Page 62: ...directory of Drivers Windows 8 32 bit Intel_VGA and then follow the instructions to install Audio Windows 7 Ultimate 64 bit Run Setup exe in the directory of Drivers Windows 7 64 bit Audio 6777_PG360_...

Page 63: ...of Drivers Windows 8 32 bit Intel_ME MEI_allOS_7 1 40 1161_PV and then follow the instructions to install Intel Rapid Storage Technology Windows 7 Ultimate 64 bit Run iata_cd_10 8 0 1003 exe in the di...

Page 64: ...Windows 7 Ultimate 64 bit Run setup exe in the directory of Drivers Windows 7 64 bit Touch Screen PenMount Windows Universal Driver V2 4 0 306 WHQL and then follow the instructions to install Windows...

Page 65: ...n follow the instructions to install Windows 8 Ultimate 32 bit Run Texas_Instruments_xHCI_Driver_v1 16 2 0_WHQL_ Multilanguage exe in the directory of Drivers Windows 8 32 bit USB3 0 Texas_Instruments...

Page 66: ...install Windows 8 Ultimate 32 bit Run setup exe in the directory of Drivers Windows 8 32 bit IntelR Turbo Boost Technology Monitor and then follow the instructions to install Gigabit LAN Windows 7 Ult...

Page 67: ...t Run setup exe in the directory of Drivers Windows 7 32 bit RTL8111E Install_Win7_7046_07202011 and then follow the instructions to install Windows 8 Ultimate 64 bit Run setup exe in the directory of...

Page 68: ...bit Intel_WiFi6235 WLAN and then follow the instructions to install Then into the Wireless Power Manager to turn on the WLAN device Bluetooth Option Windows 7 Ultimate 64 bit First into the Wireless P...

Page 69: ...U5_USB_drv3264_install_UI exe in the directory of Drivers Windows 7 32 bit UBlox 6H Driver and then follow the instructions to install Windows 8 Ultimate 64 bit First into the Wireless Power Manager t...

Page 70: ...he directory of Drivers Windows 7 32 bit AirPrime MC8305 HSPA module Gobi GenericGobi3k and then follow the instructions to install Install MC8305 module AP Run Watcher_Generic_Q msi in the directory...

Page 71: ...S to turn on the TPM device Run setup exe in the directory of Drivers Windows 7 32 bit TPM and then follow the instructions to install Windows 8 Ultimate 64 bit First into the BIOS to turn on the TPM...

Page 72: ...trial grade DDR3 SO DIMM x 1 1333MHz Touch Screen Type 12 1 XGA LCD with LED B L Resolution 1024 x 768 pixels Brightness min typ 280 nits 350 nits Single touch resistive Sunlight readable Hard Disk Dr...

Page 73: ...SIM Card slot x 1 SD Card slot x 1 Bottom Docking connector x 1 USB 3 0 port x 1 USB 2 0 with Fast Charger port x1 DC power jack Dimensions and Weight Width 12 1 in 310mm Depth 10 in 255mm Height 2 1...

Page 74: ...mension 5 91 in W x 3 54 in D x 0 79 in H 150 mm W x 90 mm D x 20 mm H Weight 1 1 lb 500 g AC Adapter Input Voltage AC 100 240V Frequency 50 60 Hz Output Voltage DC 19V Maximum Power 90 Watts Dimensio...

Page 75: ...UL grade PC ABS GE C2800 or TN 3813BW Bracket Aluminum 5052 Steel with Nickel plating Stainless Steel S304 PCB FR 4 UL 94V0 Battery Rechargeable Lithium Ion cells Packing Carton Unbleached paper Cush...

Page 76: ...terface Mini PCIe form factor GPS u blox LEA 6H USB interface 2nd Gigabit LAN 1Gbps internal Mini PCIe Card Memory Card The memory card will expand main memory to facilitate better system performance...

Page 77: ...pproximately DC input 12 32V Environmental Certifications CE FCC IP54 Multi Battery Charger The charger provides two slots for the Primary and Secondary battery respectively It allows charging of both...

Page 78: ...water dust protection up to IP54 Back light illumination backlight device green LED PS 2 compatible Trackpoint and mouse buttons Dimensions 12 73 in W x 6 77 in D x 0 98 in H 323 4 mm W x 172 mm D x...

Page 79: ...ction keys to simulate standard keyboards StickPointer to simulate mouse and keypad Currently support versions English UI English UK German DE Swedish SV and Russian RU 5 versions LED Backlight Caps L...

Page 80: ...in office or in vehicle There are 2 configuration options Stand unit only to accept system unit Stand unit with Docklight hooked to accept system unit Mount Stand Unit 1 Open the rubber cap on the do...

Page 81: ...er Problems When I turn on the Tablet computer it does not respond If you are using battery power check if the battery is charged If you are using AC power ensure that the connection of AC adapter is...

Page 82: ...ber Place and date of purchase or the original invoice number Date of failure A DETAILED description of the problems you have encountered including The operating system the add on device installed if...

Reviews: