Two Post Car Lift AM-TPL10F
12
•
Please carefully remove all the parts from the package.
•
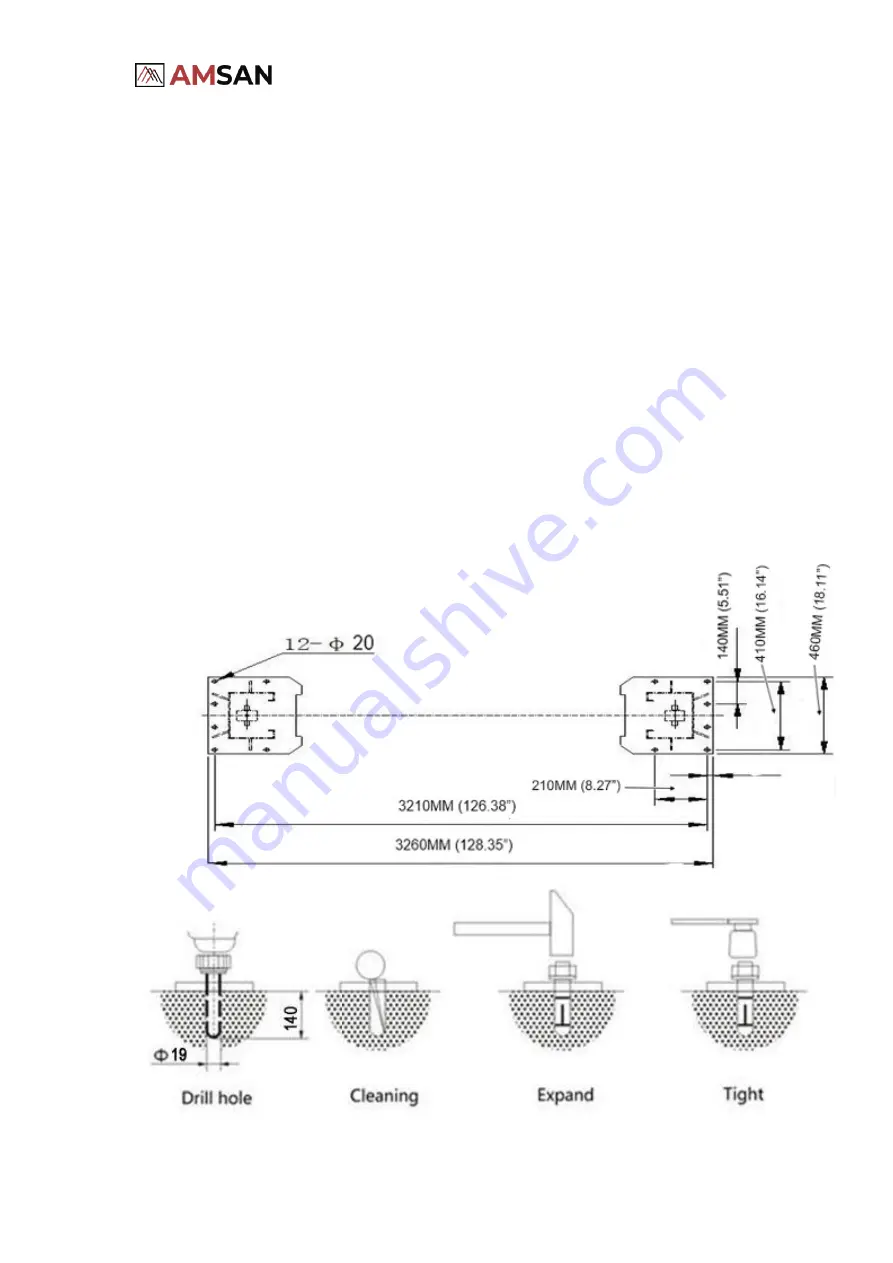
Use a concrete rotary hammer drill with 3/4” drill bit. Do not use excessively
worn or incorrectly sharpened drill bits.
•
Keep the drill in a vertical position when drilling. Do not apply excessive
pressure and let the drill do the work. Try to lift the drill up sporadically and
clean residue in the hole. Power blow dust from the hole for better holding.
•
Drill the holes 1.25" deeper than the length of the anchor bolts. Try to drill
through the concrete so that when you move the lift to a new location, you may
hammer down the anchor bolts instead of cutting them off.
•
Assemble the washers and nuts onto the anchor bolts. Thread the nuts onto
the anchor bolts where the tops of the nuts are just above the top of the bolts,
as shown in figure below. Using a hammer, carefully tap the anchor bolts into
the concrete until the washer rests against the baseplate. Do not damage the
nuts or threads. Try not to use an impact wrench to tighten the nut. Tighten the
nut two or three turns after the concrete is cured (30-day minimum cure). In
case where the concrete is very hard, tighten only one or two turns.
Check the following diagram for the footprint of columns with anchor bolts
positions.
Summary of Contents for AM-TPL10F
Page 1: ...PLEASE READ THE PRODUCT MANUAL ENTIRELY BEFORE INSTALLING OR OPERATING THE LIFT ...
Page 7: ...Two Post Car Lift AM TPL10F 7 LIFT COMPONENTS ...
Page 8: ...Two Post Car Lift AM TPL10F 8 LIFT DIMENSIOINS ...
Page 18: ...Two Post Car Lift AM TPL10F 18 ...
Page 27: ...Two Post Car Lift AM TPL10F 27 EXPLODED DRAWING ...
Page 28: ...Two Post Car Lift AM TPL10F 28 ...
Page 29: ...Two Post Car Lift AM TPL10F 29 ...
Page 30: ...Two Post Car Lift AM TPL10F 30 MAINTENANCE LOG ...


