PREPARING THE LADDER
1. Remove the ladder from its packaging and place it lid down on a bench or saw stool.
The lid is less likely to get damaged there than laying it on the ground, as well as
being better for your back!
now as it is easier than later, when the unit is in the ceiling.
3. Turn the ladder over so the lid is facing up. Fit the screw eye 100mm in from the
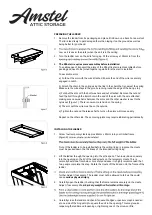
4. The R36 stair requires some assembley before installation:
To enable ease of transport the arms of the R36 attic stair are dissembled before
packing and need to be joined together again before the stair is installed.
To assemble arms:
a) Fold out the arm with the wire attached. Ensure the end of the wire is securely
engaged in notch.
b) Attach the chain to the spring using the link in the chain that is nearest the spring.
Make sure the wire stays in the groove running round the edge of the banjo stay.
c) Fold out the arm with the bolt, washers and nut attached. Remove the nut and
feed the bolt through the 8mm hole in the end of the arm with the wire attached
making sure one washer is between the arms and the other washer is next to the
nylok nut (Figure 7). There is now some tension on the spring.
d) The arm with the wire must be on the outside
e) Tighten the nut and the release half a turn so the arms will move easilly.
Repeat on the other side. These moving joints may require lubricating periodiocally.
INSTALLING THE LADDER
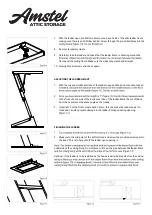
1. Screw four temporary cleats approx 80mm x 40mm into your timber frame
Note: If the ladder is to be installed before the ceiling lining is in place, the cleats
must be packed down the thickness of the intended ceiling lining.
2. Lift the ladder through the opening into the attic space. Then lower down squarely
into the opening so the lid of the ladder rests on the temporary cleats. This is
normally best done from below. For safety and ease it is highly recommended that
two people complete this step. Rotate the cleats off the lid and onto the frame of the
ladder.
further. Adjust if necessary. The ladder must not be allowed to fall, as this could
cause serious physical injury.
4. Carefully open the ladder, checking that the frame remains securely on the cleats.
Adjust if necessary.
.
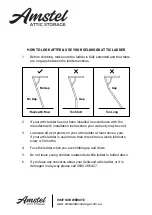
6. Carefully close the ladder and check if square. Wedges or packers may be needed
at one side of the hinge strip to square the unit in the opening. This may require
reopening the ladder and loosening or tightening one of the screws a little.
Washer


