background image

FOUR

NINE

5

9

6

10

7

11

8

76

74

Vinyl Tire

Vinyl Tire

Vinyl Tire

78CR

77CR

30

72

34

32

50

51

55

56

37

18

54

19

29

33

31

72

Rear Drive Axle

Heat Swage

Heat Swage

Heat Swage

Oil

Oil

36

26

27

53

28

Both Sides

Forward Drive Axle

75

Carefully Trim Center

Cores Out Of Tires

NOTE: Cores may be

pre-trimmed from the

factory. 

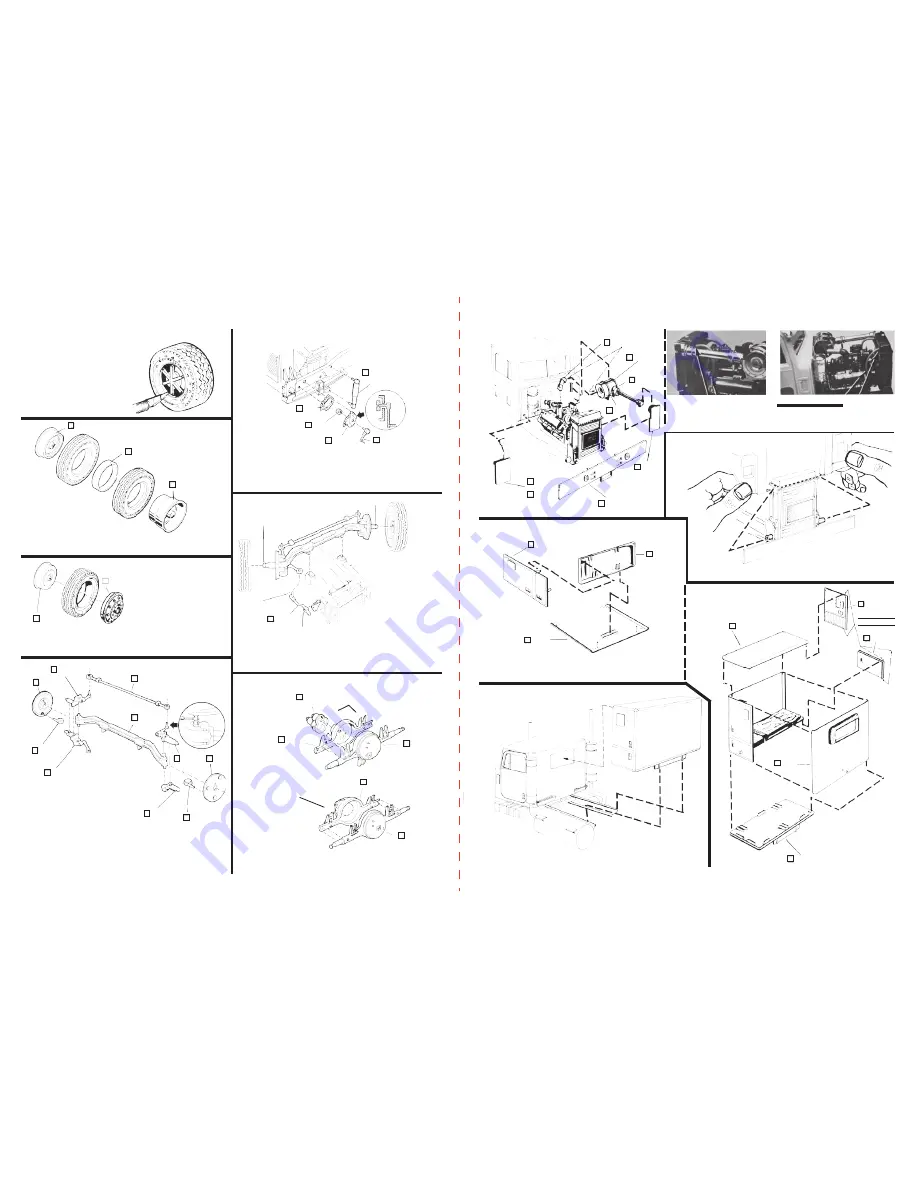
Scrape chrome from 78 where it glues to 74 and 76.

Glue units together. Make 4 sets.

Glue axle to frame. Attach idler arm – 37 – next. Snap front 

tires and hubs to axle – oil first with a light machine oil.

Carefully glue 53 to shaft end of steering arm – 36 –

after steering arm is slipped through 28. Shock

absorber – 26 – goes on both sides of frame.

Assemble carefully. Avoid getting glue on the pins at end of

axle – 50 – if you want steerable wheels. See heat swage

instructions on page 2 for attachment of tie rod – 51. 

Scrape chrome off 77 where it joins to 75. Make 2 sets.

29

30

31

A

SLEEPER UNIT OPTION

32

B

Cut (2) sections of vinyl tubing to the length above and attach

to pins and into radiator tank as indicated.

Spread the fenders of the hood – 161 – and snap pins

into the bosses on the forward frame.

163

164

174

170

169

168Y

175

173

171

172

92CR

100CR

104CR

71CR

105CR

166

Cement

Inside

Holes

Do Not Cement

Radiator Hoses

Summary of Contents for Transtar 4300 Eagle

Page 1: ... add to or start your model collection INTERNATIONAL and other International truck trademarks are licensed by INTERNATIONAL TRUCK INTELLECTUAL PROPERTY COMPANY Goodyear and wing foot design are trademarks of Goodyear Tire Rubber Company Akron Ohio USA used under license by Round 2 LLC AMT design and ERTL are registered trademarks of Learning Curve Brands Inc used under license to Round 2 LLC 2009 ...

Page 2: ...o wish to detail their model see special instructions on page 10 Painting is sequenced to fit in with the assembly of your model Use a good sharp model knife to detach and trim plastic parts Some parts will appear to have extra tabs on them cut these off When heat swage is indicated this means to heat the tip of the knife in a candle or match flame When touched to the plastic the plastic will soft...

Page 3: ... sure to use only paint formulated for use on styrene plastic Liquid cement may be applied with a fine 00 brush for neat glue joints Also the new instant glues may be used for small non chrome caution must be used when working with this cement as it WILL cement fingers together as well as anything else Do not use on clear parts as hazing may occur If cement gets on an outside surface use 600 grit ...

Page 4: ...oil Carefully glue 53 to shaft end of steering arm 36 after steering arm is slipped through 28 Shock absorber 26 goes on both sides of frame Assemble carefully Avoid getting glue on the pins at end of axle 50 if you want steerable wheels See heat swage instructions on page 2 for attachment of tie rod 51 Scrape chrome off 77 where it joins to 75 Make 2 sets 29 30 31 A SLEEPER UNIT OPTION 32 B Cut 2...

Page 5: ...EAR DRIVE AXLE FORWARD DRIVE AXLE 73 4 8017 111CR 43 42 Trim off four pins from frame 67 143 142 122 123 86CR 149 48 47 Build 2 85CR 150 6CL 90CR 58 57 52 Long 52 Short 38 24 26 25 28 27 Glue exhaust system mounting brackets 132 133 to rear of cab Now glue cab to frame as shown in the front and side views Glue muffler assemblies together as shown keeping track of which is left unit right unit 88CR...

Page 6: ...and the longer straight section After decals are in position blot carefully with a wadded tissue to remove excess water let dry thoroughly before handling NOTE 1 4 3 8 17 18 19 22 20 23 21 Cement windows in place from inside of cab Work very neatly using just enough cement to do the job Cement C B radio and mike plus steering wheel to instrument panel as shown Center and glue header 159 in place C...

Reviews: