background image

Startup

BEFORE CONTINUING, CHECK 

FOR OPEN DRAIN VALVES OR 

OTHER SOURCES OF FLOODING BEFORE STARTING UNIT.

1. Prime pump if necessary and adjust tank precharge to 

manufacturer’s recommendation for intended pressure 

range. The factory Guardian CP

®

 setting is 40 psi cut-in 

and 60 psi cut-out.

2. Turn on power and ensure Guardian CP display 

illuminates, 

“88”

 will appear, then code revision 

number, then “00”.  Display will blank momentarily and 

the pump will start. If not, check installation.

3. The display will now read the current line pressure.

4. Allow the pump to reach the factory cut-off setting 

of 60 psi. IF THE PUMP CANNOT REACH THIS 

SETTING, DISCONNECT POWER AND SEE THE 

TROUBLESHOOTING SECTION.

5. 

Check for leaks and repair as necessary 


before proceeding.

6. Proceed to the ADJUSTMENT section.

NOTE: 

During the first 30 seconds after start up, the pump 

can be made to operate manually by depressing the 

arrow for 6 seconds. This is useful for priming jet pumps.

Adjustment 

NOTE:

 Differential pressure cannot exceed 55 psi or be 

less than 10 psi. If display will not change, alter cut-in or 

cut-out to within 55 psi.
1. Press and hold

  

 until 

“LO”

 appears, then release. 

This will determine the pressure at which the 


pump activates.

2. When number appears, tap 

5

 or 

6

 to change 


cut-in setting.

3. Press 

 again. When 

“HI”

 appears, tap 

or 

6

 to 

change cut-out setting. This will determine the pressure 

at which the pump shuts off.

NOTE:

 Press 

 a third time to display the last 

Error Code in memory (see Error Code table). 

If no errors have occurred, the display will 


show 

“- -”.

4. After approx. 10 seconds 

“Pr”

 will appear, indicating 

the settings are programmed. Display will then revert to 

line pressure.

NOTE:

 Settings will be stored until changed manually, 

even if there is a power failure.

NOTE:

 If pump cannot reach cut-out setting within 5 

minutes with no water running, lower the pressure settings 

to fall within the pump’s pressure capabilities.

NOTE:

 Pressing 

5  6 

together for 3 seconds will rotate 

the screen 180 degrees for easier viewing.

Operation

The Guardian CP incorporates built-in diagnostic functions 

to protect the system and alert the user or installer to 

potential problems. If a fault is found, an error code will be 

displayed, indicating that service may be necessary. Error 

codes are listed in the Error Codes section.

Maintenance

A licensed professional should check the complete system, 

including the Guardian CP, yearly and more frequently as 

the system ages.

Warranty

Guardian CP Model DC2: Two (2) Year Limited Warranty 

Unit contains no serviceable parts. Removal of main circuit 

board cover will void warranty.

Visit www.amtrol.com for complete warranty details.

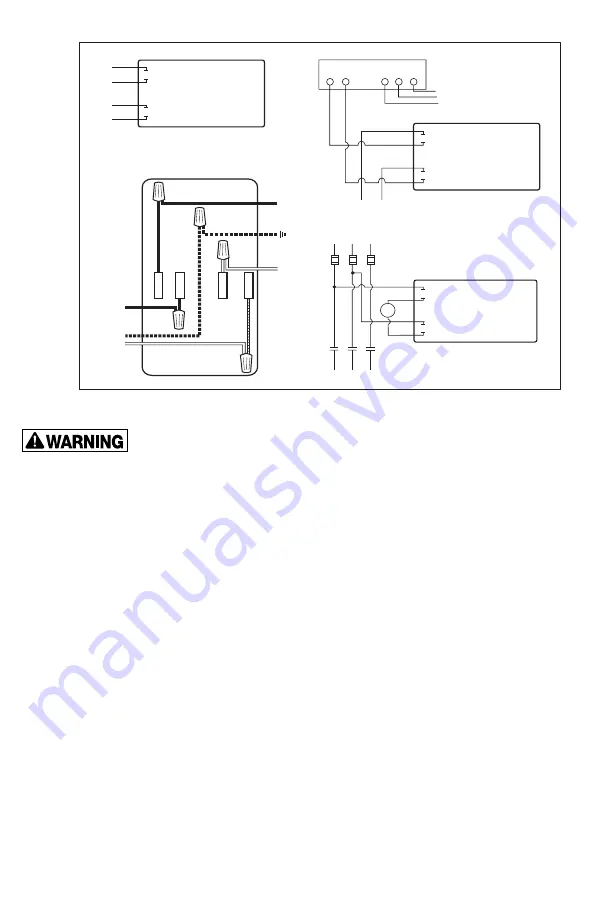
Figure 3. Basic Wiring

L1

L2

L3

GUARDIAN CP

TO MOTOR

CONTACTS

FUSES

BLACK
BLUE

WHITE
WHITE/STRIPE

COIL

3-PHASE CONTROL BOX

BLACK

BLUE

TYPICAL WIRING

CONNECTIONS

PUMP MOTOR OR

CONTROL BOX

WHITE

WHITE/STRIPE

LINE IN

115/230 VAC

L1

L2

Y

B

R

GUARDIAN CP

LINE IN

TO

MOTOR

BLACK
BLUE

WHITE
WHITE/STRIPE

LINE

LOAD

LINE

LOAD

BLACK

BLUE

WHITE
WHITE

/STRIPE

Summary of Contents for GUARDIAN CP DC2

Page 1: ...ter appropriately to insure satisfactory performance and prevent premature failure Use only lead free solder and flux for all sweat solder connections as required by state and federal codes EXPLOSION OR RUPTURE HAZARD A relief valve must be installed to prevent pressure in excess of local code requirement or maximum working pressure designated in the product manual whichever is less Do not expose ...

Page 2: ...B FT of torque NOTE Do not allow pipe sealant or other contaminants to enter the small port in the Guardian CP connection NOTE A mechanical pressure gauge is not required Use the appropriate plug to block any unused ports Electrical Connection ELECTROCUTION HAZARD FIRST DISCONNECT ALL ELECTRICAL POWER BEFORE SERVICING ELECTROCUTION HAZARD THE Guardian CP MUST BE ELECTRICALLY GROUNDED NOTE The Guar...

Page 3: ... shuts off NOTE Press a third time to display the last Error Code in memory see Error Code table If no errors have occurred the display will show 4 After approx 10 seconds Pr will appear indicating the settings are programmed Display will then revert to line pressure NOTE Settings will be stored until changed manually even if there is a power failure NOTE If pump cannot reach cut out setting withi...

Page 4: ...CP error encountered Faulty pump Improper wiring Guardian CP or pump Check circuit breaker and wiring connections See error chart below Contact pump manufacturer Check wiring per manufacturer s instructions Water flow stops before cut in Tank precharge too high Adjust precharge per manufacturer s instruction Display reads upside down Mounting position may vary Press 5 6 together for 3 seconds and ...

Page 5: ...ecuada para asegurar un rendimiento satisfactorio y evitar fallos prematuros ADVERTENCIA Utilice únicamente soldaduras sin plomo y fundentes para todas las conexiones por soldadura de estaño tal y como exigen los códigos estatales y federales ADVERTENCIA PELIGRO DE EXPLOSIÓN O RUPTURA Debe instalarse una válvula de alivio para evitar que la presión supere los requisitos del código local o la presi...

Page 6: ...ador de tuberías u otros contaminantes entren en el pequeño puerto de la conexión Guardian CP NOTA No es necesario un manómetro mecánico Utilice el tapón adecuado para bloquear los puertos no utilizados Conexión eléctrica PELIGRO PELIGRO DE ELECTROCUCIÓN DESCONECTE PRIMERO TODA LA ENERGÍA ELÉCTRICA ANTES DE REALIZAR EL MANTENIMIENTO PELIGRO PELIGRO DE ELECTROCUCIÓN El Guardian CP DEBE ESTAR CONECT...

Page 7: ...e una tercera vez para visualizar el último Código de Error en la memoria véase la tabla de Códigos de Error Si no se ha producido ningún error la pantalla mostrará 4 Después de unos 10 segundos aproximadamente aparecerá Pr lo que indica que los ajustes están programados La pantalla volverá a mostrar la presión de la línea NOTA Los ajustes se guardarán hasta que se cambien manualmente incluso si h...

Page 8: ...ba defectuosa Cableado incorrecto Guardian CP o bomba Compruebe el disyuntor y las conexiones del cableado Consulte el cuadro de errores que aparece a contin uación Póngase en contacto con el fabricante de la bomba Compruebe el cableado según las instrucciones del fabricante El flujo de agua se detiene antes del corte Precarga del tanque demasiado alta Ajuste la precarga según las instrucciones de...

Page 9: ...tes et éviter une défaillance prématurée AVERTISSEMENT N utilisez que de la soudure et du flux sans plomb pour toutes les connexions de soudure comme l exigent les codes nationaux et fédéraux AVERTISSEMENT RISQUE D EXPLOSION OU DE RUPTURE Une soupape de décharge doit être installée pour éviter que la pression ne dépasse les exigences du code local ou la pression de service maximale indiquée dans l...

Page 10: ... de produit d étanchéité pour tuyau ou d autres contaminants pénétrer dans le petit orifice de la connexion du Guardian CP REMARQUE Un manomètre mécanique n est pas nécessaire Utilisez la prise appropriée pour bloquer tous les ports inutilisés Connexion électrique RISQUE D ÉLECTROCUTION DÉBRANCHEZ D ABORD TOUTE L ALIMENTATION ÉLECTRIQUE AVANT L ENTRETIEN RISQUE D ÉLECTROCUTION LE Guardian CP DOIT ...

Page 11: ...pe s éteint REMARQUE Appuyez sur une troisième fois pour afficher le dernier code d erreur en mémoire voir Tableau des codes d erreur Si aucune erreur ne s est produite l affichage indique 4 Après environ 10 secondes Pr s affiche indiquant que les paramètres sont programmés L affichage revient alors à la pression de ligne REMARQUE Les paramètres sont stockés jusqu à ce qu ils soient modifiés manue...

Page 12: ...ée Pompe défectueuse Câblage incorrect Guardian CP ou pompe Vérifiez le disjoncteur et les connexions du câblage Voir le tableau des erreurs ci dessous Contactez le fabricant de la pompe Vérifiez le câblage selon les instructions du fabricant Le débit d eau s arrête avant l activation Précharge du réservoir trop élevée Réglez la précharge selon les instructions du fabricant L affichage se lit à l ...

Reviews: