background image

instruction manual

Computer Control

PC Presenter

Summary of Contents for Computer Control PC Presenter

Page 1: ...instruction manual Computer Control PC Presenter...

Page 2: ...liability applies whether damages are sought or a claim is made under this warranty or as a tort claim including negligence and strict product liability a contract claim or any other claim This limita...

Page 3: ...he PC Presenter 15 Installing the PC Presenter for Stand Alone Operation 15 Step 1 Connecting the AXR MSE to the PC keyboard and PC 15 Step 2 Connecting the AXR MSE to the PC mouse and PC 15 Step 3 Co...

Page 4: ...e 22 Programming the PC Presenter for Use With an Axcess Central Controller 23 Creating a buffer for keyboard input 23 Send_Commands 23 Send_Strings 24 Mouse Control Channels 25 Using Levels 26 Using...

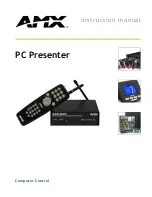
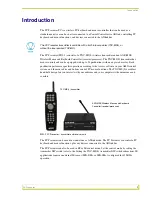
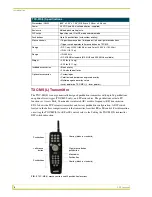
Page 5: ...disc and buttons control PC mouse functions The TXC MS L s cordless hand held design lets you interact with your audience and your computer with convenience and comfort The PC Presenter can be used in...

Page 6: ...VDC two AA alkaline batteries supplied Enclosure Molded black matte plastic DIP switch 8 position sets IR or RF mode and radio mode Pushbuttons Up to 26 pushbuttons with custom overlay Mouse controls...

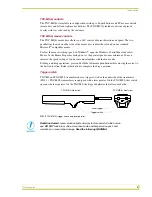
Page 7: ...u can increase the speed setting as you become more familiar with the mouse disc For drag and drop operations press and hold the left mouse pushbutton while moving the cursor to the desired location R...

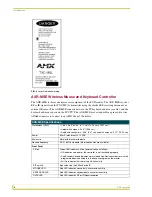
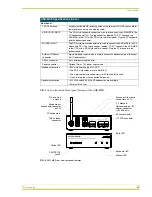
Page 8: ...0 31 cm Height with antenna 5 49 13 96 cm Depth with connectors 4 06 4 47 cm and with antenna 5 12 13 00 cm Power 65 mA max draw 12 VDC Enclosure Metal with black matte plastic Receive frequency RF 41...

Page 9: ...or connector 4 pin data power captive wire is used to connect an optional external IR sensor for IR applications AXlink connector 4 pin data power captive wire Power connector Optional 2 pin 12V power...

Page 10: ...Introduction 6 PC Presenter...

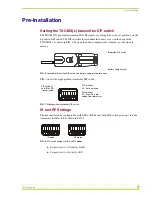
Page 11: ...on transmitter DIP switch IR and RF Settings The transmitter can be configured for either IR or RF but not both DIP switch position 1 sets the transmitter for IR or RF as shown in FIG 8 Set position 1...

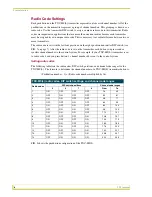
Page 12: ...hannel number to the control system For example if your TXC MS L transmitter is set to radio code 4 and you press button 1 channel number 64 is sent to the control system Setting radio codes The follo...

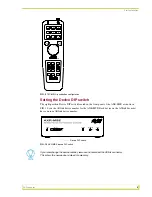
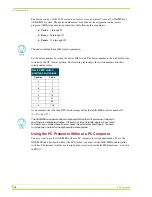
Page 13: ...Each device on the AXlink bus must have a unique AXlink device number FIG 9 TXC MS L pushbutton configuration FIG 10 AXR MSE device DIP switch 1 8 15 2 9 16 3 10 17 4 11 18 5 12 19 6 13 20 7 14 21 22...

Page 14: ...E as device number 97 1 32 64 97 Using the PC Presenter Without a PC Computer You may want to use the AXR MSE without a PC computer in certain applications To use the AXR MSE and a keyboard without th...

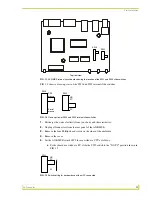
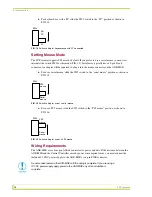
Page 15: ...ides of the enclosure 4 Remove the cover 5 Set the AXR MSE switch SW2 for use without a CPU as follows For keyboard use without a PC slide the SW2 switch to the NO PC position shown in FIG 13 FIG 11 A...

Page 16: ...e slide the SW3 switch to the PS2 mouse position as shown in FIG 16 Wiring Requirements The AXR MSE uses a four pin AXlink connector for power and data If the distance between the AXR MSE and the Cent...

Page 17: ...installed farther away from the control system than recommended in the above table connect a 12 VDC power supply to the two pin 12 VDC PWR IN connector on the rear panel Preparing captive wires You wi...

Page 18: ...Pre Installation 14 PC Presenter...

Page 19: ...ecting the AXR MSE to the PC keyboard and PC To connect the AXR MSE to the PC keyboard and PC 1 Turn off your PC 2 Disconnect the PC keyboard from the CPU 3 Connect the PC keyboard cable to the bottom...

Page 20: ...ral Controller s AXlink connector male on the rear panel of the AXR MSE for data and 12 VDC power as shown in FIG 18 AXlink data and 12 VDC power supply connections Connect the Central Controller s AX...

Page 21: ...R MSE is powered up the front panel LEDs light to indicate the status of the unit as described below All LED s lighting sequentially from left to right indicates that the AXR MSE firmware is loaded an...

Page 22: ...Installing the PC Presenter 18 PC Presenter...

Page 23: ...resenter in Stand Alone Mode The PC Presenter has two modes of programming in stand alone mode command mode in which you give specific commands to the PC Presenter and programming mode in which you as...

Page 24: ...earing the memory press Y PC Presenter tells you that the memory has been cleared To abort this command press N PC Presenter tells you that the command has been aborted H List commands Help Press H at...

Page 25: ...program the transmitter pushbuttons 1 Begin at a DOS prompt on the PC that is connected to the AXR MSE 2 At the DOS prompt enter program mode by selecting and holding the following keys on the PC key...

Page 26: ...the same radio transmitter button the button pressed in step 4 a second time This action displays a second asterisk immediately after the recorded keystrokes the transmitter button s code number and t...

Page 27: ...ands Use the Send_Commands listed in the following table to program the Axcess Control System and the PC Presenter Refer to the Axcess Programming Guide for additional programming information Programm...

Page 28: ...s the transmitter ID for mouse disc only Only TXC MS L with the radio code set to n will be recognized n ASCII number 0 to 16 Set n from 0 to 15 for specific radio codes Set n to 16 to enable mouse di...

Page 29: ...95 PAGE UP 150 96 PAGE DOWN 151 97 SCROLL LOCK 152 98 PAUSE 153 99 BREAK 154 9A PRINT SCREEN 155 9B SYSRQ 156 9C TAB 157 9D WINDOWS 158 9E MENU 159 9F UP ARROW 160 A0 DOWN ARROW 161 A1 LEFT ARROW 162...

Page 30: ...tion on Axcess programming and using levels refer to the Axcess Programming Guide Mouse Control Channels Cont Channel Direction Speed 14 West Northwest speed1 15 Northwest speed1 16 North Northwest sp...

Page 31: ...when the Axcess operating software is programmed OLDesign also contains an online help system that describes producing custom overlay designs and pushbutton descriptions and then storing them on your...

Page 32: ...Using the OLDesign Engraving Program 28 PC Presenter...

Page 33: ...ceed one year Use alkaline batteries for long battery life and optimum performance Replacing the batteries The battery compartment of the TXC MS L is located on the back of the transmitter FIG 21 Slid...

Page 34: ...ve richardson TX 75082 USA 469 624 8000 800 222 0193 fax 469 624 7153 technical support 800 932 6993 046 004 1901 4 05 2005 AMX Corporation All rights reserved AMX the AMX logo the building icon the h...

Reviews: