For full warranty information, refer to the AMX Instruction Manual(s) associated with your Product(s).
12/08
©2008 AMX. All rights reserved. AMX and the AMX logo are registered trademarks of AMX.
AMX reserves the right to alter specifications without notice at any time.
3000 RESEARCH DRIVE, RICHARDSON, TX 75082 • 800.222.0193 • fax 469.624.7153 • technical support 800.932.6993 • www.amx.com
93-0678-30
REV: D
Place The UPS Properly
It is necessary to select a proper environment to install the unit, in order to minimize the
possibility of damage to the UPS and extend the life of the UPS.
•
Keep at least 20cm (8") clearance from the rear panel of the UPS from the wall or
other obstructions.
•
Do not block the air-flow to the ventilation openings of the unit.
•
Ensure that the installation site environmental conditions are in accordance with the
UPS working specifications to avoid overheat and excessive moisture.
•
Do not place the UPS in a dusty or corrosive environment or near any flammable
objects.
•
This UPS is not designed for outdoor use.
Setup
IMPORTANT
: Plug the UPS onto the wall receptacle to charge the UPS for over 8 hours
after initial installation.
Initial Battery Charge (required before first use)
IMPORTANT
: Plug the UPS onto the wall receptacle to charge the UPS for over 8 hours
after initial installation.
Plug-In Charge
If the Input Power Cord is connected to the wall receptacle properly and the utility is normal,
the UPS will start charging automatically without processing “Turn On” procedure.
Note:
Charge the batteries for at least 8 hours every 3 months when the UPS is in an
idle condition.
Connect Utility and Load
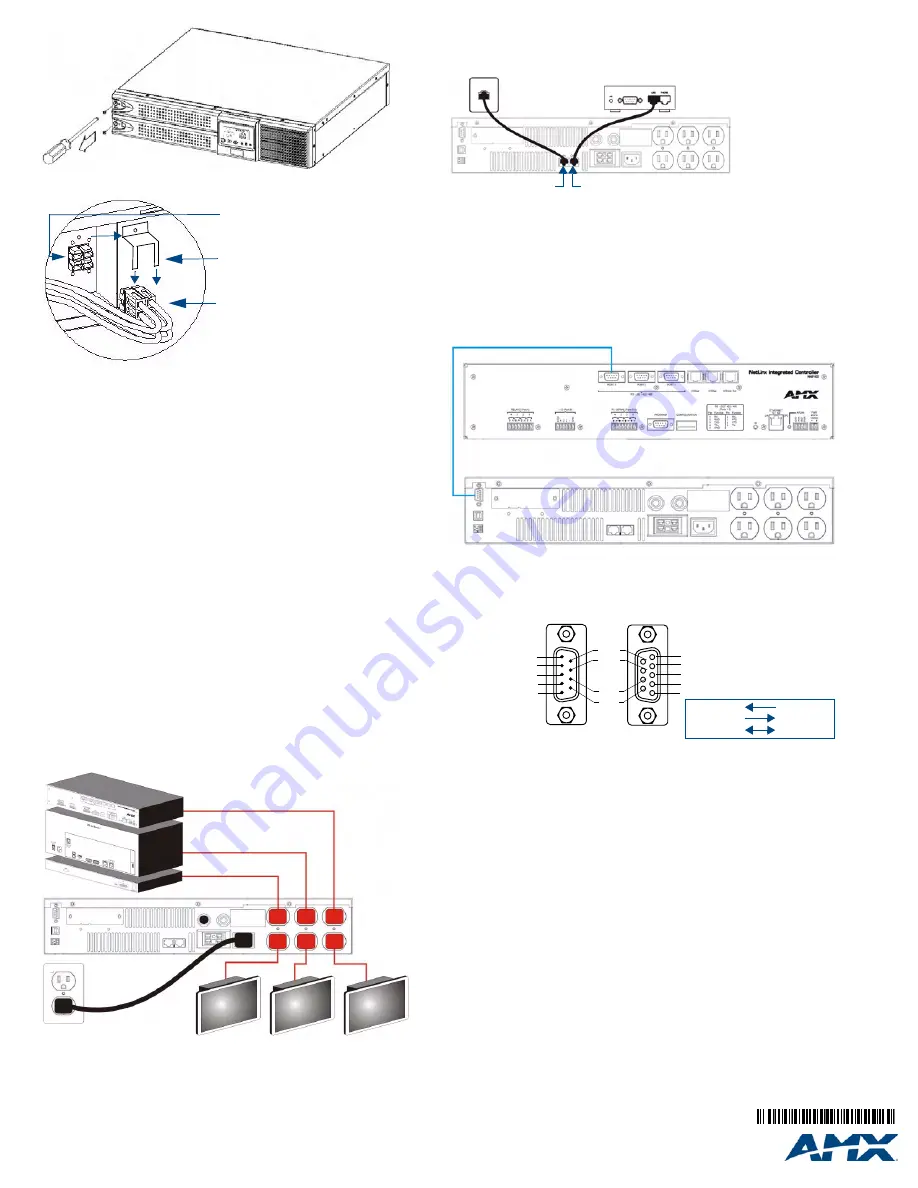
First, connect the UPS with Utility, then plug the loads into the Outlets on the rear of the
UPS (FIG. 6). To use the UPS as a master “On/Off” switch, make sure that all of the loads
are switched “on”. These UPS outlets provide battery backup and surge protection to the
equipment when Utility voltage is out of window.
Caution
: Do not connect a laser printer to the UPS outlets.
Connect Network Surge Protection
Connect a 10 base-T / 100 base-T network cable with the RJ-45 network surge protection
“IN” jack on the rear of the UPS. Connect from the “OUT” jack with network cabling to
network equipment (FIG. 7).
NOTE
: If using the NXA-UPS1500 as part of a MAX system, do not run the A/V segment of
the network through the RJ45 network surge protection jack on the UPS.
The A/V segment of a MAX network requires a GB Ethernet switch, and the NXA-UPS1500
only provides a 10/100 connection.
You can connect the Control segment of the MAX network to the UPS, since it does not
require a GB connection to operate properly.
Connect the RS-232 Communication Port
Connect the supplied RS-232 interface cable between the RS-232 port on the rear of the
UPS and an available RS-232 port on the NetLinx Master (FIG. 8).
RS-232 Communication Port Pin Assignment
The NXA-UPS1500 provides a DB9F (9-pin female) connector to communicate via RS-232.
The pinout configuration for the RS-232 Communication Port connector is shown in FIG. 9:
Operation
Turn On the UPS
1.
Connect the UPS to the wall receptacle. LCD will display “OFF”, when Utility is nor-
mal. If there is nothing on the LCD, go to step 3.
2.
Push the “On” Switch on the front panel to start the UPS. Both the LCD and Utility
LED (Green) are lit. The start-up procedure is completed and the loads are supplied
by the UPS.
To cold start the UPS, press the “On” Switch on the front panel for approximately 3
seconds until the LCD lights up and buzzer sounds, then release the “On” Switch.
The UPS starts operating and Battery Backup LED (Amber) lights up. The cold start-
up procedure is completed and the loads are supplied by the UPS.
The UPS will run under Backup mode and the buzzer alarms every 2 seconds in
case of blackout or over/under voltage. On the contrary, If Utility is back to normal
and then the UPS will run under Utility mode and silence alarm.
CAUTION
: The UPS will remain at “NO” output, if the start-up operation is not proceeded
properly even though the Input Power Cord is connected to the wall receptacle.
Turn Off the UPS
1.
Press the “Off” Switch for at least 3 seconds to turn off the UPS.
In some occasions, the UPS will shut itself down in case of overload, output short-
circuited or battery cutoff point reached in the Backup mode.
2.
The UPS will automatically shut off the output and beep for 5 seconds then
completely shut itself down.
FIG. 4
Remove the two screws that secure the Battery Compartment Cover
FIG. 5
Remove the metal securing piece, connect it to the battery cable harness, and
connect the harness to the matching connector inside the unit.
FIG. 6
Connect Utility and Load
4-pin connector from the
battery wiring harness
4-pin connector power
connector inside the enclosure
Metal securing piece
NetLinx / MAX Equipment
Touch Panels
UPS
FIG. 7
Connect Network Surge Protection
FIG. 8
Connect RS-232 Communication Port
FIG. 9
RS-232 Communication Port Pin Assignment
To Network
Network
Equipment
OUT
IN
(Network Surge Protection)
5
4
3
2
1
9
8
7
6
(Male)
NetLinx
(Female)
5
4
3
2
1
9
8
7
6
UPS
Pin 2: TX signal
Pin 3: RX signal
Pin 5: GND
Pin 2: RX signal
Pin 3: TX signal
Pin 5: GND
RX (Pin 2)
TX (Pin 3)
GND (Pin 5)
TX (Pin 2)
RX (Pin 3)
GND (Pin 5)


