background image

8

 4. CLIMBING SMALL OBSTACLES

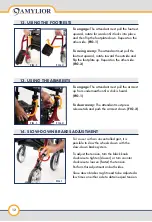
Pressing your foot down on the extended frame  
(curb climbers) makes it easier to lift the front wheels 
to negotiate curbs. 

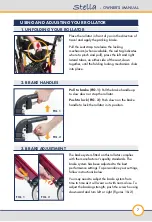
 5. HANDLE HEIGHT ADJUSTMENT


(DEPENDING ON MODELS)

FIG. 1

FIG. 2

Activate the brake to immobilize the rollator.

Model 1 (FIG.1): 

This adjustment should be done 

while standing. Press the gray adjustment button and 
move the push handle up/down until you obtain the 
required height. As a guide, the wrist should align 
with the handgrip. Once positioned, release the gray 
button. 

Model 2 (FIG.2): 

This adjustment should be done 

while standing. Open the tightening tab, press the 
gray adjustment button and move the push handle 
up/down until you obtain the required height. As a 
guide, the wrist should align with the handgrip. Once 
positioned, release the gray button and close the 
tightening tab. 

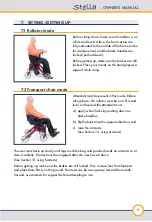
 6. BACK STRAP ADJUSTMENT

FIG. 1

FIG. 2

Strap height (FIG.1): 

Unscrew (yellow arrow) the 

gray knobs on both sides of the rollator and slide the 
back strap up/down on the extruded handle until 
the required height. The back strap should be well 
positioned on the back in the lumbar area. Once 
positioned, tighten the gray knobs (red arrow). 

Strap rotation (FIG.2): 

The flip-back strap allows for 

use in either rollator mode or transport chair mode.

Summary of Contents for Stella

Page 1: ...Before using this product please read this manual carefully to insure user safety OWNER S MANUAL Rollator M OM PD A20608 EN 1000587 Rev 05 ...

Page 2: ...Obstacles 8 Handle Height Adjustment 8 Back Strap Adjustment 8 Sitting Getting Up 9 Folding your Rollator 10 Attaching Removing the Storage Bag 10 Cup Holder Installation 1 1 Cane Holder Installation 1 1 Using the Footrests Optional equipment 12 Using the Armrests Optional equipment 12 Slow Down Brakes Adjustment Optional equipment 12 Technical Specs 13 Limited Warranty 13 Our Mission 14 Our Value...

Page 3: ...ny form whatsoever even in part unless prior written consent from the manufacturer For updates on these instructions please contact the manufacturer or visit www amylior com SPECIFICATIONS AND INTENDED USE FOR INDOOR AND OUTDOOR USE The STELLA rollator is intended as a walking aid for people with reduced mobility who weigh up to 300 lb 136 kg for the standard model and 400 lb 180 kg for the heavy ...

Page 4: ... locks are released the wheels should rotate freely Do not lean to one side always keep your weight balanced on the rollator Leaning forward while using the Stella as a transport chair without proper assistance can cause tipping In rollator mode before sitting put your hands on the hand grips and back up until your legs touch the seat In transport chair mode before sitting back up until your legs ...

Page 5: ...tor brakes work properly Avoid exposing the rollator directly to the sun or extreme heat for an extended period of time as this can cause the rollator s parts to overheat and burn the user This rollator is not intended to be used as a seat or otherwise in a moving vehicle Do not lean foward while using as transport chair NOTE You and your attendant should consult a qualified professional for the c...

Page 6: ...ng commercially available products Never use steam degreasers Never use scouring or harmful cleaning agents Maintenance The STELLA rollator requires little maintenance If the braking function weakens wheel movement becomes stiff or you notice any other functional impairment please take the rollator to your authorized dealer for servicing Never use any kind of lubricant on any parts of the rollator...

Page 7: ... 2 BRAKE HANDLES FIG 1 FIG 2 Pull to brake FIG 1 Pull the brake handle up to slow down or stop the rollator Push to lock FIG 2 Push down on the brake handle to lock the rollator in its position 3 BRAKE ADJUSTMENT FIG 1 FIG 2 The brake system fitted on this rollator complies with the manufacturer s quality standards The brake system has been adjusted to the best performance settings To personalize ...

Page 8: ...2 This adjustment should be done while standing Open the tightening tab press the gray adjustment button and move the push handle up down until you obtain the required height As a guide the wrist should align with the handgrip Once positioned release the gray button and close the tightening tab 6 BACK STRAP ADJUSTMENT FIG 1 FIG 2 Strap height FIG 1 Unscrew yellow arrow the gray knobs on both sides...

Page 9: ...fore sitting down the rollator must be on a firm and level surface and the attendant must a apply wheel locks by pushing down on brake handles b flip the back strap the opposite direction and c raise the armrests See Section 13 using armrests The user must back up slowly until legs touch the bag and position hands on armrests to sit down carefully Footrest must be engaged after the user has sat do...

Page 10: ...r and prevent any damage to items Pull the seat strap when available the red tag indicates where to pinch and pull and pull upward FIG 1 until the rollator locks in folded position FIG 2 9 ATTACHING REMOVING THE STORAGE BAG FIG 2 FIG 1 To remove the storage bag fold the rollator slightly FIG 1 and slide bag out of receptacle pulling on both ends FIG 2 To replace the bag reverse above steps The SWL...

Page 11: ...older SWL safe working load is 3 lb 1 3 kg 11 CANE HOLDER INSTALLATION NOT COMPATIBLE WITH ARMRESTS FIG 2 FIG 1 FIG 3 Installing the cane holder reversible left or right requires no tools Simply clip both cane holder s parts to the same side Clip the upper part underneath the handle FIG 1 Clip the bottom part above the brake or above the front wheel FIG 2 For proper cane alignment once clipped bot...

Page 12: ... engage The attendant must pull the armrest up from underneath until a click is heard FIG 1 To clear away The attendant must press release tab and push the armrest down FIG 2 14 SLOW DOWN BRAKES ADJUSTMENT FIG 1 For a user with an uncontrolled gait it is possible to slow the wheels down with the slow down brake system To adjust the tension turn the black knob clockwise to tighten slower or turn co...

Page 13: ...nty on the aluminum frame and cross braces 5 years on the brake handles and a 12 month warranty on all other parts Parts subject to wear or misuse such as upholstery handgrips and wheels are excluded from warranty If this product is found to be defective it will be repaired or replaced according to the manufacturer s decision This warranty does not cover freight or labor charges incurred during th...

Page 14: ...y where everyone can contribute their very best Innovation is the essence of our vision We are continuously moving forward learning improving challenging the status quo by encouraging our employees to pursue new ideas that make a difference Excellence is the goal in our performance It is the main driver in achieving our objectives We believe this excellence highlights our leadership and firm deter...

Reviews: