


ADSP-2181 EZ-KIT Lite Evaluation System Manual
1-5
Getting Started
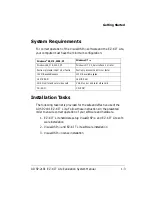
To configure your board to take advantage of the audio capabilities of the
demos, use the following procedure.
1. Plug a set of self-powered computer speakers into jack
J1
on the
board. Turn on the speakers and set the volume to an adequate
level.
2. Connect the line out of an electronic audio device to jack
J2
on the
board. Set jumper
JP2
to
LINE
.
3. Open Jumper
JP2
to
GND
to enable the AD1847 codec. (This is the
board default).
This completes the hardware installation. For information about the
EZ-KIT Lite hardware design, refer to
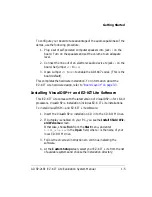
Installing Vi+ and EZ-KIT Lite Software
This EZ-KIT Lite comes with the latest version of Vi+ for 16-bit
processors. Vi+ installation includes EZ-KIT Lite installations.
To install Vi+ and EZ-KIT Lite software:
1. Insert the Vi+ installation CD into the CD-ROM drive.
2. If Autoplay is enabled on your PC, you see the
Install Shield Wiz-
ard Welcome
screen.
Otherwise, choose
Run
from the
Start
menu, and enter
D:\ADI_Setup.exe
in the
Open
field, where
D
is the name of your
local CD-ROM drive.
3. Follow the on-screen instructions to continue installing the
software.
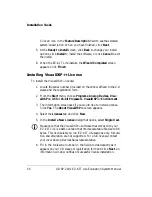
4. At the
Custom Setup
screen, select your EZ-KIT Lite from the list
of available systems and choose the installation directory.
Summary of Contents for ADSP-2181
Page 42: ...Using EZ KIT Lite VisualDSP Interface 2 18 ADSP 2181 EZ KIT Lite Evaluation System Manual ...
Page 58: ...Designing EZ ICE Compatible Systems 3 16 ADSP 2181 EZ KIT Lite Evaluation System Manual ...
Page 60: ...A 2 ADSP 2181 EZ KIT Lite Evaluation System Manual ...
Page 64: ...B 4 ADSP 2181 EZ KIT Lite Evaluation System Manual ...
Page 70: ...INDEX I 6 ADSP 2181 EZ KIT Lite Evaluation System Manual ...


