background image


b.

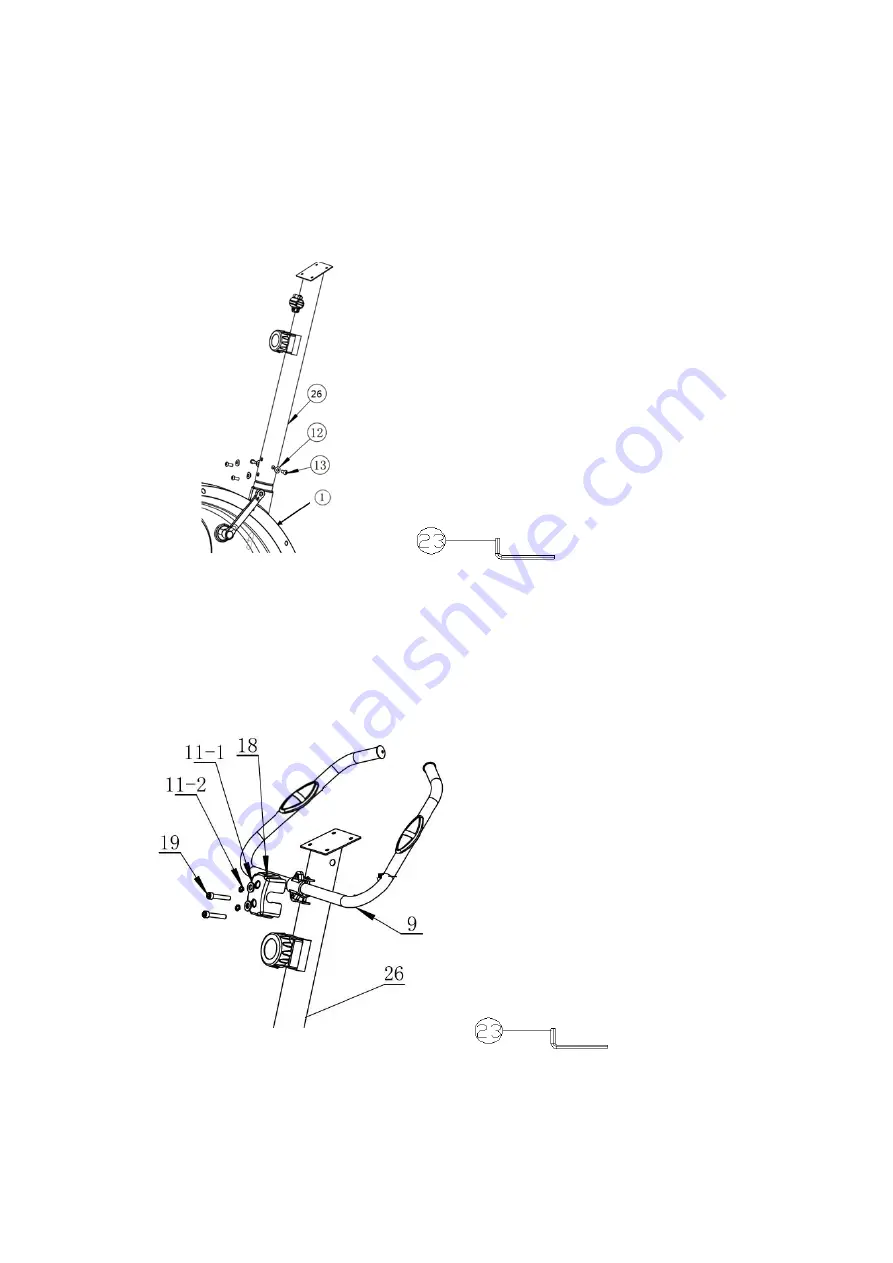
  After finish connecting all cables, insert the Handlebar Support Tube (26) to the front opening tube 

of the Main Frame (1), to tighten it with 4 X Ø8 Curved Washers (12) and 4 X M8*16 Hexagon Screws 

(13) by L shape wrench (23). 


STEP 5 

a.


Fix Handlebar (9) on the Handlebar Support Tube (26) and tighten with 2 X M7*1.0 Screws (19), 2 X 
Spring Washers (11-2) and 2 X Ø8 Flat Washers (11-1) by L shape Wrench (23).   

b.

  Then button the Cover for Handle (18) on the Handlebar (9). 


Summary of Contents for MAGNETIC BIKE

Page 1: ...Installation Video https youtu be gNXEiI0vYHw MAGNETIC BIKE USER S MANUAL CAUTION Read all precautions and instructions in this manual before using this equipment Keep this manual for future reference ...

Page 2: ...2 CONTENTS Safety Precautions 3 Exploded View 4 Part List 5 Assembly Instructions 6 Computer Operation Instructions 10 Maintenance 11 Exercise Instructions 12 Troubleshooting 13 Warranty 14 ...

Page 3: ... Please use the exercise bike when the equipment is in good operation Make necessary maintenance using original spare parts 9 When regulating the equipment note to observe the best position and largest adjustable position to ensure the adjusted position is safe 10 Unless otherwise specified in the instruction this exercise bike is only for use by one person at one time 11 During exercise please we...

Page 4: ...4 EXPLODED VIEW ...

Page 5: ... M16 Lock Knob 1 8 Saddle 1 22 Cover for Seat 1 9 Handlebar 1 23 L shape Wrench 2 10 Computer 1 24 Multi function Screwdriver 1 11 1 Ø8 Flat Washer 2 25 13 15 Wrench 2 11 2 Spring Washer 2 26 Handlebar Support Tube 1 12 Ø8 Curved Washer 4 27 Self tapping Screw 2 13 M8 16 Hexagon Screw 4 28 Screw 2 14 M8 Cap Nut 4 Ø8 Flat Washer M8 Cap Nut Ø8 Curved Washer M8 16 Hexagon Screw M7 1 0 Screw 13 15 Wre...

Page 6: ...13 15 Wrench 25 b Repeat Step a to install Rear Stabilizer 3 to Main Frame 1 STEP 2 a Insert the Seat Support Tube 4 to the rear opening tube of the Main Frame 1 b Adjust the Seat Support Tube 4 to your desired height then refit and tighten the M16 Lock Knob 21 c Select your desired forward or backward position then tighten the M10 Lock Knob 17 Note The Horizontal Sliding Bar 7 and the Cover for S...

Page 7: ...d sensor cables as shown in the following illustrations 1 Adjust the tension control to 8 levels making sure the supper tension cable A to bet the longest 2 Insert the upper tension cable A to the hole C in the middle of the lower tension hook B Then pull the upper tension cable A till the metal head D drop into the hole to lock in 3 Connect upper sensor cable E to lower sensor cable F ...

Page 8: ...to tighten it with 4 X Ø8 Curved Washers 12 and 4 X M8 16 Hexagon Screws 13 by L shape wrench 23 STEP 5 a Fix Handlebar 9 on the Handlebar Support Tube 26 and tighten with 2 X M7 1 0 Screws 19 2 X Spring Washers 11 2 and 2 X Ø8 Flat Washers 11 1 by L shape Wrench 23 b Then button the Cover for Handle 18 on the Handlebar 9 ...

Page 9: ...ng Screws 27 by the provided Screwdriver 24 STEP 7 a Firmly fix the left pedal 5L to the crank arm marked L in a anti clockwise direction by 13 15 Wrench 25 until tight b Now firmly fix the right pedal 6R to the crank arm marked R in a clockwise direction Failure to follow the above instructions could result in damage to the cranks and pedals Most Important After all above 7 steps finished the mos...

Page 10: ... provided to operate the Computer 2 To select the function you want press the MODE button and then select the function of choice from the table above 3 To reset the Computer hold down the MODE button for 5 seconds 4 The Computer will automatically turn off after 4 minutes when the bike is not in use Press any key to restart 5 To adjust the resistance turn the tension control to the right harder or...

Page 11: ... prints Note harsh chemicals will destroy the protective coating on the Computer and cause a static build up inside the Computer that could damage the components 3 Check the front and back stabilizers each time you use the bike to ensure the bike is stable and level with the floor 4 Check and tighten loose nuts buts the saddle adjustment locks pedals and handlebars to ensure they are secure each t...

Page 12: ...ew stretching exercises as shown below Each stretch should be held for approximately 30 seconds do not force or jerk your muscles into a stretch if it hurts STOP 2 The Exercise Phase This is the stage where you put the effort in After regular use the muscles in your legs will become more flexible Work to your own pace but it is very important to maintain a steady tempo throughout The rate of work ...

Page 13: ...ETY LOCK UNTIL TIGHT DO THIS WHILE STANDING 4 MY FEET BARELY TOUCH THE PEDALS 1 ADJUST THE HEIGHT OF THE SADDLE BY PULLING OUT THE HEIGHT ADJUSTMENT LOCK 2 ADJUST THE HEIGHT OF THE BIKE UNTIL THE SADDLE IS HIP HEIGHT 3 REPEAT STEP 1 AND STEP 2 UNTIL YOUR FEET COMFORTABLY SIT INSIDE THE FOOTSTRAPS WITH YOUR LEGS SLIGHTLY BENT 5 THE COMPUTER DOESN T RESPOND 1 REMOVE THE COMPUTER FROM THE COMPUTER BR...

Page 14: ... responsibility 3 The exercise bike is only for home use if the problems occurred by commercial use our company takes no responsibility 4 After sales service isn t restricted by time and our after sales service staff would solve your problems immediately after receiving telephone and hearing feedback idea of users 5 MOST IMPORTANT THING you should show our products series no and relative pictures ...

Reviews: