PIN CONFIGURATION
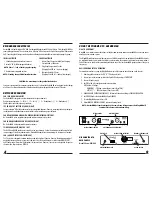
The WingMAN interface connector uses a 3-pin XLR jack on the back
panel. Connect the interface box with the wired intercom system us-
ing the 3 pin XLR jack on the rear panel.
Pin Configuration
Select Wired Channel
(A or B) to be used according to the pin de-
scription above
(also shown on pack panel). The Wired Channel
Switch matches the Anchor Audio PortaCOM belt pack channels.
BASIC SYSTEM OPERATION
1. Attach supplied antennas to the “RX” & “TX” back
panel jacks.
2. Connect your wired intercom system to the 3-pin XLR back
panel jack “INTERFACE”.
3. Connect DC power supply.
4. Set DIP Switch #4 to designate wired intercom system.
DIP Switch #4 Settings:
ON
(DOWN) – 100 ohm systems
(Anchor Audio PortaCOM)
OFF (UP) – 200 ohm systems
(Clearcom or RTS)
5. ANCHOR AUDIO PORTACOM USERS ONLY: Select wired
channel according to PIN CONFIGURATION on back panel.
6. Set GROUP knob to the AnchorMAN belt packs GROUP.
7. Turn the WingMAN power switch to ON.
8. Adjust WIRED & WIRELESS VOLUME to desired
listening levels.
NOTE: AnchorMAN belt packs assigned to the
same Group & Frequency as the WingMAN will
experience interference when transmitting.
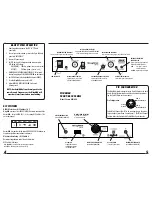
WINGMAN
FRONT/BACK PANELS
Model Shown: WM-900
DIP SWITCHES
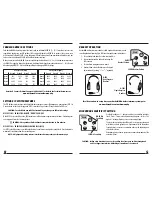
USER ID Selection – DIP Switches 1 & 2
WingMAN uses one of four GROUP/USER IDs to communicate with the
AnchorMAN. Select a USER ID
(1 – 4) by setting DIP Switches 1 & 2
on the back panel:
AnchorMAN belt packs with the same GROUP & USER ID setting may
experience significant transmission interference.
Wired Interface Setup – DIP Switch 4
Determines impedance match of the wired interface.
DIP Switch #4 Settings:
ON
(DOWN) –
100 ohm systems
(Anchor Audio PortaCOM)
OFF
(UP) –
200 ohm systems
(Clearcom or RTS)
RECEIVE ANTENNA JACK
(see ANTENNA PLACEMENT)
DC POWER JACK
Connect DC power supply
TRANSMIT ANTENNA JACK
(see ANTENNA PLACEMENT)
WIRED SYSTEM INTERFACE
3-pin XLR jack – connect to
wired intercom system
DIP SWITCH
Setup USER ID & Select
100/200 ohm operation
(see DIP SWITCHES)
XLR JACK PIN ASSIGNMENTS
(see PIN CONFIGURATION)
RECEIVE INDICATOR LED
Lights when signal is being received
ANCHORMAN GROUP SELECTOR
Set to match GROUP selection on
AnchorMAN belt packs
RECEIVE VOLUME CONTROL
Level of received signal going to the wired intercom system
TRANSMIT VOLUME CONTROL
Level of party line signal sent to the transmitter
POWER SWITCH
WIRED CHANNEL SWITCH
Select channel for wired system
(see PIN CONFIGURATION)
ANTENNA SEPARATION
INDICATOR LED
System signal range/performance is
effected by antenna separation
RED
Poor signal – increase
antenna separation
GREEN
Optimum signal strength
SETTING LISTENING LEVELS
Adjust the WIRED VOLUME & WIRELESS VOLUME
knobs to match listening levels across systems
PIN 1:
Ground
PIN 2:
Wired Channel A
PIN 3:
Wired Channel B
SWITCH USER 1 USER 2 USER 3 USER 4
1
UP DOWN UP DOWN
2
UP UP DOWN DOWN
4
5

