30’
CLASSIC FRAME TENTS
|
ASSEMBLY INSTRUCTIONS
ORGANIZE TUBING & FITTINGS
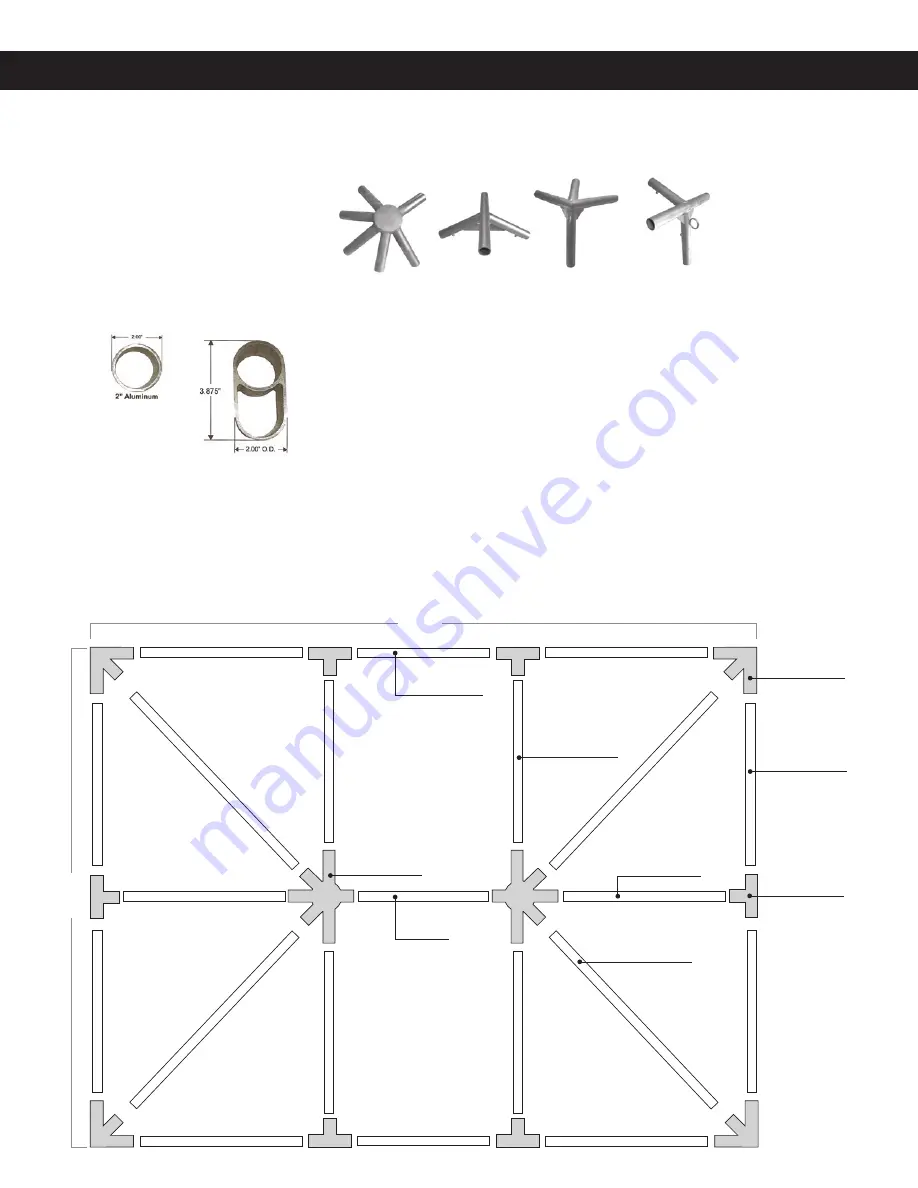
Lay out all the canopy frame tubing and fittings on the ground forming a loose diagram of the framing layout. It
is best to do the assembly in the approximate location that the tent will be in when assembled. Note: A 30’ x 40’
frame layout is used in this manual for illustration. Go to www.economytent.com for frame sketches for all the 30’
Classic frame sizes, along with a materials list for each frame size.
Corner Fitting
Mid-Leg/
Rafter Fitting
6-Way
Crown Fitting
14’4”
Side Eave Bar
9’4”
Top Bar
21’8” Double Tube
Corner Rafter
16’ Mid Rafter
16’ Mid Rafter
9’4”
Side Eave Bar
40’
30’
TUBING, FITTING, EQUIPMENT LIST
30’ TUBING
• 9’4” Side Eave Bar
• 9’4” Top Bar
• 14’4” Side Eave Bar
• 16’ Mid Rafter Bar
• 21’8” Double Tube Corner Rafter Bar
• 7’ - 9’ Adjustable Leg
SINGLE TUBE DOUBLE TUBE
30’ FITTINGS
6-Way Crown
Mid-Leg/Rafter
Top Extension
Corner
RECOMMENDED EQUIPMENT AND MANPOWER FOR INSTALLATION
:
• Six experienced installers can normally install these products in three hours or less.
• One or two 8’-10’ commercially rated step ladders.
• Approved safety head gear, steel toed shoes and eye protection.
• Frame tent jacks (minimum one for a 30’x40’ frame. One additional jack is recommend-
ed for each additional 20’ in length).
• Prior to laying out this or any other ETI product be sure you have thoroughly inspected
the area for any overhead or underground obstructions that may interfere with the safe
installation of this product. Please refer to IFAI anchoring and installation guidelines.


