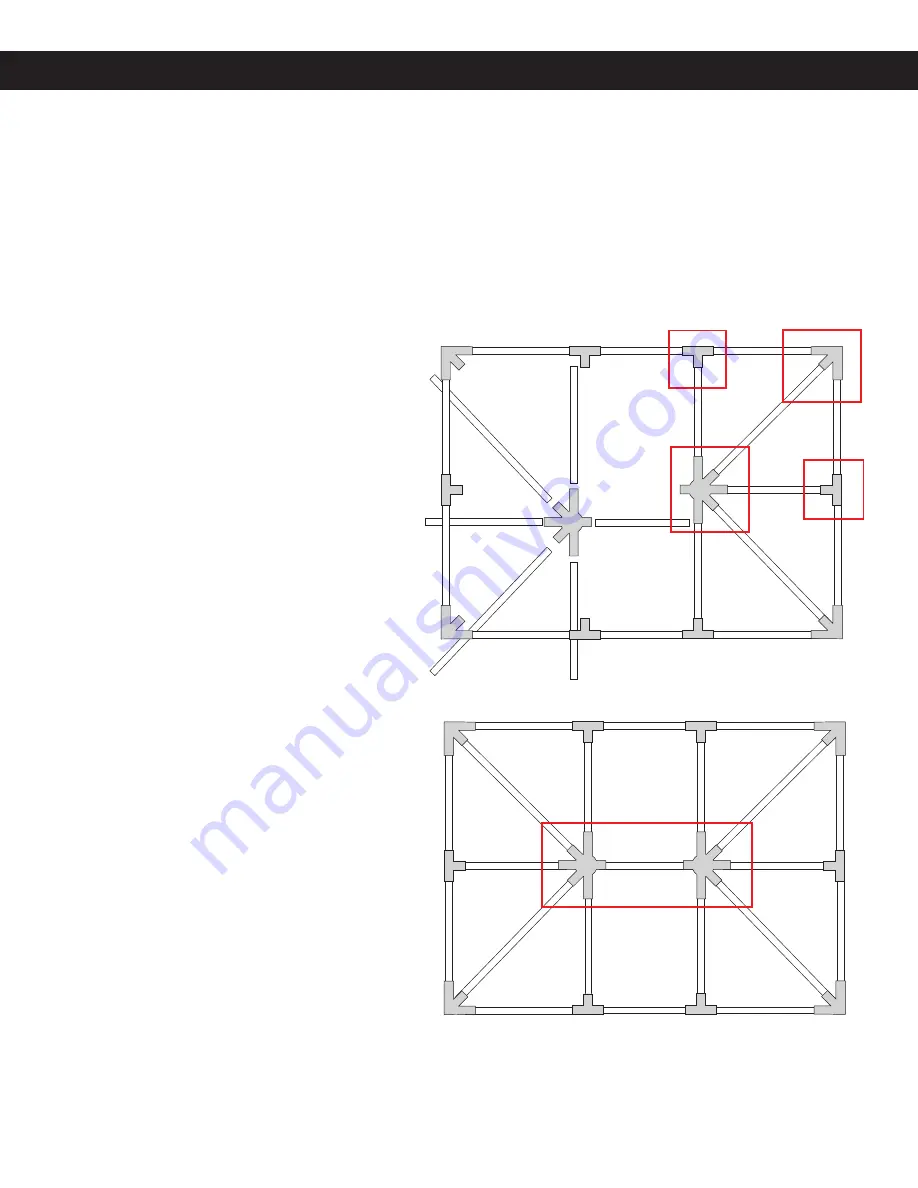
If needed, position a tent jack near the center
of the tent to support the 6-Way Crown Fitting
and Rafters while assembling. You may also
need a ladder when connecting the rafters to
the crown fitting.
4.
Starting on either the left or right 30-foot
side, slide a
(21’8-1/4”) Double Tube
Corner Rafter into the rafter connector
opening of each of the
Corner Fittings.
Assure that the snap buttons engage.
Using a ladder if necessary, attach the
6-Way Crown Fitting to the other end of
each of the Corner Rafters until the snap
buttons engage. If needed, temporarily
supply support the Crown Fitting using
the tent jack. (
Note: The corner connector
openings of the 6-Way Crown Fitting that
connect to the Corner Rafters will be the
shorter tube openings.) Be sure the 90°
connector opening of the 6-Way Crown
Fitting is pointing towards the opposite
Crown Fitting.
5.
One at a time, insert a
(16’1/4”) Mid-Rafter
to a
Mid-Leg/Rafter Fitting until the snap
button engages and connect the other
end to the 6-Way Crown Fitting until the
snap button engages. Repeat for all three
Mid-Rafters. The perimeter of the frame is
designed to flex sufficiently to make this
step easy.
6.
Repeat steps 4 & 5 for the opposite side.
7.
Connect the two
6-Way Crown Fittings in
the middle with a
(9’4”) Top Bar. Be sure
to insert the bar until the snap buttons
engage. You now have a completed 30’ x
40’ peak assembly.
RAFTER / PEAK ASSEMBLY
30’
CLASSIC FRAME TENTS
|
ASSEMBLY INSTRUCTIONS
For structures longer than 40’, connect the end
9’4” Top Bars to a Top Extension Fitting. Connect additional
9’4” Top Bars between the Top Extension Fittings and the opposite end 6-Way Crown Fitting. One at a time,
insert a
(16’1/4”) Mid-Rafter to a Mid-Leg/Rafter Fitting until the snap button engages and connect the
other end to the
Top Extension Fitting(s) until the snap button engages.


