background image

10

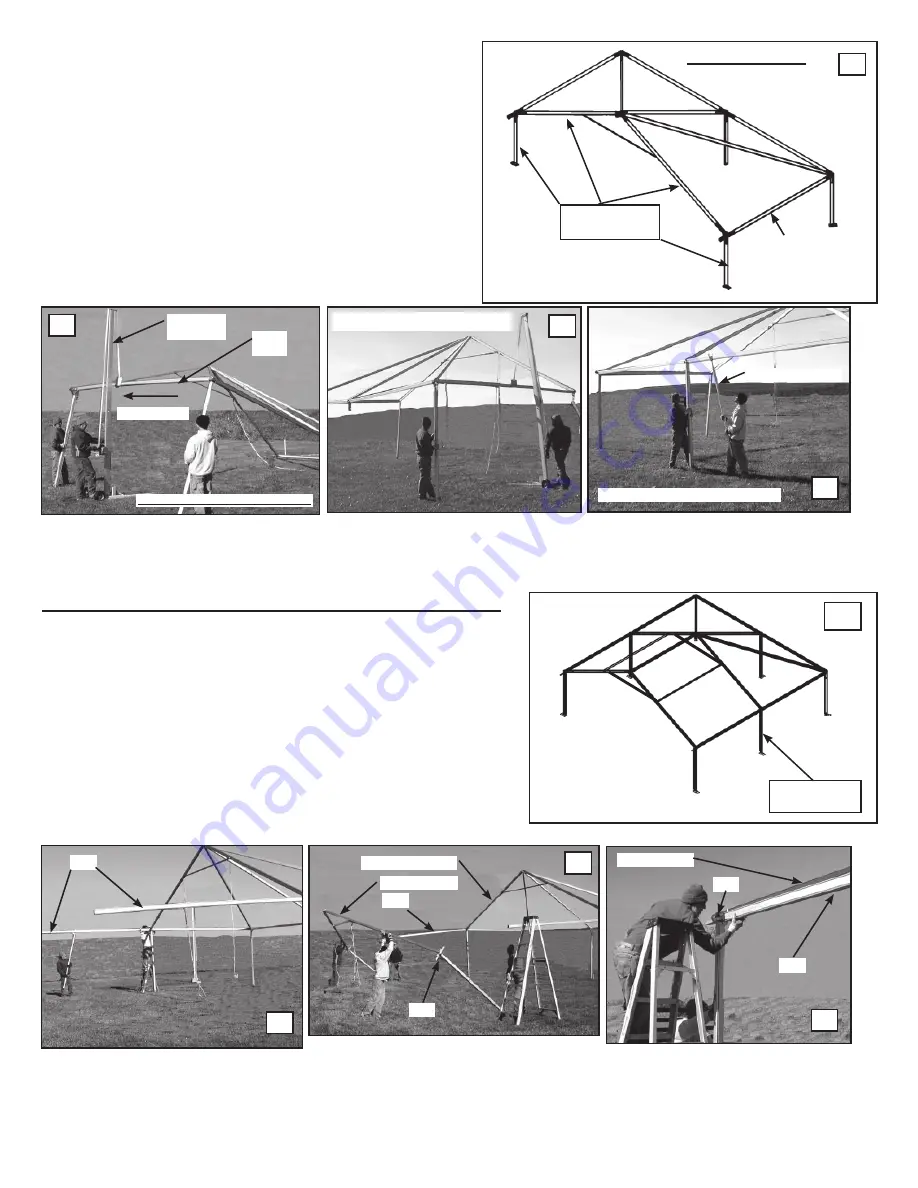
Using the method shown, you should be able to install the NAVI-
TRAC LT using only one NAVI-TRAC JACK.  

You will lift one side of the Hip End and insert and pin the 
Uprights onto the under fitting of each weldment.  Then, move the 
jack to the opposite side and install the remaining Uprights.

NOTE:  To achieve proper balance, the NAVI-TRAC JACK 
should be positioned 1 ft off center on the side Eave Bar (E-
15) in the direction of the peak of the frame (see fig. 22).  

Be 

attentive to the balance of the frame should uneven terrain require 
a slight shifting of this balance point.

INSTALLING UPRIGHTS UNDER 

THE UPPER HIP FRAME.

Use the NAVI-TRAC JACK at 1 ft off-center of 
the Eave Bar (in the direction of the peak) to lift 
one side of the hip end upper frame. Insert the 
uprights onto the bottom fitting of each weldment 
and secure horizontally with a short pin.

Repeat this procedure on the opposite side 
Eave Bar (again 1 ft off-center in the direc-
tion of the peak), and install the opposite side 
Uprights.

To install an upright under the Eave Weldment 
on the end eave, simply use a Lifting Cradle to 
lift the Eave as shown.

ADDING MIDDLE BAYS TO FORM A RECTANGULAR UNIT

The NAVI-TRAC LT hip end unit can be extended into a rectangle by adding 
parallel middle bays as shown (fig. 25). 

Each middle beam is constructed the same as the hip end cross beam, except 
that uprights are attached before standing the beam to vertical.  Also, the con-
necting parts (Ridge, Eaves, etc) are first installed on the standing beam, and 
the new middle beam is stood and then joined to them in the air.

Unlimited middle bays can be added, but when the unit exceeds 60’ in length, 
and for each each additional 60’ of overall length, an X-cabled bay must be 
included (see Appendix 1, fig. 57 & 58 for a description of the X-cabling).

This assembly section describes units with hip ends on both ends of the unit.  
(For hip end-gabled end or purely gabled end units, see Appendix 1).

Install Eave Bars (E-15) to the Eave Weldments 
of the standing beam.  Let the Eave Bars simply 
hang in a horizontal position as shown above.

.  Construct the add-on beamwith uprights attached 
and pivot it to vertical as shown above.  

Note: work-

ers must “foot” the baseplates to prevent the 
baseplates from sliding out.

Secure the new middle beam by attach-
ing the Eave Bars (E-15) from the standing 
beam to the mid beam’s Eave Weldment as 
shown above.

NAVI-TRAC

JACK

E-15 

(SIDE)

INSTALLING UPRIGHTS (1st SIDE)

INSTALLING UPRIGHTS (2nd SIDE)

INSTALLING UPRIGHT @ MID EAVE

LIFTING CRADLE

E-15

MIDDLE BEAM

HIP CROSS BEAM

E-15

E-15

MIDDLE BEAM

EW

EW

21

22

23

24

25

26

27

28

HIP END FRAME

HIP END 

CROSS BEAM

OFF-CENTER

HIP END 

CROSS BEAM

E-15 

(SIDE)

Summary of Contents for Navi-Trac Lite

Page 1: ...n instructions before the installation or removal of this product Installation Instructions Navi Trac Lite Frame Tent 30 Wide System Non Certified Installation 7701 Highway 41 N Evansville IN 47725 Ph...

Page 2: ...g Guidelines 7 Frame Assembly Cross Beam 8 Hip End Upper Frame 9 Upright Installation Adding Mid Bays 10 Hip Frame Completion 11 Fabric Installation Fabric Guide Bracket 11 Hip End Panel 12 Mid Panel...

Page 3: ...el beams intercon nected by ridge bars purlins and eave bars see the Appendix I The hip end gabled end hex end versions of the LT are guyed units that depend on staked ratcheted guy webs at legs and c...

Page 4: ...N SAFETY GUYS FABRIC PULL ROPES X CABLING NAVLTCS BAY15 U8 NAVLTCS BAY15 U9 NAVLT BAY15 RIDGE BRACE RB NAVLTCS BAY15 U10 U BRACKET END PROFILE WRAPS AROUND BEAM ON BOTH SIDES L BRACKET END PROFILE WRA...

Page 5: ...E 3580660 1 1 UPRIGHTS U 8 UPRIGHT 8 8004450 8 2 WELDMENTS FITTINGS PLATES BA BASEPLATES ADJUSTABLE 2 HOLED 8004505 8 2 CW CORNER WELDMENTS W PINS 8004525 4 0 RW RIDGE WELDMENTS W PINS 8004545 1 1 EW...

Page 6: ...se of the section to avoid slippage along the ground 10 When installing gabled end units be sure all beams are stabilized either by safety guys or cross cabling until con nected to a section of the un...

Page 7: ...E LINE IS EQUAL TO THE UPRIGHT HEIGHT FOR EXAMPLE 8 UPRIGHT 8 STAKE OUT DISTANCE 1 30 Stake through base plate Drive into ground as far as possible 42 Stake driven through stake plate Stake must be dr...

Page 8: ...t pin provided thru the rafter side to side to secure the connection Slide the top squared ends of each Rafter R 30 onto the Ridge Weldment RW and secure with the short pins provided on the weldment A...

Page 9: ...Corner Weldments at each end of the end Eave Bar assembled in the preceding steps The free ends of the Eave Bars used to pivot the cross beam can now be attached to the Corner Weldments and pinned ver...

Page 10: ...y adding parallel middle bays as shown fig 25 Each middle beam is constructed the same as the hip end cross beam except that uprights are attached before standing the beam to vertical Also the con nec...

Page 11: ...in the tensioning slot of the upright leg as shown to the right see fig 34 35 Using the butterfly set screws attach the Navi Trac Wheeled Panel Guide wheels into the open end of the bracket at the hin...

Page 12: ...frame fig 38 Insert the leading edge of the kedar between the guide wheels and pull the panel up and over When the leading edge of the kedar reaches the eave weld ment on the opposite side pull the co...

Page 13: ...the tent to the other so that the snaps hang near the Fabric Guide Brackets Feed the leading edge of each Middle Panel kedar through the gap in the guide wheels on each side of the Middle Panel and sn...

Page 14: ...HOTO THE TENT WALLS HAVE ALREADY BEEN INSTALLED TO SLOT IN UPRIGHT WEB RATCHET DOUBLE HOOK MID 2 OR HIP MID 1 TENSION STRAP 2 TENSION STRAP 1 PULL RING VELCRO GUY WEB DOUBLE HOOK TENSION STRAPS WEB RA...

Page 15: ...ITH CHANNELS E 15 EAVE 15 8004410 0 2 RG 15 RIDGE W HOOKS 15 8004415 0 1 R 30 RAFTER 30 WHITE BRACE HOLE 8004440 0 2 EE 10 GABLED END MID EAVE 10 8004475 1 0 EW 10 GABLED END WING EAVE 10 8004460 2 0...

Page 16: ...it will be easier to install the Gabled End Uprights GU and the Gabled End Rafter Fittings GFL and GFR while that end beam is still on the ground On the 30 Frame the top fitting on the GU must be slid...

Page 17: ...NCE RIGHT SIDE LEFT SIDE STANDARD LOOP GROMMET LACE WITH WEATHER FLAP TOP CHANNEL A structure with 2 Gabled Ends lacks the initial stability normally provided by the hip end frame during installation...

Page 18: ...so that the beam does not slide out from under the workers pushing it up After the first bay has been X cabled the installation safety guys can be removed Gabled Ends are installed in the same way as...

Page 19: ...legs are hinged see parts BH BHG on page 4 so that the beam can be pivoted to vertical after the baseplate has been secured to the ground or to appropriate footings The baseplates have 4 holes for st...

Page 20: ...VLWH 6WDNLQJ LQIRUPDWLRQ SURYLGHG LQ WKH LQVWDOODWLRQ LQVWUXFWLRQV LV QRW D VXJJHVWLRQ DERXW ZKDW LV QHFHVVDU WR PHHW D VLWH VSHFL F ORDG RU DGGLWLRQDO LPSRUWDQW LQIRUPDWLRQ FRQVXOW 7KH 3URFHGXUDO DQ...

Reviews: