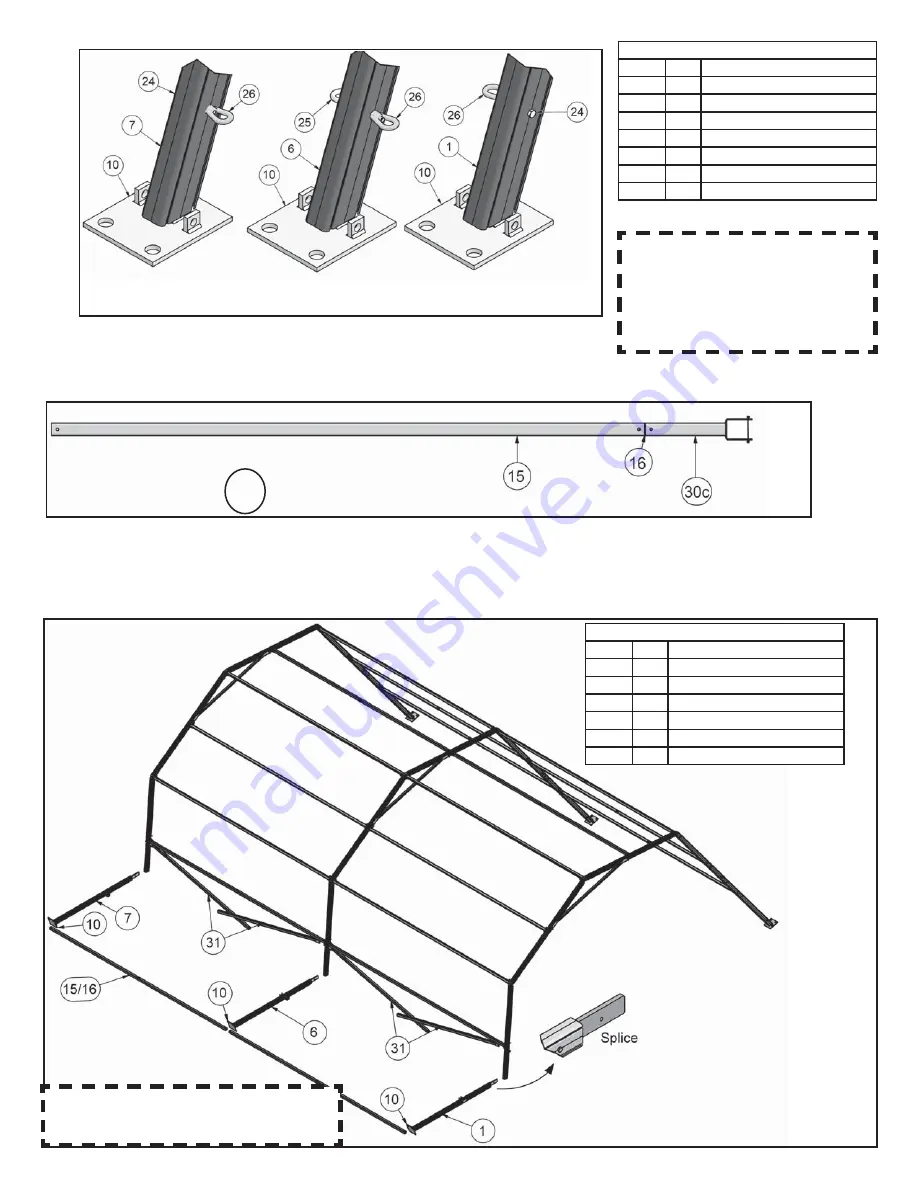
Right Leg w/
bolt and eyenut.
Figure 5b
Mid Leg w/ eye-
bolt and eyenut.
Left Leg w/ bolt
and eyenut.
Figure 5b Parts List
ITEM
Qty
Description
24
2
3/8” x 2 3/4” Bolt
26
3
Eye Nut
25
1
Eye Bolt
10
3
Base Plate Weldment
7
3
Lower Leg Right
6
3
Lower Leg Mid
1
3
Lower Leg Left
STEP 6 - Add Lower Legs to the remaining side.
•
Connect the four (4) frame lifts to a half purlin with a splice to form the frame lift assembly.
See Figure 6a
.
Frame Lift Assembly
31
Figure 6a
•
Lay out the parts as the previous step. Secure the base plates to the legs with the appropriate hardware.
•
Secure the frame lifts to the purlin on the upper leg with the shock cord. The shock cord should be next to the leg and the
half purlin lying more or less under the purlin.
See Figure 6b.
Figure 6b
8
Note: On 8’ Extension Kits, sub-
stitute the Eye Nut and/or Eye Bolt
(Items 25 & 26) with Bolt and/or
Nylock Nut (Items 24 & 31) because
eyes will not be required on 8’ bays
where cables are not required.
Note: For installation of frames with exten-
sions, (2) additional Frame lift assemblies
will be required per extension bay.
Figure 6b Parts List
ITEM
Qty
Description
15/16
2
Purlin
31
4
Frame Lift Assembly
10
3
Base Plate Weldment
7
3
Lower Leg Right
6
3
Lower Leg Mid
1
3
Lower Leg Left


