background image


15

8. PREPARATION BEFORE USE 

 
The measurement environment recommended by ISO 8655 is as follows. 
Temperature: Constant between 15°C and 30°C, changes in temperature ±0.5°C.     
Humidity: 50%RH or greater   
 

8-1  Filling the Evaporation Trap with Water 

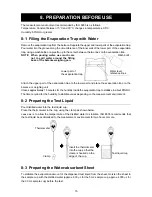
Remove the evaporation trap from the balance. Separate the upper and lower parts of the evaporation trap. 
Pour water into the groove along the circumference of the inner wall of the lower part of the evaporation 
trap, using a wash bottle or a pipette, up to the center between the two lines on the evaporation trap.   

NOTE   When pouring water, use much care 

not to spill water around the fitting 
boss of the balance weighing pan. 


Attach the upper part of the evaporation trap to the lower part and place the evaporation trap on the 
balance or weighing unit. 
It takes approximately 15 minutes for the humidity inside the evaporation trap to stabilize to about 85%RH. 
The time required for the humidity to stabilize varies depending on the measurement environment. 
 

8-2  Preparing the Test Liquid 

Pour distilled water into the test liquid cup. 
Place the thermometer in the cup, using the clamp as shown below.   
Leave as is to allow the temperature of the distilled water to stabilize. ISO 8655 recommends that 
the test liquid be acclimatized to the measurement environment for two hours or more. 


8-3  Preparing the Water-absorbent Sheet 

To stabilize the evaporation amount of the dispensed test liquid from the sheet, moisten the sheet in 
the sample cup with the distilled water (approx. 600 

L for the 5 mL sample cup, approx. 4000 

L for 

the 30 mL sample cup) before the test. 

Wash bottle

Water level 
reference lines 

Lower part of 
the evaporation trap

Thermometer 

Clamp 

Test liquid cup 

Insert the thermometer 
into the cup so that the 
clamp is hooked on the 
edge of the cup. 

Summary of Contents for BM Series

Page 1: ...Pipette Accuracy Tester Kit for the BM series BM 014 INSTRUCTION MANUAL 1WMPD4002534C ...

Page 2: ... by any means without the written permission of A D Company Limited The contents of this manual and the specifications of the instrument covered by this manual are subject to change for improvement without notice Microsoft Windows Excel and Word are either registered trademarks or trademarks of Microsoft Corporation in the United States and or other countries ...

Page 3: ...NG A PC TO THE BALANCE 12 6 1 Connecting a PC 12 6 2 Checking COM Port Numbers 13 7 CALIBRATING THE BALANCE 14 7 1 Calibrating Using the Internal Mass Calibration of balance 14 8 PREPARATION BEFORE USE 15 8 1 Filling the Evaporation Trap with Water 15 8 2 Preparing the Test Liquid 15 8 3 Preparing the Water absorbent Sheet 15 8 4 Using the Thermometer 16 9 MEASUREMENT 22 9 1 Measuring Procedure 22...

Page 4: ...ster Kit is contained in a carrying case The case is only for carrying the tester and is not solid enough to endure transportation So do not transport the tester using the carrying case When transporting the tester be sure to use the original packing material When handling the tester be careful not to drop it even if it is placed in the carrying case The illustration below shows the content of thi...

Page 5: ... hold the 5 mL sample cup Balance weight Used for the BM 252 500 300 200 in combination with the microfuge tube holder To hold the 5 mL sample cup without using the 30 mL sample cup holder Sample cup A measuring cup to contain the test liquid dispensed from a pipette with a water absorbent sheet installed to prevent water droplets from remaining on the edge of the pipette tip Test liquid cup A con...

Page 6: ...e percentage to the pipette volume The mass value data from the balance can be transmitted to the PC either using a COM port or using a USB connection For a USB connection use the accessory USB converter For testing various pipettes easily multiple test conditions pipette volume number of measurements and specifications can be set previously When multiple operators are set previously an operator c...

Page 7: ...eak to prevent drafts in the measurement environment from influencing the weighing operation and enable a stable weighing The evaporation trap is designed for an easy dispensing of the test liquid The upper part has a sloped surface so that the pipette can be inserted from obliquely above 1 5 Description of the Sample Cup When dispensing a test liquid from the pipette to perform an accuracy test o...

Page 8: ...te 2 Lift the plate and remove the hooks 3 Rotate the plate on the axis of the back edge Rotate the plate on the axis of the front edge 4 Remove the plate from the chamber 5 Remove the weighing pan and so on refer to the figure below from the BM balance 1 3 1 3 2 4 Hook Screw Hook Separation plate 5 BM 500 BM 300 BM 252 BM 200 BM 20 BM 22 Weighing pan Breeze break i Dust plate Pan support Pan supp...

Page 9: ... 3 Insert the 5 mL sample cup into the microfuge tube holder 4 Install the lower part of the evaporation trap on the evaporation trap base 5 Install the upper part of the evaporation trap on the lower part to complete assembly Completed 1 2 3 Center positioning boss Evaporation trap base Microfuge tube holder 5 mL sample cup 4 5 Evaporation trap Upper part Evaporation trap Lower part ...

Page 10: ...sample cup is used Insert the 5 mL sample cup holder into the 30 mL sample cup holder and then insert the sample cup To use the 5 mL sample cup only with the microfuge tube holder place the balance weight on the microfuge tube holder Then insert the sample cup into the holder 1 2 Center positioning boss Evaporation trap base 30 mL sample cup holder 5 mL sample cup holder 5 mL sample cup 30 mL samp...

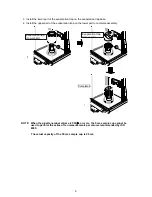
Page 11: ...p on the lower part to complete assembly Completed NOTE When the pipette nominal volume is 500 L or more the 5 mL sample cup cannot be used to perform the series of ten measurements per volume recommended by ISO 8655 The actual capacity of the 30 mL sample cup is 25 mL 3 4 Evaporation trap Upper part Evaporation trap Lower part ...

Page 12: ...not affected by air from heaters or air conditioners Install the balance where it is free of dust Install the balance away from equipment which produces magnetic fields Install the balance in a stable place avoiding vibration and shock Corners of rooms close to pillars or walls far from a passageway are best as they are less prone to vibration The weighing table should be solid and free from vibra...

Page 13: ...tor of the BM series to remove the static electricity 5 INSTALLING WinCT Pipette For detailed information on the WinCT Pipette program refer to How to use WinCT Pipette pdf in the WinCT Pipette CD ROM For installing WinCT Pipette refer to Readme txt in the WinCT Pipette CD ROM System requirements OS Windows XP SP2 or later CPU Pentium or the equivalent 1 GHz or more recommended RAM 512 MB or more ...

Page 14: ... When connecting the USB converter to the USB port for the first time installing a driver is required Some PCs may require a driver installation even when the USB port used is changed The driver installation CD and the instruction manual are contained in the same package with the USB converter For instructions on installation read the manual After driver installation connect the USB converter to t...

Page 15: ...are and Device Manager 4 Double click Port COM LPT COM port numbers will be displayed When the USB converter is used ATEN USB to Serial Bridge COMx appears In the example below the COM port number is 4 The COM port for a PC is displayed as Communications Port COMx In the example below the PC has two COM ports Therefore two COM ports appear Communications Port COM1 and Communications Port COM2 Chan...

Page 16: ...nothing in the holder connect the AC adapter and warm up the balance for at least one hour 3 Press the CAL key to display Cal in 4 The balance performs calibration using the internal mass Do not allow vibration or drafts to affect the balance 5 If GLP output is set glp is displayed the calibration test report is output to the RS 232C interface or stored in memory For details refer to GLP output in...

Page 17: ...kes approximately 15 minutes for the humidity inside the evaporation trap to stabilize to about 85 RH The time required for the humidity to stabilize varies depending on the measurement environment 8 2 Preparing the Test Liquid Pour distilled water into the test liquid cup Place the thermometer in the cup using the clamp as shown below Leave as is to allow the temperature of the distilled water to...

Page 18: ...below the lower limit for the display range or there is an error in the temperature sensor or internal circuit Hi Appears when the measurement temperature exceeds the upper limit for the display range or there is an error in the temperature sensor or internal circuit LCD ON OFF button AUTO OFF button MAX MINI button Battery cover Sheath Sheath holder Low battery indicator Minimum value display Max...

Page 19: ...he main body Then turn the battery cover in clockwise direction using a coin until the mark on the battery cover is aligned with the lower mark on the main body The battery cover that is not secured properly may result in water entering inside and damaging the thermometer CAUTION Precautions on the battery use The provided battery is for monitoring purposes and its life may therefore be shorter th...

Page 20: ...to measure the temperature When there is steam arising from the liquid handle the thermometer so that the display is not exposed to the steam Otherwise the steam may damage the thermometer When measuring the semisolid material Stick the sensor to the depth where you would like to measure the temperature in the material Attempting to forcibly stick the sensor into the material when the measurement ...

Page 21: ...her than the sheath to high or low temperatures of the substances to be measured Storing the maximum and minimum temperatures in memory The thermometer can automatically store the maximum and minimum temperatures measured after the battery is installed in the thermometer or after the memory is reset Press the MAX MIN button to display the maximum or minimum temperature as shown on the right Gas Sh...

Page 22: ...old it for more than two seconds The display goes into the bar display and both the maximum and minimum temperatures stored in memory are reset to store new maximum and minimum temperatures About the auto power off function and turning the power off Auto power off function The thermometer has the auto power off function The auto power off function is disabled when the battery is replaced To enable...

Page 23: ... Specifications Sensor Thermistor Temperature measurement range 40 0 C to 260 0 C Display resolution 0 1 C Measurement accuracy 1 0 C 9 9 to 59 9 C 2 0 C 19 9 to 10 0 C 60 0 to 99 9 C 3 0 C 29 9 to 20 0 C 100 0 to 199 9 C 4 0 C 40 0 to 30 0 C 200 0 to 260 0 C Display refresh rate Every second Waterproof level JIS IPX7 Waterproof for 30 minutes at a water depth of 1 meter still water at room temper...

Page 24: ...s does not exceed the specified maximum permissible error Repeatability exceeds does not exceed the specified maximum permissible error 9 3 Example Causes of Measurement Errors Evaporation of the test liquid Evaporation of the distilled water dispensed from the pipette into the sample cup can be a cause of measurement error To reduce errors caused by evaporation Be sure to use the evaporation trap...

Page 25: ...e balance in a stable place avoiding vibration and shock Use a solid weighing table that is free from vibration If the installation site is the second floor or higher use the anti vibration table Airflow Airflow in the measurement environment yields unstable measurement values To reduce errors caused by airflow Install the balance where it is not affected by heaters or air conditioners or where no...

Page 26: ...k function is useful How this function works After the test liquid is dispensed from the pipette the measurement starts When the mass value is stable data is averaged After a certain period of time the averaged value is locked in the display Averaging process Locked display NOTE The RE ZERO operation unlocks the display 10 2 Auto Print Mode In the balance function setting of Data output dout when ...

Page 27: ... table AD 1671 to avoid vibration We recommend that you use the built in static eliminator of the BM series if the cause of the unstable values may be due to static charges Repeatability of the measurement values is low The measurement values are not correct Measures to take Referring to 3 PRECAUTIONS BEFORE USE check the measurement environment Using a weight measure the balance repeatability and...

Page 28: ...he sheet is installed in the cup before shipping AX PT 01 30 mL sample cup with a water absorbent sheet installed 30 mL sample cup 5 pcs Lid for 30 mL sample cup 5 pcs Water absorbent sheet for 30 mL sample cup 5 pcs The sheet is installed in the cup before shipping AX PT 02 Water absorbent sheet for the 5 mL sample cup 5 pcs AX PT 03 Water absorbent sheet for the 30 mL sample cup 5 pcs AX PT 04 ...

Page 29: ... 5 1000 0 8 8 0 0 3 3 0 2000 0 8 16 0 3 6 0 5000 0 8 40 0 3 15 10000 0 6 60 0 3 30 0 1 1 The maximum volume selectable for adjustable volume pipettes 2 The BM 20 22 can be used for the pipette volume range from 1 L to 200 L 3 The BM 252 can be used for the pipette volume range from 20 L to 10000 L 4 The BM 500 300 200 can be used for the pipette volume range from 200 L to 10000 L NOTE Pipette accu...

Page 30: ...28 MEMO ...

Page 31: ...13 ...

Page 32: ...eet Thebarton South Australia 5031 AUSTRALIA Telephone 61 8 8301 8100 Fax 61 8 8352 7409 A D KOREA Limited 한국에이 엔 디 주 서울특별시 영등포구 국제금융로6길33 여의도동 맨하탄빌딩 817 우편 번호 150 749 817 Manhattan Bldg 33 Gukjegeumyung ro 6 gil Yeongdeungpo gu Seoul 150 749 Korea 전화 82 2 780 4101 팩스 82 2 782 4280 OOO A D RUS OOO ЭЙ энд ДИ РУС 121357 Российская Федерация г Москва ул Верейская дом 17 Business Center Vereyskaya Pla...

Reviews: