p9
E1 Single Speed Electric Motor Unit, 12V & 24V
To Suit Self-Tailing Winch Sizes 28,34,40
INSTALLATION INSTRUCTIONS
STEP 5
*Note:
The push button [A1] requires 25mm depth clearance the behind mounting surface.
The push button is supplied with 500 mm (19 5/8”) of cable and the motor unit with 1400 mm
(55 3/16’’) of control cable. If the push button to motor unit requires more than 1500 mm (59”)
of cable you will need to provide your own extension cabling.
•
Select the desired position for the push button [A1].
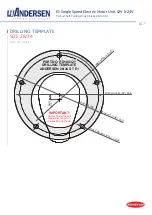
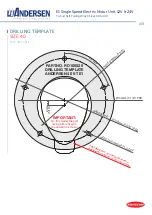
• Drill a Ø19 mm (3/4”) hole at the center of the push button location and a 5mm (3/16”) hole
immediately beside it for the breather tube. Or drill a Ø25mm (1”) hole, at a 2mm offset to the
centre of the push button location. Refer to the push button drilling diagram below.
•
Using the supplied push button gasket [A2] as a template, drill 3 x Ø3 mm (1/8’’) mounting holes.
•
Ensure the clear breather tube is inserted into the back of the push button.
•
Fit gasket [A2] and push button [A1] in place (with hinged cover opening upwards, if mounted on
vertical surface).
•
Apply a small amount of sealing compound to the mounting holes.
•
Fasten push button with provided 3 pcs. #6 x 19 mm screws [A9].
HOLE
Ø5mm
(3/16’’)
for breather
tube
12mm
(1/2’’)
20mm
(3/4’’)
HOLE
Ø19mm (3/4’’)
ON CENTRE
50mm
(1 15/16’’)
Cover in open position
50mm
(1 15/16’’)
2mm
(1/16’’)
37mm
(1 7/16’’)
3 HOLES
Ø3mm (1/8’’) TYP
25mm
(1’’)
50mm
(1 15/16’’)
HOLE
Ø25mm (1’’)
OFFSET 2mm from
centre of switch
9mm
(3/8’’)
DRILLING TEMPLATE
PUSH BUTTON
NOT TO SCALE


