background image

4

5

the blade. If this happens, you can clean out the hair by brushing out the cavity 

with a small brush or an old toothbrush while the blade is off the clipper.

REPLACING OR CHANGING BLADE SET

To replace or change your blade set, slide the blade bracket onto the hinge of 

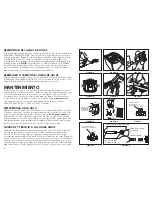
the clipper (Figure C) and with the clipper 

turned ON

, push the blade towards 

the clipper to lock into position.

USER MAINTENANCE

The internal mechanism of your motor clipper has been permanently lubricated 

by the factory. Other than the recommended maintenance described in this 

manual, no other maintenance should be performed, except by Andis Company, 

or an Andis Authorized Service Station. To find an Andis Authorized Service 

Station near you log on to 

www.andis.com

 or contact our customer service 

department: 1-800-558-9441 (U.S.) or 1-800-335-4093 (Canada).

BLADE TEMPERATURE

Due to the high speed nature of Andis clippers, please check for blade heat 

often, especially on close cutting blades. If blades are too hot, dip the 

blades 

only

 into Andis Blade Care Plus or apply Andis Cool Care Plus and then Andis 

Clipper Oil. If you have a detachable blade unit, you can change your blade in 

order to maintain a comfortable temperature; using multiple blades of the same 

size is popular among groomers.

CARE AND SERVICING OF YOUR ANDIS CLIPPER BLADES

Blades should be oiled before, 

during

, and after each use. If your clipper blades 

leave streaks or slow down, it’s a sure sign blades need oil. Place a few drops of 

Andis Clipper Oil on the front and side of the cutter blades (Figure D). Wipe 

excess oil off blades with a soft dry cloth. Spray lubricants contain insufficient oil 

for good lubrication, but are an excellent clipper blade coolant. Always replace 

broken or nicked blades to prevent injury. You can clean the excess hair from 

your blades by using a small brush or worn out tooth brush. To clean the blades 

we suggest to immerse the 

b

lades only

 into a shallow pan of Andis Clipper Oil, 

while the clipper is running. Any excess hair and dirt that has accumulated 

between the blades should come out. After cleaning, turn your clipper OFF and 

dry blades with a dry cloth and start clipping again.

If upon cleaning your blades you find that the blades will still not cut, there may 

be a few fine pieces of hair trapped between the upper and lower blade. If this 

happens, you will need to snap the blade off the clipper. Proceed to slide the 

upper blade to one side, without loosening the tension spring or moving the 

upper blade completely out from under the tension spring (See Figure E for 

position of blade). Wipe the surface between the blades clean with a dry cloth, 

then place a drop of clipper oil where the upper and lower blades meet and also 

FIGURE A

FIGURE B

FIGURE C

FIGURE E

FIGURE D

OIL

OIL

OIL

FIGURE J

FIGURE K

INCORRECT

POSITION

OF DRIVE 

BEARING

FIGURE I

FIGURE H

FIGURE G

BLADE

DRIVE

MOUNTING

SCREWS

FIGURE F

CARBON BRUSH

CARBON BRUSH CANAL

BEVEL

INSERT BEVEL SIDE FIRST

SPRING

CAP

TOP OF CLIPPER

CORRECT

POSITION

OF

DRIVE

BEARING

Summary of Contents for AG2

Page 1: ...ctions MODEL AG2 AGP Item pictured may differ from actual product El artículo ilustrado puede diferir del producto real Il est possible que l article sur la photo soit différent du produit réel LITERATURE PACKET 04973 ...

Page 2: ... where aerosol spray products are being used or where oxygen is being administered 8 Do not use this appliance with a damaged or broken blade or comb as injury to the skin may occur 9 To disconnect turn control to OFF then remove plug from outlet 10 WARNING During use do not place or leave appliance where it may be 1 damaged by an animal or 2 exposed to the weather SAVE THESE INSTRUCTIONS THIS PRO...

Page 3: ...eaks or slow down it s a sure sign blades need oil Place a few drops of Andis Clipper Oil on the front and side of the cutter blades Figure D Wipe excess oil off blades with a soft dry cloth Spray lubricants contain insufficient oil for good lubrication but are an excellent clipper blade coolant Always replace broken or nicked blades to prevent injury You can clean the excess hair from your blades...

Page 4: ...ng blade drive assembly note the way it is positioned this will help you in reassembly Remove blade drive assembly Figure H 5 Drive bearing should be at its lowest position if not move it with your finger to lowest position Figures I J 6 Put on new drive assembly align screw holes and press down Figure H 7 Reassemble blade drive by mounting screws Figure G 8 Replace drive cap Figure F 9 Replace bl...

Page 5: ...erficies calientes 6 Nunca deje caer el aparato ni inserte ningún objeto en ninguna de sus aberturas 7 No lo utilice al aire libre ni lo opere donde se estén usando productos en aerosol nebulizados o donde se esté administrando oxígeno 8 No utilice este artefacto con una hoja o peine dañado o roto ya que se podrían ocasionar lesiones en la piel 9 Para desconectar coloque el control en la posición ...

Page 6: ... 4093 Canadá TEMPERATURA DE LA HOJA Debido a la naturaleza de alta velocidad de las recortadoras de Andis verifique el calor de la hoja con frecuencia especialmente para el caso de hojas de corte al ras Si las hojas están demasiado calientes remoje las hojas únicamente en Andis Blade Care Plus o aplique Andis Cool Care Plus y luego el aceite Andis para recortadoras Si tiene una unidad con hoja des...

Page 7: ...arbono destornille las tapas de los cepillos usando un destornillador estándar Trabaje en un lado a la vez Precaución los cepillos de carbono están cargados a resorte El resorte del cepillo debe estar a simple vista al desmontar la tapa Retire el resorte y el cepillo de su canaleta y luego quite el cepillo de carbono desgastado Incline la recortadora hacia un lado de modo que el cepillo de carbono...

Page 8: ...n centre de réparation agréé par Andis pour examen et réparation 5 Garder le cordon à l écart des surfaces chaudes 6 Ne jamais insérer un objet quelconque dans une ouverture de l appareil 7 Ne pas utiliser l appareil à l extérieur dans un endroit où des aérosols sont employés ou encore dans un endroit où l on administre de l oxygène 8 Pour éviter les blessures ne pas utiliser des lames ou des guid...

Page 9: ... les lames dans de l Andis Blade Care Plus ou appliquez de l Andis Cool Care Plus puis de l huile pour tondeuse Andis Si vous avez une lame détachable changez de lame pour maintenir une température confortable l utilisation de lames multiples de même taille est populaire auprès des spécialistes du toilettage ENTRETIEN DES LAMES DE LA TONDEUSE ANDIS Les lames doivent être huilées avant pendant et a...

Page 10: ...n robinet d eau la tenir sous un filet d eau ni la plonger dans l eau De telles manœuvres présentent un risque d électrocution et d endommagement de la tondeuse Andis Company ne pourra être tenue responsable de blessures qui font suite à une négligence leur longueur n atteigne 1 6 mm Pour remplacer les brosses en carbone dévisser leur capuchon avec un tournevis standard Procéder une brosse à la fo...

Page 11: ...En Canadá llame al 1 800 335 4093 para obtener información sobre reparaciones Adjunte también una carta explicando la naturaleza del problema Debido al material extraño que a veces se encuentra en el pelo la garantía no cubre las hojas ni su reafilado Andis no será responsable por el costo de ninguna reparación realizada por otra persona agencia o compañía ni por daños incidentales o consecuentes ...

Reviews: