14
REPLACING THE BLADE YOKE
1. Turn the trimmer off.
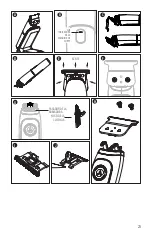
2. Unscrew the blade screws and remove the blade assembly
from the trimmer assembly (Fig. H)
3. Remove the upper blade/yoke by pulling the lower blade
towards you and away from the lower blade.
4. Place the upper blade/yoke on a flat surface with the yoke
facing upwards.
5. Locate the notches in the blade opposite the teeth and
gently twist the screwdriver clockwise/counterclockwise
between the blade and the yoke. (Fig J)
6. Completely remove the yoke from the upper blade and
clean the surface of the upper blade to remove any debris.
7. Place the new yoke into the mating hole with the groove
facing towards the teeth and press firmly ensuring the
tension spring mates with the groove on the yoke,
alternating from one side to the other until the yoke fully
seats in the upper blade.
8. Set the blade gap of the upper blade to the lower blade to
your preference, taking care that the upper blade does not
overhang, as it can cause damage to skin. (The blades are
gapped at 0.010” from the factory.) (Fig. N)
9. To re-assemble the blade ensure the lower blade holes
align with trimmer blade screw holes and the cam fits
between the yoke arms.
10. Reattach the two blade screws, once again confirming that
the upper blade does not travel over the lower blade.


