background image

4

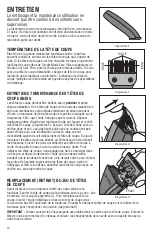
CHARgiNg UNit

the battery can be charged with the charging stand or by plugging power cord directly into the clipper: 

•  To charge with the charging stand

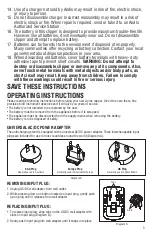
, plug wall adapter into 100-240V, 50/60 cycle AC electrical current or 

as noted on the unit. Make sure the proper input plug is attached to the wall adapter. Plug power cord 

directly into back of charger stand. Place clipper into the form fitting pocket on charger. Both power cord 

and clipper are "keyed" to fit only one way. The clipper has electrical contacts that touch electrical contacts 

in the charger. The weight of the unit will give sufficient contact. 

•  To charge by plugging power cord directly into the clipper

, plug wall adapter into 100-240V, 50/60 cycle 

AC electrical current or as noted on the unit. Make sure the proper input plug is attached to the wall adapter. 

Plug power cord directly into outlet on bottom of clipper. Power cord is "keyed" to fit only one way.

Before using your clipper for the first time, make sure the battery has been pre-charged for 2 hours. Note 

that it is normal for the clipper and wall adapter to feel warm to the touch when charging. This is especially 

true if the battery has been deeply discharged as indicated by the Battery Indicator Light turning red (see 

below) while the clipper is running in battery operation. the clipper will only charge when the switch is in 

the Off position. To use the clipper, move the switch button forward to the ON position. To stop and/or 

charge the clipper, return the switch button back to the OFF position.
You may keep the power cord plugged into the charging stand or clipper when not in use. The clipper has a 

lithium ion battery that cannot be damaged by overcharging. However, we recommend that the power cord 

be unplugged if not in use for more than a week. 

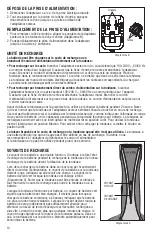
CHARgiNg iNDiCAtOR LigHtS 

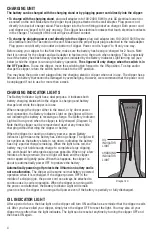
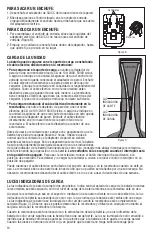
The Battery Indicator Light has a dual purpose. It indicates both 

battery charging status while the clipper is charging and battery 

charge level while the clipper is in use.
When charging the clipper either in the stand, or by direct power 

cord connection, the Battery Indicator Light on the clipper will turn 

red indicating the battery is receiving a charge. The Battery Indicator 

Light will turn green when the clipper is fully charged (Diagram C).  

Note that the clipper can be removed and used at any time while 

charging without harming the clipper or battery.
When the clipper is running on battery power, a green Battery 

Indicator Light means the battery has a strong charge. The light will 

turn yellow as the battery starts to run down, indicating the battery 

has only a partial charge remaining. When the light turns red, the 

battery may not hold enough charge to complete a large clipping 

job, and should be recharged as soon as possible. When only a few 

minutes of charge remain, the red light will flash and the clipper 

motor speed will gently pulse. When this happens, the clipper is 

about to automatically power OFF to preserve the battery.
Automatically powering off protects the lithium-ion battery and is 

not a malfunction. The clipper will resume normal battery powered 

operation when it is recharged. If the clipper powers OFF in the 

middle of a clipping job, the power cord can always be attached to 

continue use in corded operation. When the clipper is running with 

the power cord attached, the Battery Indicator Light will remain 

green to show the clipper is running at full power, even if the battery is partially or fully discharged.

OiL iNDiCAtOR LigHt

After a period of use, the blue light on the clipper will turn ON and flash as a reminder that the clipper needs 

oil. After you have oiled your clipper, simply turn the clipper OFF to reset the light. You may also oil your 

clipper more often than the light indicates. The light can be reset at anytime by turning the clipper OFF and 

then back ON again. 

OIL

INDICATOR

LIGHT

CHARGING

INDICATOR

LIGHT

Diagram C

Summary of Contents for RACR

Page 1: ...le que l article sur la photo soit diff rent du produit r el El art culo ilustrado puede diferir del producto real Il prodotto reale pu essere diverso da quello rappresentato De afbeelding kan verschi...

Page 2: ...ack of experience and knowledge if they have been given supervision or instruction concerning use of the appliance in a safe way and understand the hazards involved 3 Children shall not play with the...

Page 3: ...d result in fire or serious injury save these instructions OPERATING INSTRUCTIONS Please read the following instructions before using your new Andis clipper Give it the care that a fine precision buil...

Page 4: ...has a dual purpose It indicates both battery charging status while the clipper is charging and battery charge level while the clipper is in use When charging the clipper either in the stand or by dire...

Page 5: ...mpany or an Andis Authorized Service Station BLADE TEMPERATURE Due to the high speed nature of Andis clippers please check for blade heat often especially on close cutting blades If blades are too hot...

Page 6: ...Frequently remove accumulated hair from the cavity under the blade set Remove the blade set as described above and brush hair from the cavity using a small brush or toothbrush Use Guidelines for LITH...

Page 7: ...upplier or through an Andis Authorized Service Station If you wish your clipper to be serviced as well it should be carefully packed and mailed either Parcel Post Insured or U P S to any Andis Authori...

Page 8: ...ant un handicap physique sensoriel ou mental ou un manque d exp rience et de connaissances condition d avoir fait l objet de la supervision ou re u les instructions concernant l utilisation de l appar...

Page 9: ...er les autorit s locales 18 Avant de jeter des batteries usag es recouvrir les bornes de ruban adh sif solide pour viter les courts circuits AVERTISSEMENT Ne pas essayer de d truire ni de d monter la...

Page 10: ...ie est fortement d charg e comme indiqu par l allumage en rouge du voyant de la batterie voir ci dessous pendant que la tondeuse fonctionne sur batterie La tondeuse se rechargera seulement avec son in...

Page 11: ...un des guides de coupe con us pour la tondeuse Andis Diagramme D Les guide de coupe sont faciles utiliser ils s installent et s enl vent par enclenchement Pour attacher un guide de coupe le glisser s...

Page 12: ...de coupe Diagramme E Essuyer l exc s d huile avec un chiffon doux et sec Les lubrifiants pulv ris s ne contiennent pas assez d huile pour une lubrification correcte mais ce sont d excellents agents de...

Page 13: ...du chargeur La batterie acceptera une pleine charge apr s plusieurs cycles d utilisation et de recharge de la tondeuse 6 D brancher le chargeur ou la tondeuse de la prise secteur si de longues p riod...

Page 14: ...rtefacto puede ser utilizado por ni os de 8 a os de edad y m s y por personas con capacidades f sicas sensoriales o mentales reducidas o con falta de experiencia y conocimientos siempre y cuando hayan...

Page 15: ...sechar las bater as usadas cubra los terminales con cinta adhesiva resistente para evitar cortocircuitos ADVERTENCIA No trate de destruir o desarmar la recortadora ni le quite ninguno de sus component...

Page 16: ...d se sientan calientes al tacto al cargar Esto es especialmente cierto si la bater a ha sido profundamente descargada de acuerdo con las indicaciones de la luz indicador de la bater a ilumin ndose de...

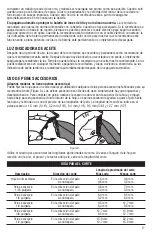
Page 17: ...se restablecer autom ticamente despu s de un apagado autom tico USO DE PEINES ACCESORIOS Algunos modelos no tienen peines accesorios Puede fijar las hojas para un corte m s largo utilizando cualquiera...

Page 18: ...s frontal y lateral de las hojas cortadoras Figura F Limpie el exceso de aceite de las hojas usando un pa o suave seco Los lubricantes en aerosol contienen una cantidad insuficiente de aceite para log...

Page 19: ...po tal vez no acepten una carga completa Esto es normal y no indica un problema con la bater a o el cargador La bater a aceptar una carga completa despu s de varios ciclos de uso y recarga de la recor...

Page 20: ...rung des Risikos von Verbrennungen Feuer elektrischem Schlag oder K rperverletzungen ist Folgendes zu beachten 1 Ein mit dem Stromnetz verbundenes Ger t niemals unbeaufsichtigt lassen 2 Die Nutzung di...

Page 21: ...bauen und nicht versuchen den Akku zu ersetzen 17 Akkus k nnen bei unsachgem er Entsorgung umweltsch dlich sein In vielen Gemeinden gibt es Batterie Akku Recycling bzw Sammelstellen Informationen ber...

Page 22: ...Vor dem erstmaligen Gebrauch des Ger ts sicherstellen dass der Akku zwei Stunden lang geladen wurde Hinweis Es ist ganz normal dass sich Ger t und Netzadapter warm anf hlen w hrend das Ger t aufgelade...

Page 23: ...lt werden Die Leuchte kann jederzeit zur ckgesetzt werden indem das Ger t aus und anschlie end wieder eingeschaltet wird Die lanzeigeleuchte wird auch nach einer automatischen Abschaltung zur ckgeset...

Page 24: ...ropfen Andis Schermaschinen l vorne und seitlich auf die Scherk pfe Abb F geben bersch ssiges l mit einem weichen trockenen Tuch abwischen Schmiersprays enthalten nicht genug l f r eine gute Schmierun...

Page 25: ...Akku nimmt eine vollst ndige Ladung an nachdem er mehrere Benutzungs und Aufladezyklen durchlaufen hat 6 Das Ladeger t bzw das Ger t von der Steckdose trennen wenn es voraussichtlich l ngere Zeit nic...

Page 26: ...stodito mentre collegato alla presa elettrica 2 Questa unit pu essere utilizzata da bambini di et superiore a 8 anni e da persone con abilit mentali sensoriali o fisiche ridotte o mancata esperienza e...

Page 27: ...re le batterie usate coprire i terminali con nastro adesivo resistente per impedire cortocircuiti ATTENZIONE non cercare di distruggere o smontare l apparecchio o rimuovere alcuno dei suoi componenti...

Page 28: ...pia della batteria che si accende in colore rosso vedi sotto mentre l apparecchio si sta caricando Si pu caricare l apparecchio solo quando l interruttore sulla posizione OFF spento Per utilizzare l a...

Page 29: ...utilizzando uno dei pettini inclusi ottimizzati per l apparecchio Andis Figura D I pettini inclusi si inseriscono con un solo scatto e quindi sono facili da utilizzare Inserire il pettine nel bordo su...

Page 30: ...lle lame Figura F Ripulire le lame dall olio in eccesso con un panno morbido e asciutto I lubrificanti spray non contengono olio sufficiente per una lubrificazione adeguata ma sono eccellenti per raff...

Page 31: ...rsi completamente Si tratta di un evento normale che non indica un problema con la batteria o il caricabatterie La batteria si caricher completamente dopo diversi cicli di uso e ricarica dell apparecc...

Page 32: ...amelijk letsel te verminderen 1 Laat een apparaat nooit zonder toezicht achter als de stekker in het stopcontact zit 2 Dit apparaat kan worden gebruikt door kinderen van 8 jaar en ouder en personen me...

Page 33: ...elijke overheid over afvoermethoden in uw omgeving 18 Wanneer oude batterijen worden afgevoerd moeten de batterijpolen met zwaar plakband worden bedekt om kortsluiting te voorkomen WAARSCHUWING Niet p...

Page 34: ...f is opgeladen voordat u de tondeuse voor de eerste keer gebruikt Let op dat het normaal is dat de tondeuse en de wandadapter warm aanvoelen tijdens het opladen Dit is met name het geval als de batter...

Page 35: ...rdt ook automatisch gereset nadat de tondeuse automatisch is uitgeschakeld GEBRUIK VAN OPZETKAMMEN Sommige modellen hebben geen opzetkammen U kunt de messen instellen voor een langere kniplengte door...

Page 36: ...brengen Tekening F Overtollige olie met een zachte droge doek van de messen vegen Smeerspray bevat onvoldoende olie voor goede smering maar is een uitstekend koelmiddel voor de tondeuse Gebroken of ge...

Page 37: ...ader De batterij kan volledig worden opgeladen nadat de tondeuse enkele malen is gebruikt en opgeladen 6 De stekker van de tondeuse uit het wandstopcontact nemen als verwacht wordt dat hij lange tijd...

Page 38: ...ca deve ser deixado desatendido quando estiver conectado tomada el trica 2 Este aparelho pode ser usado por crian as com 8 ou mais anos de idade e por pessoas com capacidades f sicas sensoriais ou men...

Page 39: ...re as pr ticas de descarte na sua regi o 18 Ao descartar baterias antigas cubra os terminais da bateria com fita isolante resistente para evitar curto circuitos ATEN O N o tente destruir ou desmontar...

Page 40: ...e am durante o carregamento Isto especialmente verdade se a bateria foi totalmente descarregada veja abaixo a descri o de luz indicadora vermelha da bateria enquanto conectada m quina em funcionamento...

Page 41: ...esencaixam facilmente Para conectar um pente deslize o acess rio na parte superior da l mina e empurre o para baixo at que encaixe na borda inferior da l mina Os pentes acess rios ajudam a orientar o...

Page 42: ...rente e na lateral das l minas de corte Diagrama A Limpe o excesso de leo das l minas com um pano macio seco Lubrificantes do tipo Spray cont m leo insuficiente para a boa lubrifica o mas s o um excel...

Page 43: ...egador A bateria voltar a aceitar uma carga completa ap s v rios ciclos de uso da m quina e de recarga 6 Desconecte o carregador da tomada de CA caso antecipe que ficar um longo per odo sem utilizar a...

Page 44: ...44 Andis 1922 Andis Andis 1 2 3 4 5 1 2 8 8 3 4 Andis 5 Andis 6 7 8 9 10 11 12 1 2 13 14 Andis 15 Andis 16 17...

Page 45: ...45 18 Andis AC DC AC DC A 1 AC DC 2 1 AC DC B 2 100 240V 50 60 Hz 100 240V 50 60 Hz 2 SAA A B...

Page 46: ...0 8 mm 1 8 3 2 mm 1 16 3 16 4 8 mm 5 16 7 9 mm 3 32 2 4 mm 5 32 3 9 mm 1 8 1 4 6 4 mm 3 8 9 5 mm 1 8 3 2 mm 1 4 6 4 mm 1 4 3 8 9 5 mm 1 2 12 7 mm 1 4 6 4 mm 3 8 9 5 mm 3 8 1 2 12 7 mm 5 8 15 9 mm 3 8...

Page 47: ...47 Andis Andis Andis Andis Blade Care Plus Andis Cool Care Plus Andis Andis E Andis F Andis G H 1 NiMH NiCd 2 3 4 5 6 Andis Andis Andis U P S Andis E F G H...

Page 48: ...ncore consulter ce guide en ligne rendez vous sur www andis com Para encontrar un centro de servicio autorizado de Andis o para acceder a este manual en l nea visite www andis com Rufen Sie die Websit...

Reviews: