33
EN
Note:
Especially for nocturnal use, it is recommended to
adjust the display to a very dark level to reduce the glare
effect. If the TigIR™ is then switched on the next day, the
display will appear so dark that it may be thought to be
defective. Therefore, if the screen appears to be black,
you should always press the #1 button a few times first.
Zoom
Pressing button 2 briefly switches between the zoom
levels listed below. Some of these can be turned off
in corresponding menu (p.34).
0.8x:
This zoom level offers the best overview and
is particularly helpful for orientation. However, since
the zoom is negative, it is difficult to estimate dis-
tances.
1x:
In this setting all objects on the display are the
same size as in reality. This setting is especially use-
ful in outdoor applications for a natural estimation
of the distance to persons or animals.
2x, 4x and 6x:
The higher zoom levels are particu-
larly suitable for observation and identification. Fre-
quently heat sources whose origin cannot be easily
determined are found in settlements or in the forest.
For example, rotting tree stumps, anthills or larger
stones produce clear heat signatures that can easily
be mistaken for humans or animals. With the help
of a strong zoom setting, objects can be classified
better by observing their movements closely - stones
e.g. move very little.
TigIR-3Z™:
Due to the different optics, the zoom
levels are 1.6x, 2x, 4x, 8x and 11x.
Menu
Special Functions
Menu
You can access the menu through simultaneous
pressing of buttons 1 and 3 (at least one second). As
long as you are in the menu, the normal functions of
the buttons are deactivated. The buttons now have
the following functions:
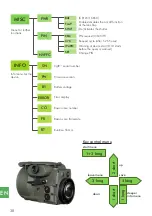
Overview
Button 1 short
= marker down, in collimation
menu image down.
Button 2 short
= marker up, in collimation menu
image up.
Button 3 short
= selection to the left in menus
with character input, in collimati-
on menu image to the left.
Button 4 short
= selection to the right in menus
with character input, in collimati-
on menu image to the right.
Button 1 long
= confirm selection/ validation of
the active number during PIN
entry
Button 2 long
= zoom level change, only in
collmation menu/ delete a num-
ber of the entered PIN
Button 3 long
= leave menu/selection,
in collimation menu = cancel.
Button 4 long
= Save setting.
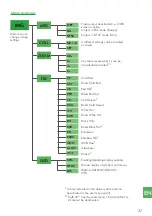
Navigating and saving in the menu
By briefly pressing the buttons 2 or 1 you can navi-
gate up and down in the menu, comparable to the
arrow buttons on the computer. Pressing and hol-
ding button 1 for at least one second is comparable
to pressing „Enter“ on the computer (p.38). By this
you can confirm a selection or move deeper into
the menu.
Pressing and holding button 3 leaves the resp. sub-
menu or whole menu without saving the settings.
Pressing and holding button 4 leaves the menu sa-
ving the settings.
IMG menu
In this area you can perform individual settings to your
device to adapt it to your operational requirements.
Submenu AVID – video output
All TigIR ™ have an analog video output which you
can select or activate. The function for this can
be found in the AVID submenu. In normal mode,
image output from the video output is disabled and
the selection is OFF.
ATTENTION:
If the video output is PAL or NTSC, no picture will be


