background image

34 

EN

displayed on the device‘s OLED screen. The screen 
will remain black until the video output is deactiva-
ted again. If you want to disable the video output, 
press and hold button 1 for 7 seconds. After relea-
sing the button, the device restarts in normal mode 
and the video output is deactivated again. 

To activate the video output, use button 1 or 2 to 
select PAL or NTSC output format, then press and 
hold button 4 to confirm your selection. „WAIT“ appe-
ars as confirmation. The screen then will go dark and 
the device will restart in the selected output mode. The 
image data is output via the video interface of the de-
vice connector. For display you need a corresponding 
screen or a recording device. For a video cable (not 
supplied), refer to Accessories on page 39. 

Note: 

The video output of the filters CR, RH and 

CG is not displayed in the corresponding colors 
but in black and white. 

Note:

  If the power/video access of the device 

connector is not used, it must always be closed 
waterproof with the cap provided.

Submenu COLL

In this submenu you can adapt the collimation of 
your TigIR™ 

Carrying out the collimation

The aim is to superimpose the camera image and 
the real image as precisely as possible. 

1.  Select memory position:

 After selecting the 

COLL submenu, select the corresponding me-
mory position. Since the collimation settings are 
very individual for each person, the TigIR™ has 
6 memory positions. Thus, one TigIR™ can be 
used by the whole family. Each user therefore sets 
his own memory position. The TigIR™ is already 
pre-collimated ex works in memory position 1.

2.  Collimation:

 using the TigIR™ look at a heat 

source which is also clearly observable in the 
visible spectrum. It should be as far away as pos-
sible to avoid additional parallax deviations (e. g. 
a standing person or a lamp at a distance of at 
least 50m/55yd/165ft with TigIR). 

3.  Select SET:

 The TigIR™ is now in collimation 

mode which starts in zoom level 1x. Pressing the 

buttons briefly allows you to align the image, 
whereby pressing button 1 moves the image 
down, button 2 moves it up, button 3 moves it left 
and button 4 moves it right. Now press the but-
tons until the thermal image and the real image 
are visible at the same place for your perception. 
If you also want to collimate the other zoom le-
vels, press and hold button 2. This way you chan-
ge to the next zoom level one after the other, and 
then the process starts all over again. Perform 
collimation in the other zoom levels as described. 

4.  Save collimation settings:

 If you are satisfied 

with the result of the collimation, save it by pres-
sing and holding button 4. „SAVED“ appears 
briefly to confirm. After that you will be asked if 
the 0.8x zoom should be activated or deactiva-
ted. To change between the 6 different collima-
tion memory positions, select the corresponding 
number in the menu and save it by pressing and 
holding button 4.

Note:

 For governmental appli-

cations of the TigIR-M-Series you 
will find more detailed collimation 
instructions at: http://marketing.
andres-industries.de/Kataloge/Col-
limation_TigIR6M_EN.pdf

Submenu ZOOM

All zoom levels are activated in the delivery state. In this 
submenu you can deactivate (or re-activate) unwanted 
zoom levels (except zoom level 1x and zoom level 2x for 
TigIR-3Z™). Select the desired zoom level, then change 
the setting to OFF (or ON to re-activate). Exit this selection 
by pressing and holding button 3. However, the corres-
ponding zoom level is only deactivated (or re-activated) 
after being saved by pressing and holding button 4. This 
process is confirmed by an „SAVED“.  

Submenu FILT

Only the filters CR, BCR, BRH, WH and BWH are 
activated in the delivery state. 
In the FILT submenu you can activate or deactivate 
all filters (except CR), so that only the filters required 
are displayed.

Select the desired filter, then change the setting to 

Summary of Contents for TigIR-3Z

Page 1: ...TigIR Handbuch Manual Stand 04 03 2021 FW 0 0 05 English pp 23 Deutsch S 2 ff...

Page 2: ...und Videoausgang Taste 1 Kurz dr cken Display Helligkeit alternierend Lang dr cken Manuelle Kalibrierung Sehr lang dr cken Videomodus PAL NTSC aus Taste 1 3 Gleichzeitig lang bet tigen Men starten Bat...

Page 3: ...en 2 Ger t schaltet automatisch aus Tasten Bet tigung Bet tigungsdauer Kurz 0 1s bis 0 5s Lang 1s bis 3s Sehr lang ab 7s Taste 4 Lang dr cken An Aus z B wenn Klappe besch digt Im Men lang dr cken Spei...

Page 4: ...t und als ein Kind der Andres Industries sollte er nat rlich extrem kurz werden und das niedrigst m gliche Gewicht haben Mit Absicht gingen wir wie schon bei der TILO nicht den Weg anderer Hersteller...

Page 5: ...Sonderfunktionen 11 Men 11 bersicht 11 Navigieren und Speichern im Men 11 IMG Men 12 Untermen AVID Videoausgang 12 Untermen COLL 12 Durchf hrung der Kollimation 13 Untermen ZOOM 13 Untermen FILT 13 Un...

Page 6: ...se Verwenden Sie nur u erlich intakte Marken batterien des Typs CR123 Das Batteriefach ist zum Ger teinneren abge dichtet Das bedeutet dass Sie auch bei Regen die Batterien wechseln k nnen In das Batt...

Page 7: ...t wechselt dann selbstt tig in den manuellen Kalibrierungsmo dus und bleibt dadurch weiterhin einsatzbereit Folgendes ist dann ver ndert 1 Es erscheint bei Bedarf das Shutterflag kleines nicht gef ll...

Page 8: ...ste Farbe Gr n ver wendet wird Mit diesem Filter ist Streulicht das z B vom Auge reflektiert wird weit weniger von Restlichtverst rkern wahrnehmbar Es handelt sich also ebenfalls um einen taktischen F...

Page 9: ...t rkere Kontraste an den berg ngen von einer Farbe zur anderen und macht noch kleinere Temperaturunterschiede sichtbar Mit diesem Filter k nnen thermisch weitgehend homogene Fl chen wie W nde besonder...

Page 10: ...et Handfl che siehe 1 c Himmel siehe 1 c und a Verwendung von wiederaufladbaren Batterien Akkus Die Nutzung von Akkus im Format CR123 Typ 16340 ist nicht gestattet Es ist m glich den TigIR mit 4 Batte...

Page 11: ...rmesignaturen die durchaus mit Menschen oder Tieren verwechselt werden k n nen Mit Hilfe einer starken Zoomeinstellung k nnen Objekte durch genaue Beobachtung ihrer Bewe gungen besser klassifiziert w...

Page 12: ...men s COLL w hlt man die entsprechende Speicherposition Da die Kollimationseinstellun gen f r Personen sehr individuell sind verf gt der TigIR ber 6 Speicherpositionen So kann ein TigIR von der ganzen...

Page 13: ...rden DIS Stellen Sie den Entfernungssch tzer in diesem Untermen ein Sie k nnen zwischen drei unter schiedlichen Einstellungen ausw hlen je nachdem f r welchen Einsatz Sie den TigIR verwenden wol len S...

Page 14: ...Dr cken der Taste 4 und wird mit SAVED best tigt PUK Wurde die PIN 5 Mal falsch eingegeben oder die Ein gabe abgebrochen wird ein Sperrbildschirm mit dem Hinweis Please enter PUK or contact andres de...

Page 15: ...Hot Boost Black Hot Boost Cold Red Boost Cold Green Black Hot Rainbow Rainbow HC Red Hot Cold Red IRON Bow Cold Green Glowbow De Aktivierung Bildschirmsymbole Hottest Entfernungssch tzer MEN HOG BUCK...

Page 16: ...ng Fehlercode Anzeige SN FW BV ERROR INFO De aktiviert die An Ausschaltfunktion der Objektivklappe CR123 16650 PWR PIN REQ CYC WARN SET BAT FLAP MISC PIN Abfrage ON OFF Abfragezyklus nach 1 255 Nutzun...

Page 17: ...r mit zus tzlicher Strom versorgung ber USB Stecker Das TigIR Video und Stromversorgungskabel ist kompatibel zum Videore corder mit WiFi und der externen Stromversorgung Nr 240432 Battery Charger 1665...

Page 18: ...ptergewinde M52x0 75 ARM52 Montagem glichkeiten Der TigIR Z ist voll kompatibel zu dem universellen Rusansystem ARM52 AD540 Hier gibt es f r prak tisch jeden Objektivau endurchmesser Ihrer Kamera oder...

Page 19: ...en Firmwarestand erhalten Update Service Unsere Produkte werden st ndig weiterentwickelt Auch beim TigIR finden kontinuierlich Weiterent wicklungen statt Damit auch Ihr TigIR immer auf dem neuesten St...

Page 20: ...10 bei erfolglosem Versuch NVFFC durchf hren S 10 falls erfolglos Ger t aus und wieder einschalten Falscher Batterietyp eingestellt Im Men BAT richtigen Batterietyp einstellen damit der Autoshutter wi...

Page 21: ...Iron Bow Glowbow Hottest Videoausgang PAL NTSC Bildschirm Micro OLED 873x500 Pixel FOV Blickfeld auf 100m horizontal 8 vertikal 6 4 14 0m 11 2m horizontal 4 vertikal 3 2 7 0m 5 6m Winkelaufl sung 0 0...

Page 22: ...es erworbe nen Produktes sofern dieser nicht bereits das Pro dukt direkt von der Andres Industries AG erworben hat EinabgewickelterGarantiefallf hrtnichtzueinerneuen Garantie von zwei Jahren die von d...

Page 23: ...TigIR Z Series Manual English pp 23 Deutsch S 2 ff Stand 03 04 2021 FW 0 0 05...

Page 24: ...al power supply and video output Button 1 Press momentarily Display brightness alternating Press and hold Manual calibration Press and hold for 7 sec Video mode PAL NTSC off Button 1 3 Press and hold...

Page 25: ...nd fold it back 2 device starts automatically Switch off 1 close flap 2 device switches off automatically Button 2 Press and hold change filter Press momentarily change zoom The zoom levels are TigIR...

Page 26: ...vilian market and as a product of Andres Industries it should of course be extremely short and have the lowest possible weight As with the TILO we intentionally did not go the way of other manufacture...

Page 27: ...batteries 32 Brightness adjustment 33 Zoom 33 Menu Special functions 33 Menu 33 Overview 33 Navigating and saving in the menu 33 IMG menu 33 Submenu AVID video output 34 Submenu COLL 34 Submenu ZOOM 3...

Page 28: ...to the inside of the device This means that you can change the batteries even in the rain Water entering the battery compartment cannot damage the internal electronics On occasion however it should be...

Page 29: ...omatically switches to manual calibration mode and thus remains ready for use The following is then changed 1 If necessary the shutter flag small unfilled squa re at the top right will appear 2 If the...

Page 30: ...t color used here is green With this filter e g stray light reflected by the eye is far less perceptible by image intensifiers So it is also a tactical filter However the nocturnal glare effect for th...

Page 31: ...emperature dif ferences visible With this filter thermally largely homogeneous surfaces such as walls can be particularly well inspected for changes e g wet areas However the orientation and classific...

Page 32: ...6340 is not allowed It is possible to use the TigIR with 4 batteries type CR123 or 2 accumulators type 16650 Please read the security advice exactly and fol low the instructions carefully Improper con...

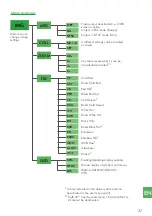
Page 33: ...of buttons 1 and 3 at least one second As long as you are in the menu the normal functions of the buttons are deactivated The buttons now have the following functions Overview Button 1 short marker d...

Page 34: ...of at least 50m 55yd 165ft with TigIR 3 Select SET The TigIR is now in collimation mode which starts in zoom level 1x Pressing the buttons briefly allows you to align the image whereby pressing butto...

Page 35: ...The correct type CR123 16650 should be selected in the BAT menu p 32 so that the battery war ning p 45 is displayed correctly and the low voltage detection and related safety functions work properly F...

Page 36: ...lity after switching on the device It is recommended to per form this procedure every 1 2 weeks as the sensor changes over time However the sensor will not be damaged if the NVFFC is not used permanen...

Page 37: ...Hot Boost Cold Red Boost Cold Green Black Hot Rainbow Rainbow HC Red Hot Cold Red IRON Bow Cold Green Glowbow Enabling disabling display symbols Hottest Distance MEN HOG BUCK OFF Are not activated in...

Page 38: ...e Error display SN FW BV ERROR INFO Enables disables the on off function of the lens flap CR123 16650 PWR PIN REQ CYC WARN SET BAT FLAP MISC PIN request ON OFF Request cycle after 1 255 uses Warning a...

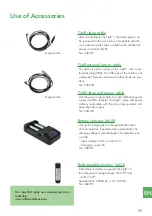
Page 39: ...the power supply cable but with additional power supply via USB connector The TigIR video and power cable is compatible with the mini video recorder and external power supply No 240432 Battery charger...

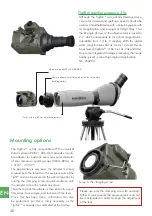
Page 40: ...thread M52x0 75 ARM52 Mounting options The TigIR Z is fully compatible with the universal Rusan system ARM52 AD540 It provides a suita ble adapter for basically every lens outer diameter of your camer...

Page 41: ...ated version with the latest firmware version Update service Our products are constantly being developed Further developments of the TigIR are also taking place continuously In order that your TigIR i...

Page 42: ...e Calibration was interrupted perform manual calibration p 32 in unsuccessful perform NVFFC p 32 if unsuccessful turn device off and on again Wrong battery type selected Select correct battery type in...

Page 43: ...NTSC Display resolution Micro OLED 873x500 Pixel FOV at 100m horizontal 8 vertical 6 4 14 0m 11 2m horizontal 4 vertical 3 2 7 0m 5 6m Angle resolution 0 0125 0 75 45 corresponds to 2 18 cm px at 100m...

Page 44: ...oduct unless the buyer has already purchased the product directly from Andres Industries AG A settled warranty case does not lead to a new warranty of two years the remaining warranty period from the...

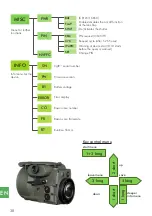
Page 45: ...e Zoomstufe S 11 4 Shutterflag S 10 5 Batteriesymbol Batteristandswarnung S 13 5 1 Display brightness displayed momentarily during change p 32 2 Current thermal filter p 30 31 3 Current zoom level p 3...

Page 46: ...zug auf die Konformit t wurden angewandt EMV St rabstrahlung ohne Kabel DIN EN 61000 6 1 Wohnbereich DIN EN 61000 6 2 Industriebereich EMV St rfestigkeit ohne Kabel DIN EN 61000 6 3 Wohnbereich DIN EN...

Page 47: ...conformity have been applied EMC interference without cabel DIN EN 61000 6 1 living area DIN EN 61000 6 2 industrial area EMC immunity without cable DIN EN 61000 6 3 living area DIN EN 61000 6 4 indus...

Page 48: ...www andres industries de Seriennummer serial number PUK Produktionsdatum production date Power in 5V CR123 3V www andres industries de Made in Germany Andres Industries AG Vorstand CEO Dr Bj rn Andres...

Reviews: