35
EN
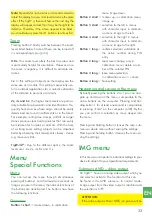
ON or OFF. Exit this selection by pressing and hol-
ding button 3.
However, the corresponding filter is only activated
or deactivated after saving by pressing and holding
button 4. This process is confirmed by an „SAVED“.
For nocturnal use, the CR and RH filters are especi-
ally useful (p.30).
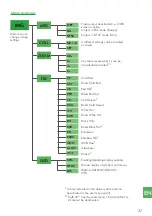
Submenu OSD – On Screen Display
SYM:
The annunciation of symbols can be deactiva-
ted. This is e.g. useful for video recording when you
do not want the symbols to interfere with the recor-
ding. If the TigIR™ is being operated upside down
frequently, the omission of the symbol annunciation
is sometimes helpful.
NFOV:
When the TigIR™ is mounted in front of a
spotting scope or something similar, only part of the
screen may be visible, depending on the objective
lens. With NFOV (Narrow Field Of View) the symbols
and menus can be placed further in the middle.
DIS:
In this submenu you can set the distance esti-
mator. You can choose between three different set-
tings, depending on the purpose for which you want
to use TigIR™ (p.34).
MEN = standing person (1.76m/5‘9“)
HOG = wild boar (1m/3,28ft/39,4in)
BUCK = roebuck (0.75m/2,46ft/29,5in)
OFF = deactivated
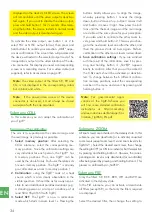
Use of the distance estimator
Bring the bottom line into alignment with the bottom
of the silhouette (soles of the feet). At the same time,
align the top of the silhouette (vertex) with one of the
other lines. The number above that line then corres-
ponds to the distance in meters. The most accurate
results are obtained by estimating at the highest pos-
sible magnification.
Example Distance Estimation MEN:
MISC menu
In this menu you can access submenus that are not
constantly needed.
Submenu PWR
BAT:
The correct type (CR123/16650) should be
selected in the BAT menu (p.32) so that the battery war-
ning (p. 45) is displayed correctly and the low voltage
detection and related safety functions work properly.
FLAP:
To prevent the TigIR™ from turning itself on in the
bag by accidentally opening the lens cover, this function
can be disabled. The unit is then switched on manually
by pressing and holding button 4 (p.32). Switching off
and calibration or deactivation of the shutter using the
flap remain functional (p.32).
SHUT:
The shutter can be deactivated/reactivated.
Submenu PIN
Secure your TigIR™ reliably against loss with your own
PIN code. If this is entered incorrectly 5 times in a row,
the TigIR™ will be permanently blocked. Other users
will not be able to use the device anymore and might
contact us. Using the serial number we can identify
you and return the device to you. If you find it too
cumbersome to enter the PIN each time before using
the TigIR™, you can set a cycle number between 1
and 255 in the PIN submenu CYC. In the latter case,
the PIN is only requested after 255 startup cycles.
Each time you enter the PIN in the PIN menu, the
cycle is automatically reset and starts counting again.
According to the above example, the PIN would only
be requested again after 255 startup cycles.To avoid
being surprised by the PIN request, you can also set a
warning period WARN. If you select e.g. 5, a warning
message (PIN) will appear on the screen 5 cycles be-
fore the actual PIN request.
Setting the PIN:
The PIN request is usually deactivated in the delivery
state. It must first be activated in the PIN menu under
REQ. In the delivery state, the PIN is set to 0000. You
can enter your own sequence of numbers in the PIN
menu under SET. To save, press and hold button 4.
PUK
If the PIN has been entered 5 times incorrectly or if


